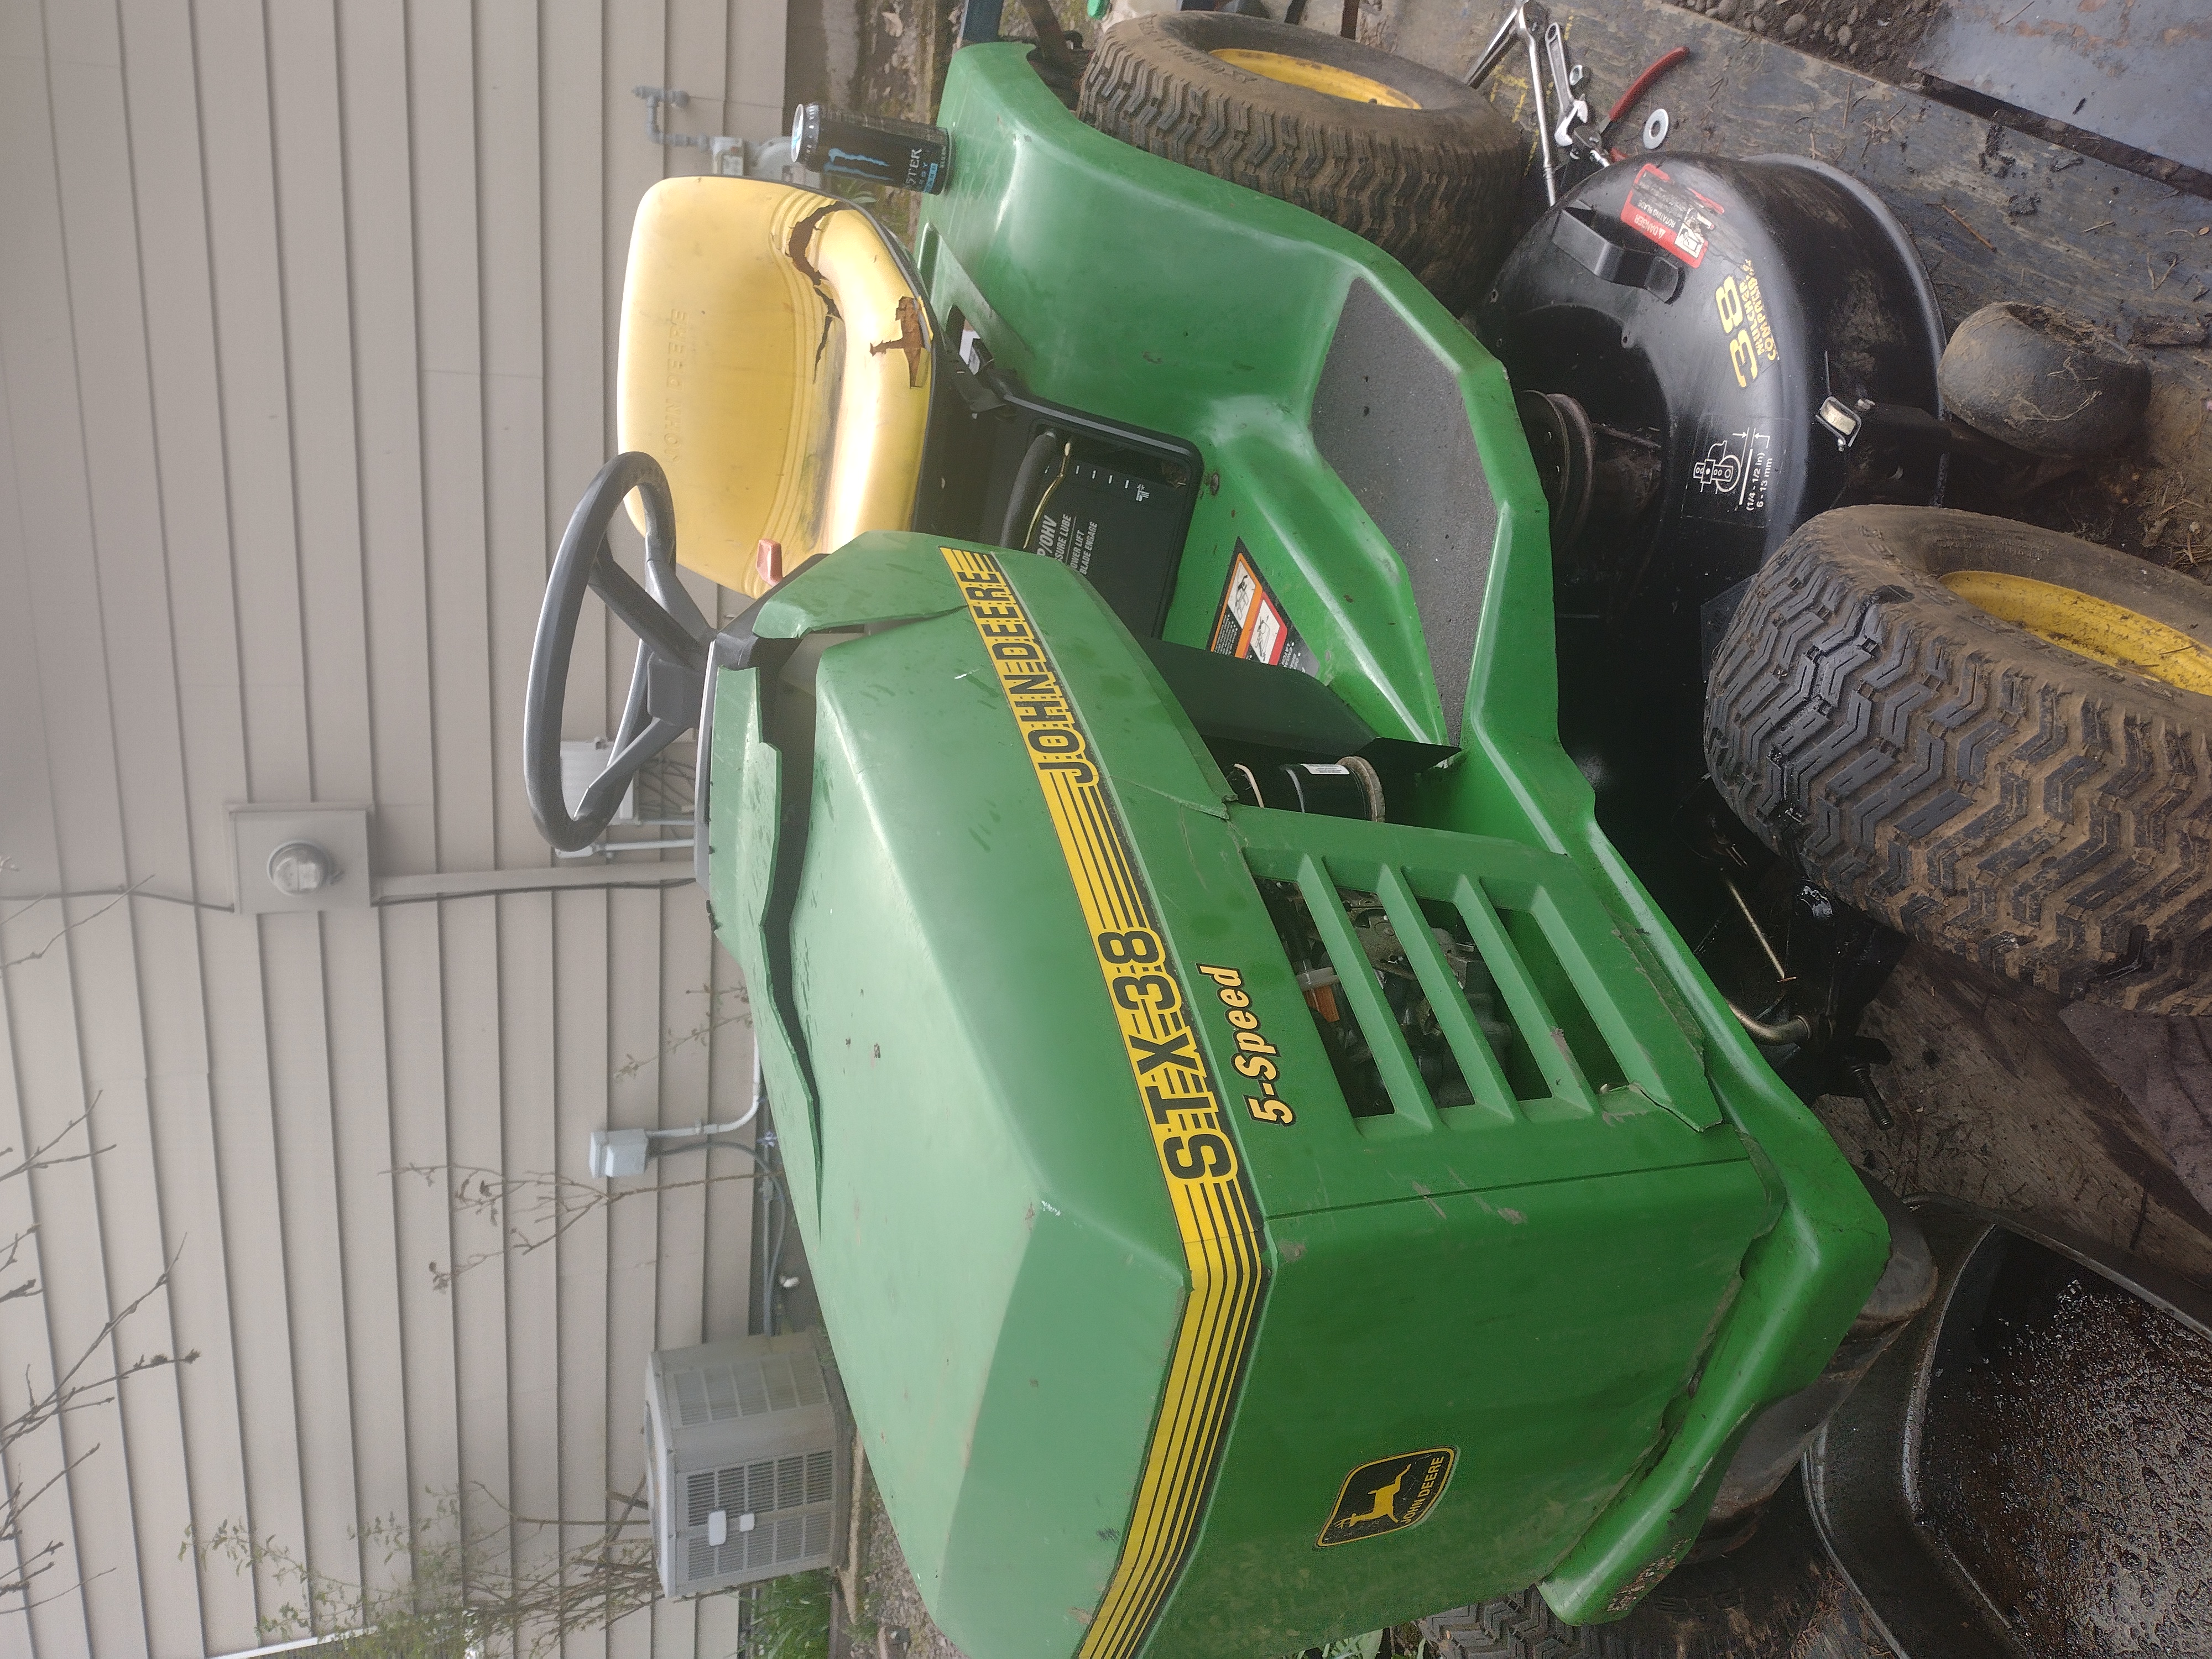
The Continuing Adventures Of Fixing The Little Green Meanie

Well, once again it’s like one step forward and two steps back but not quite.

I did make some progress on the little bastard but in the process discovered some more issues.

No surprise there.

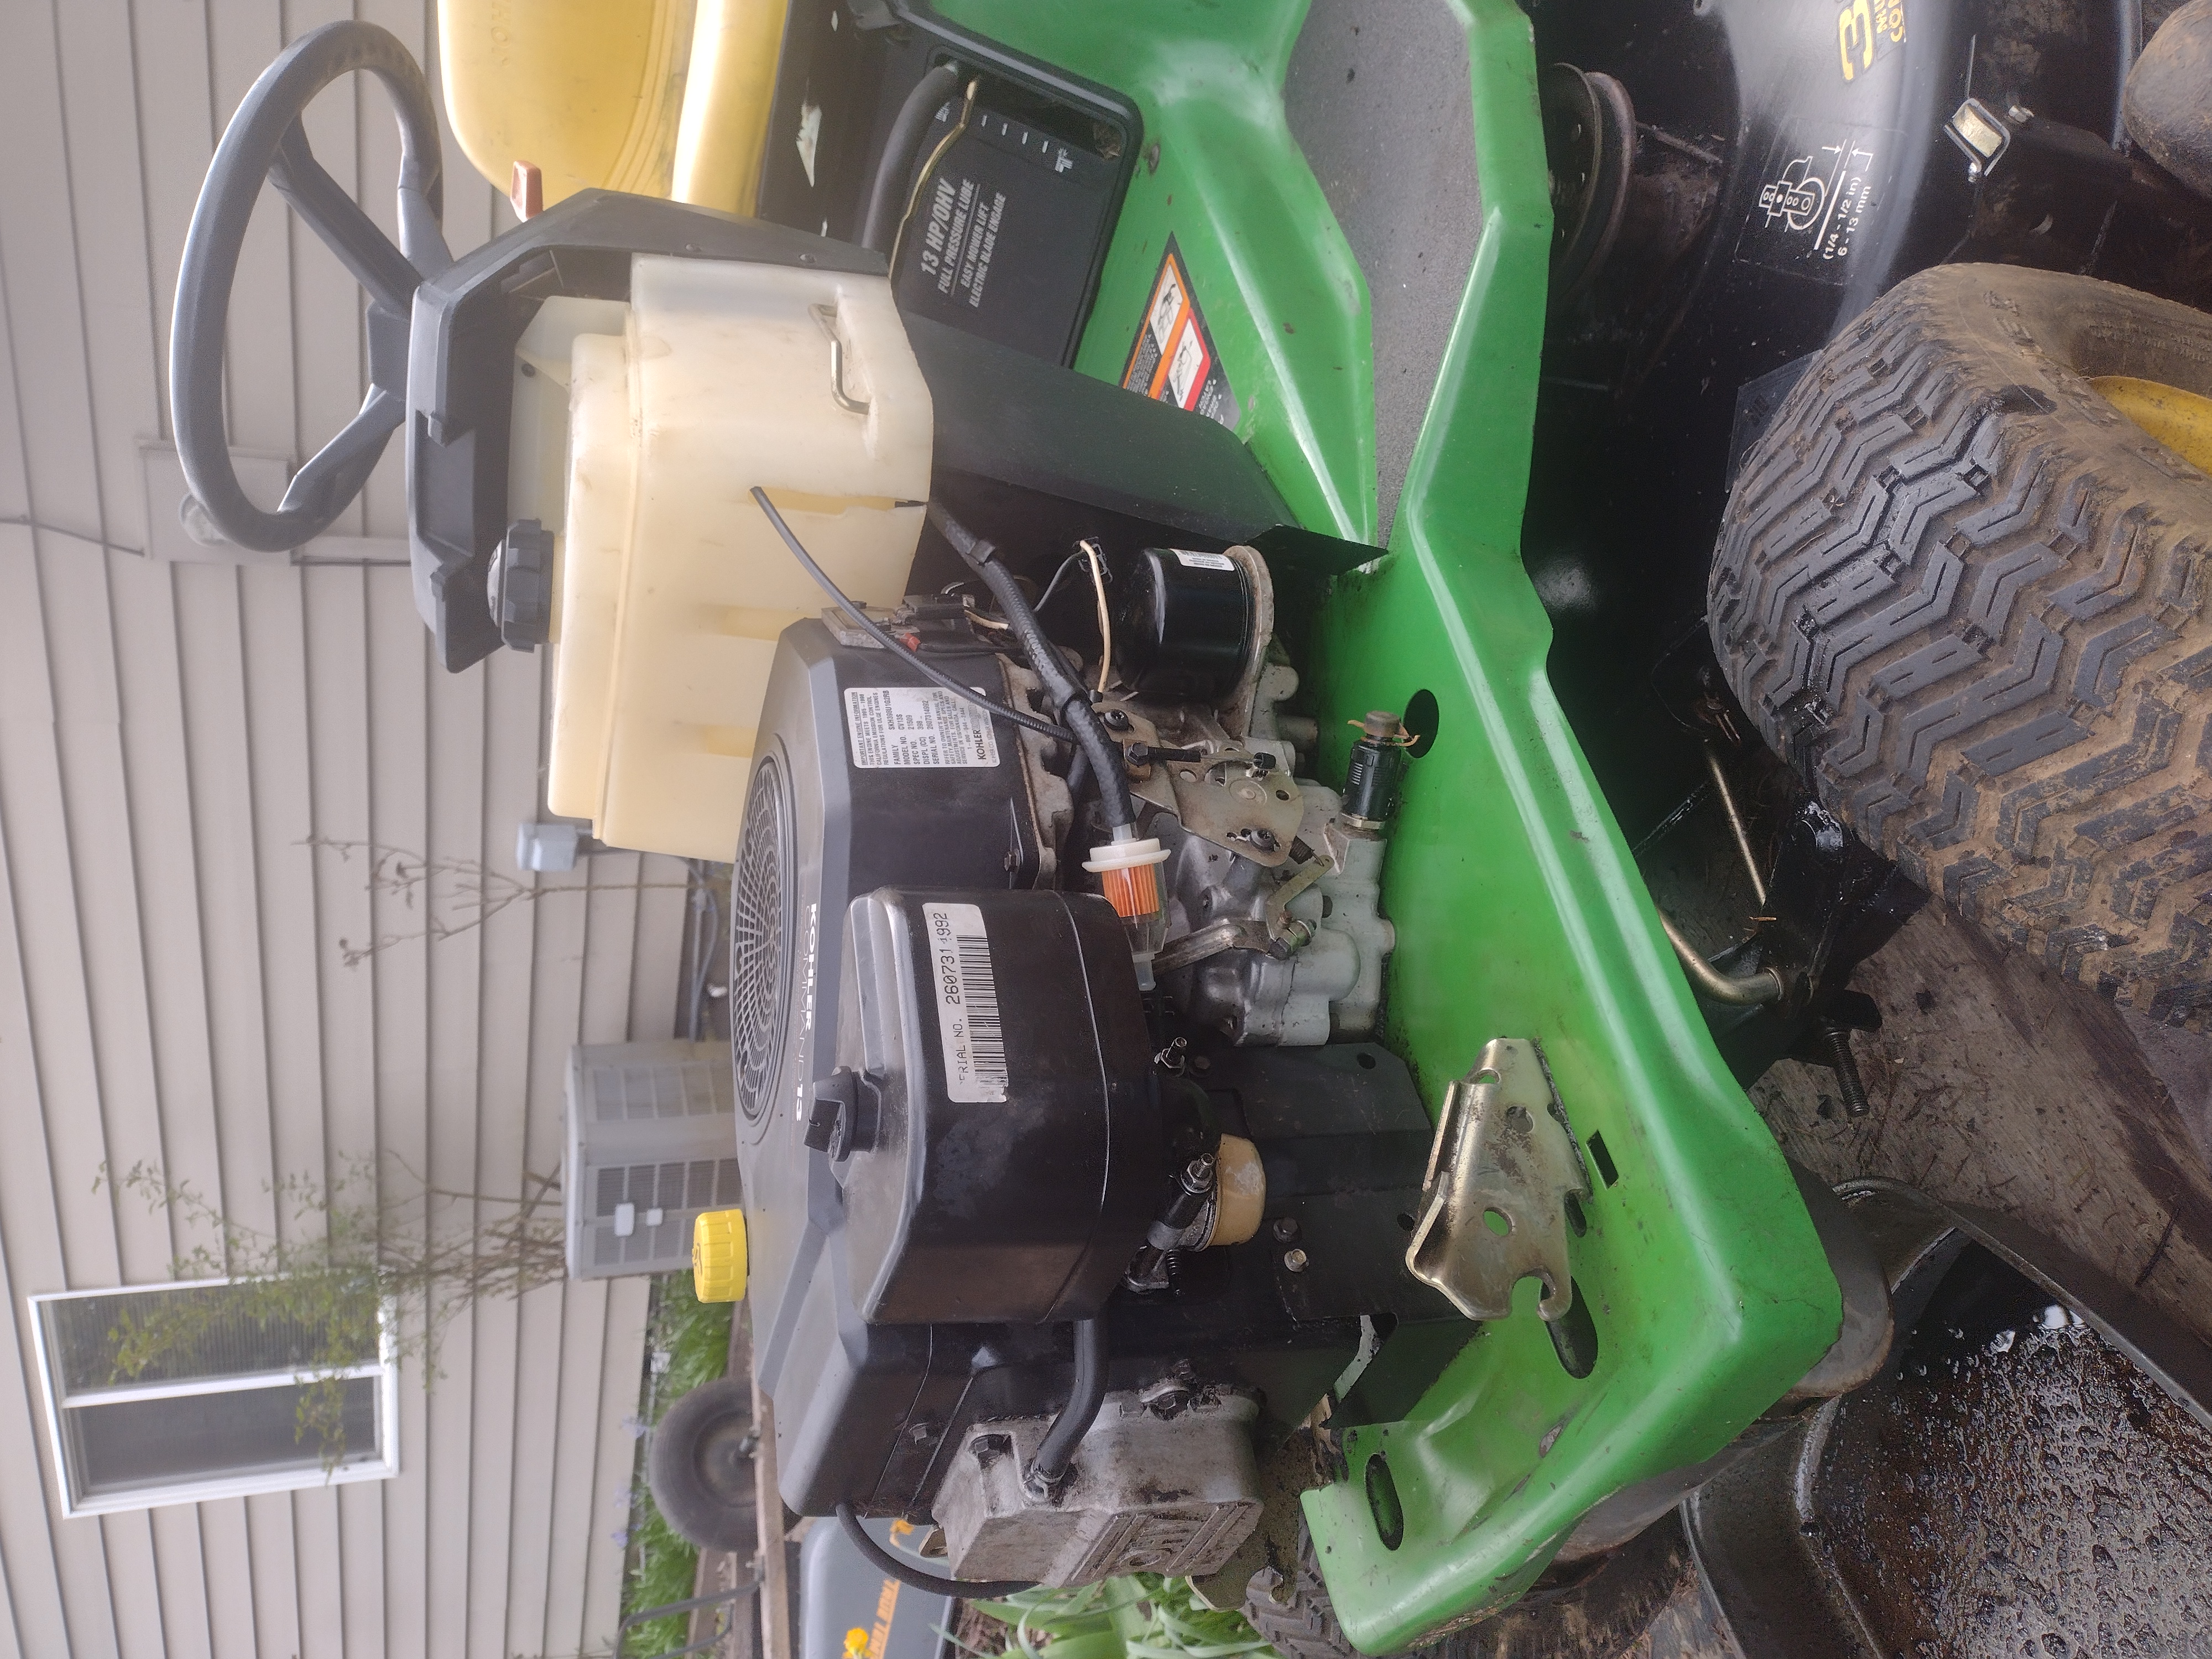
I did manage to get it cleaned up some, that whole engine was just a dirty, greasy, filthy PIG.

Then I made a huge mess trying to drain the gas that had a little oil in it out of the crankcase.

Thin?

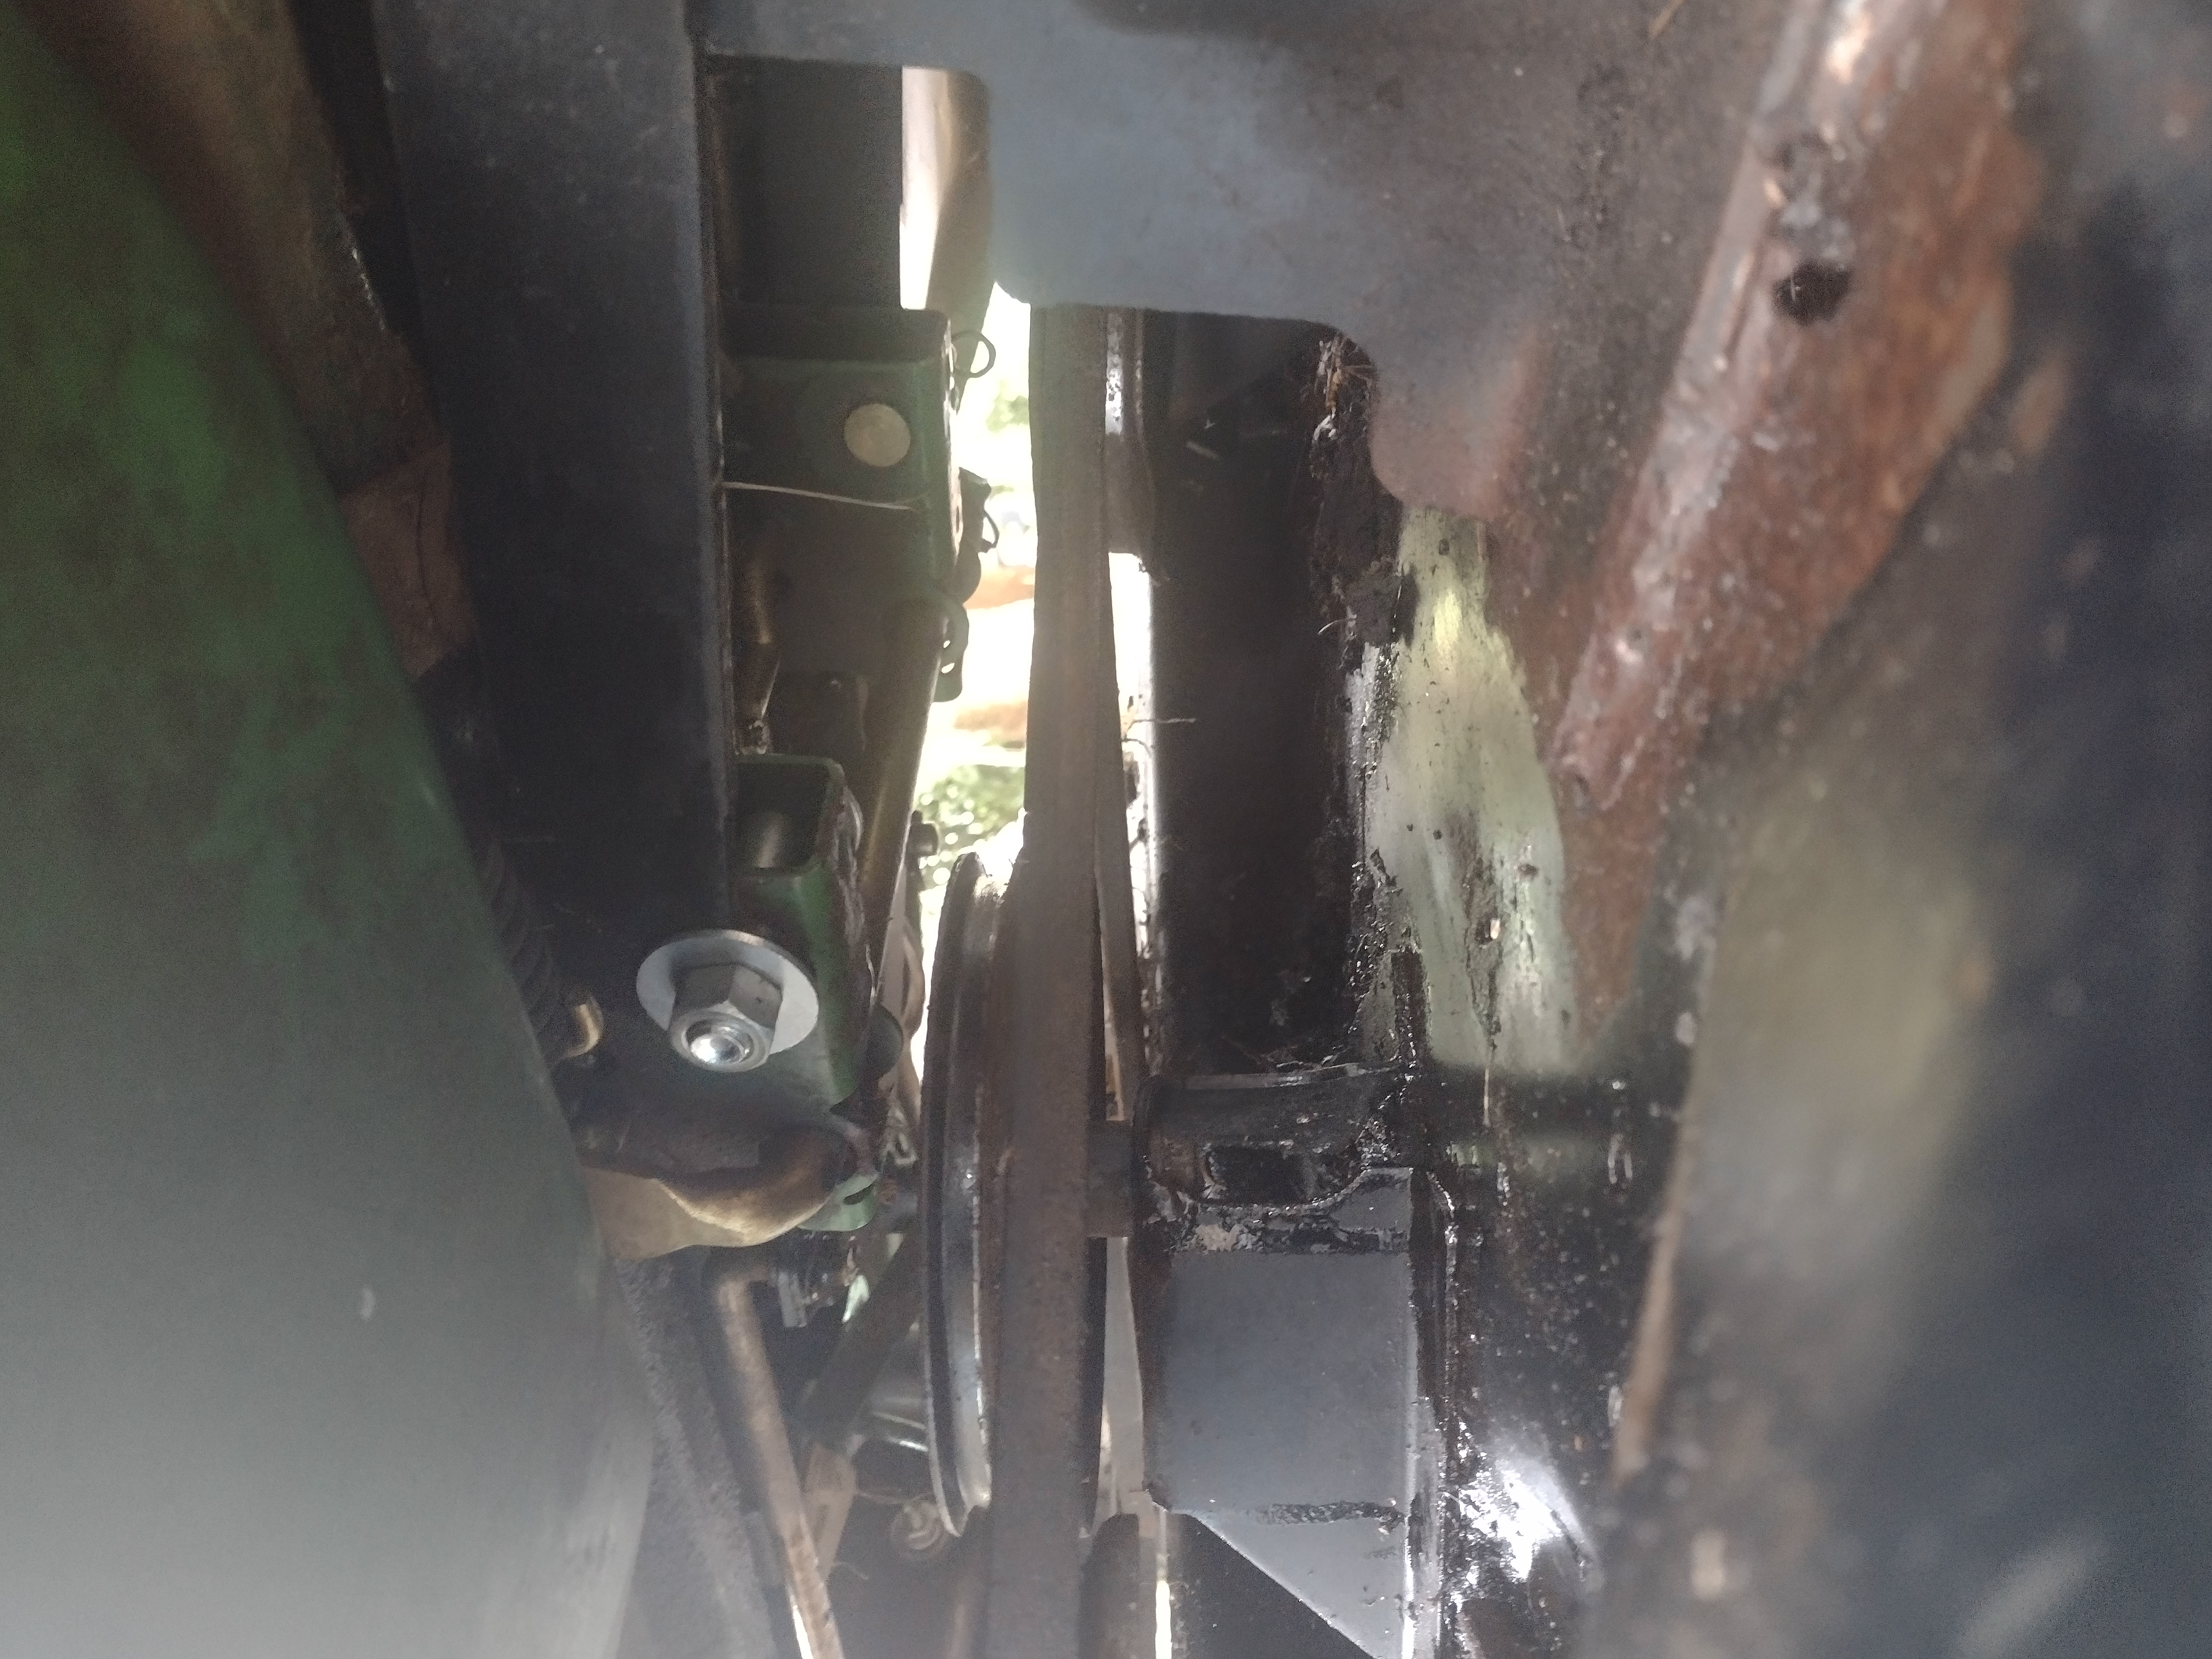
Oh yeah. You can see the oil drain tube sticking out over that hole in the middle at the bottom. It has a push and twist valve that allows the oil to drain out.

Ostensibly through that little hole they put there just for that purpose.

OH HELL NO.

That shit started shooting out of that tube all over the mower, the trailer it is sitting on and me.

Then it ran all down under the cowling and down the side step, dripped through that hole and ran all over the mower deck too.

The little drain pan I had under there maybe, MAYBE, got two fucking tablespoons full of oil in it before I grabbed ahold of that damn valve and cranked it shut.

What a mess.

Dirty bastards.

After I cleaned all that up I changed the oil filter and filled it back up.

I had the gas tank off cleaning it up, the previous owner had yanked the fuel line out from under it for some reason.

I bought some new fuel hose, clamps and an inline filter and put all that back together.

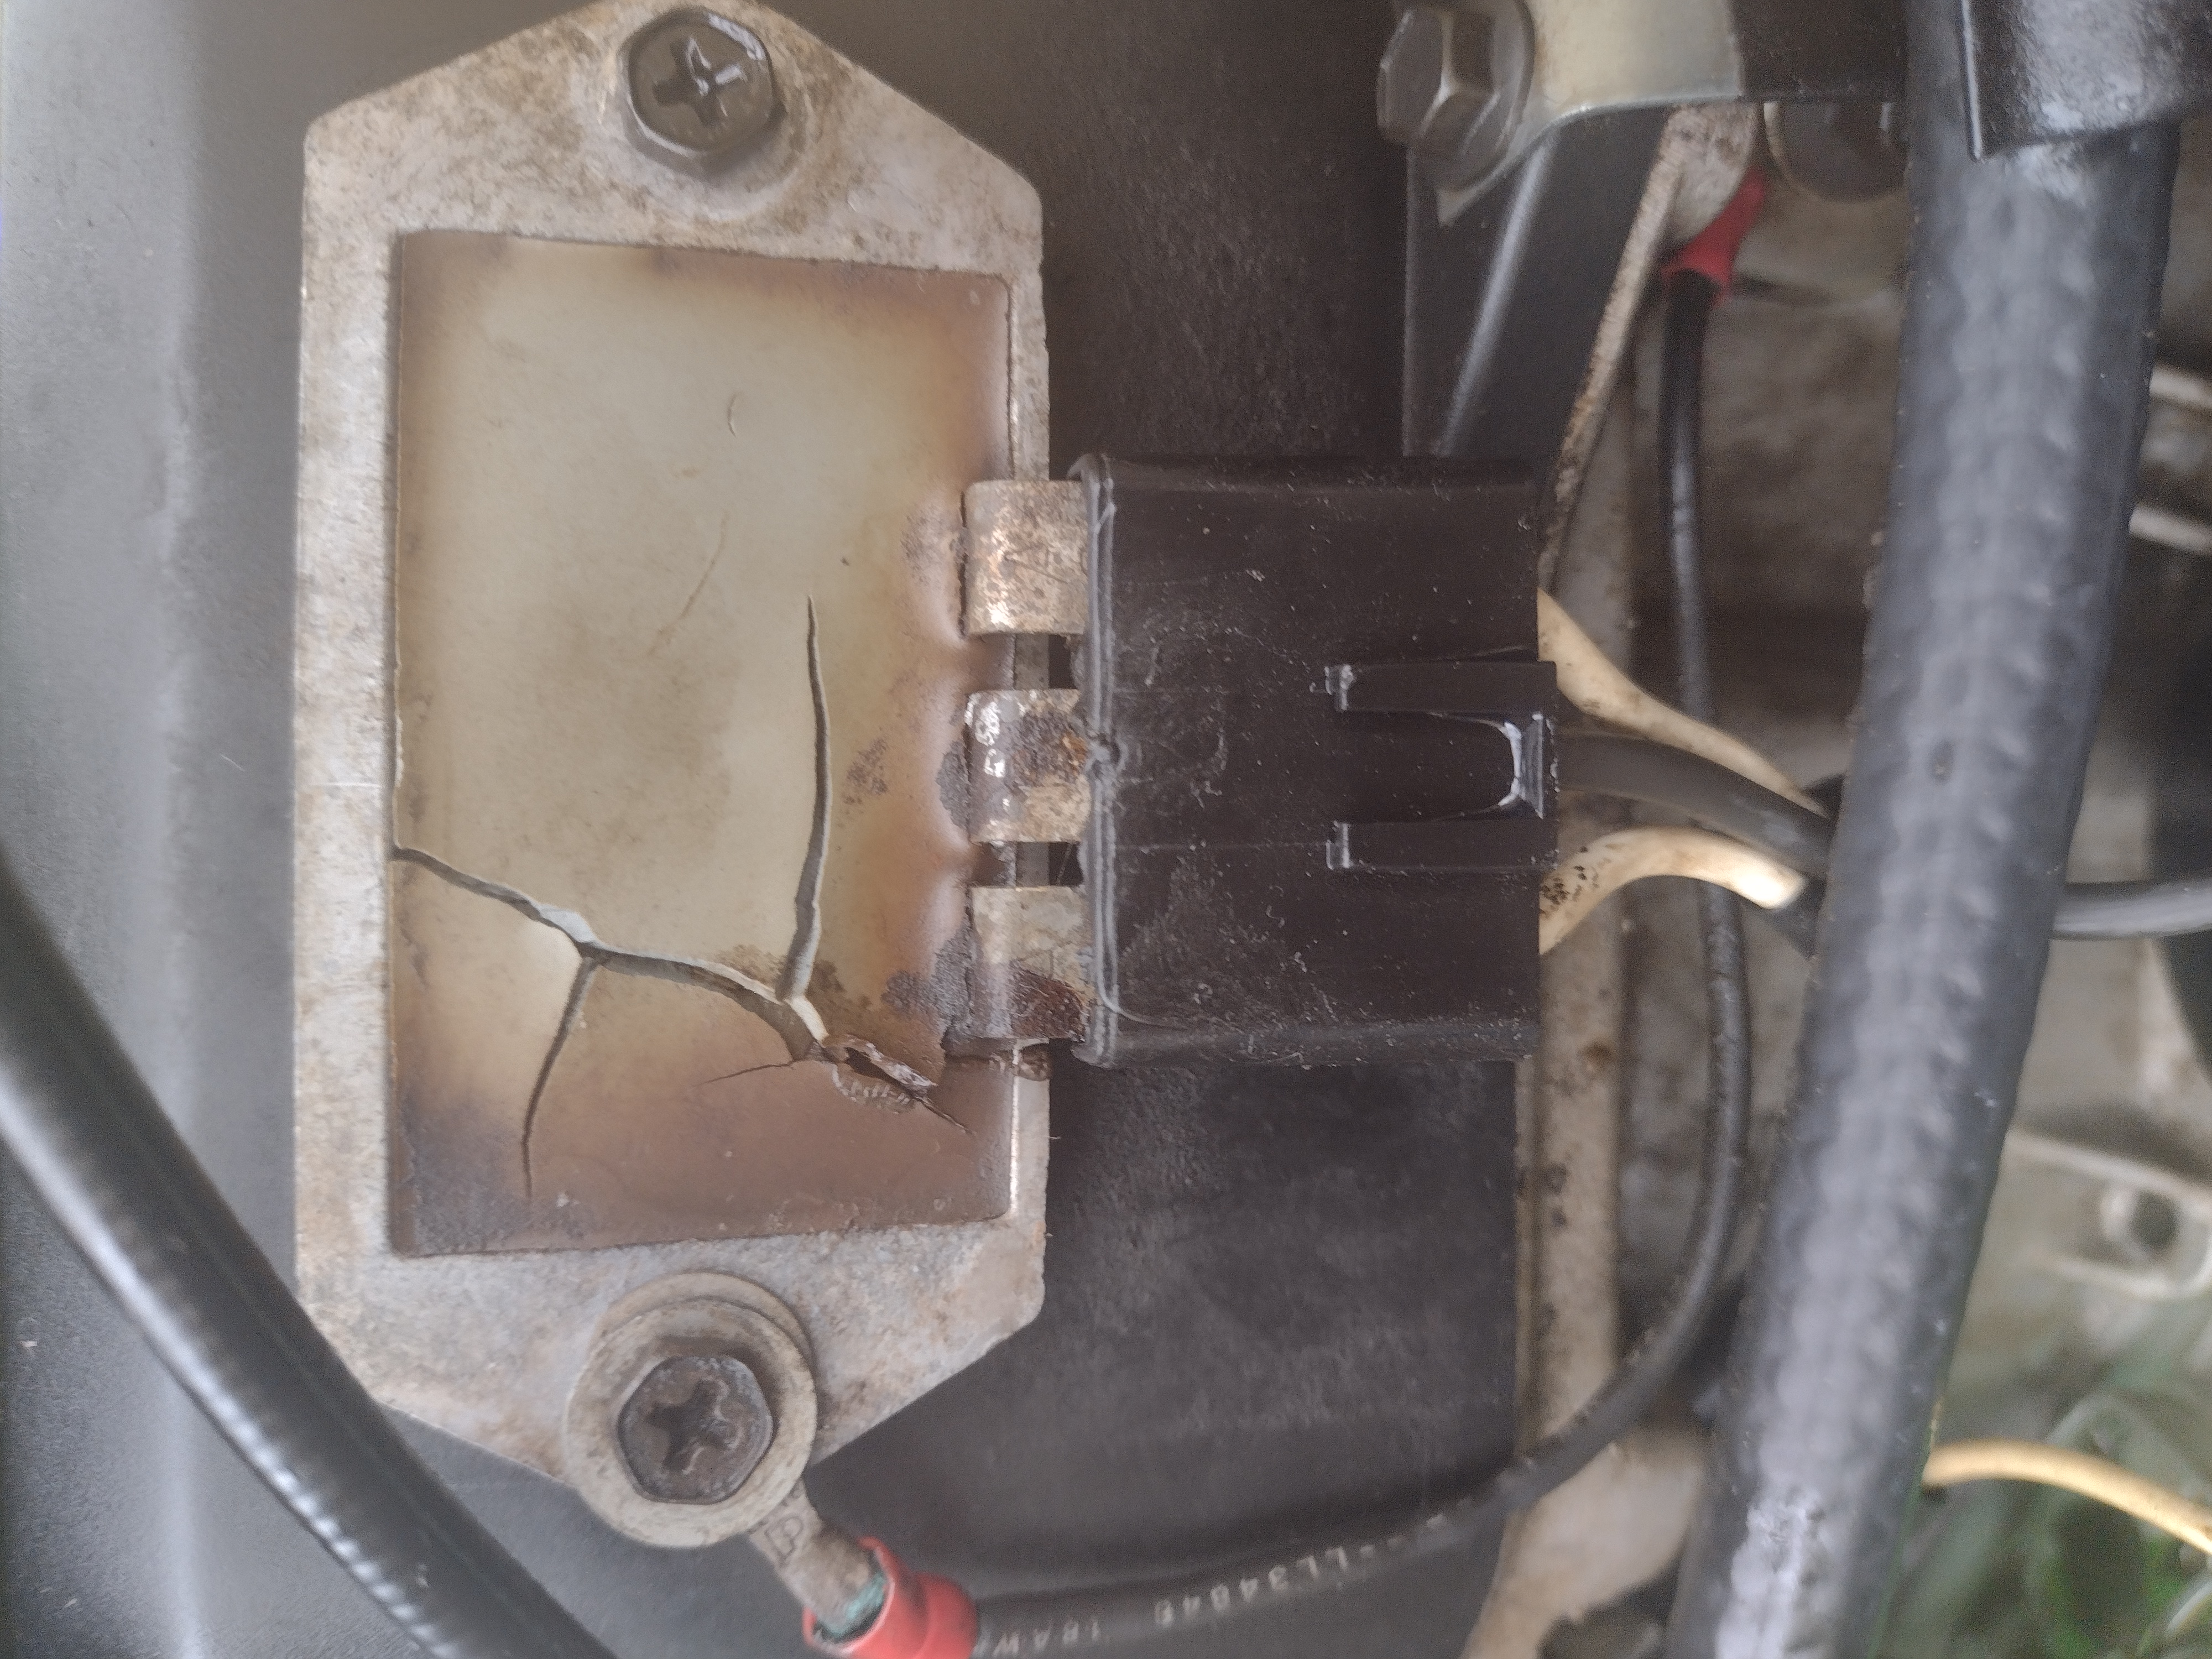
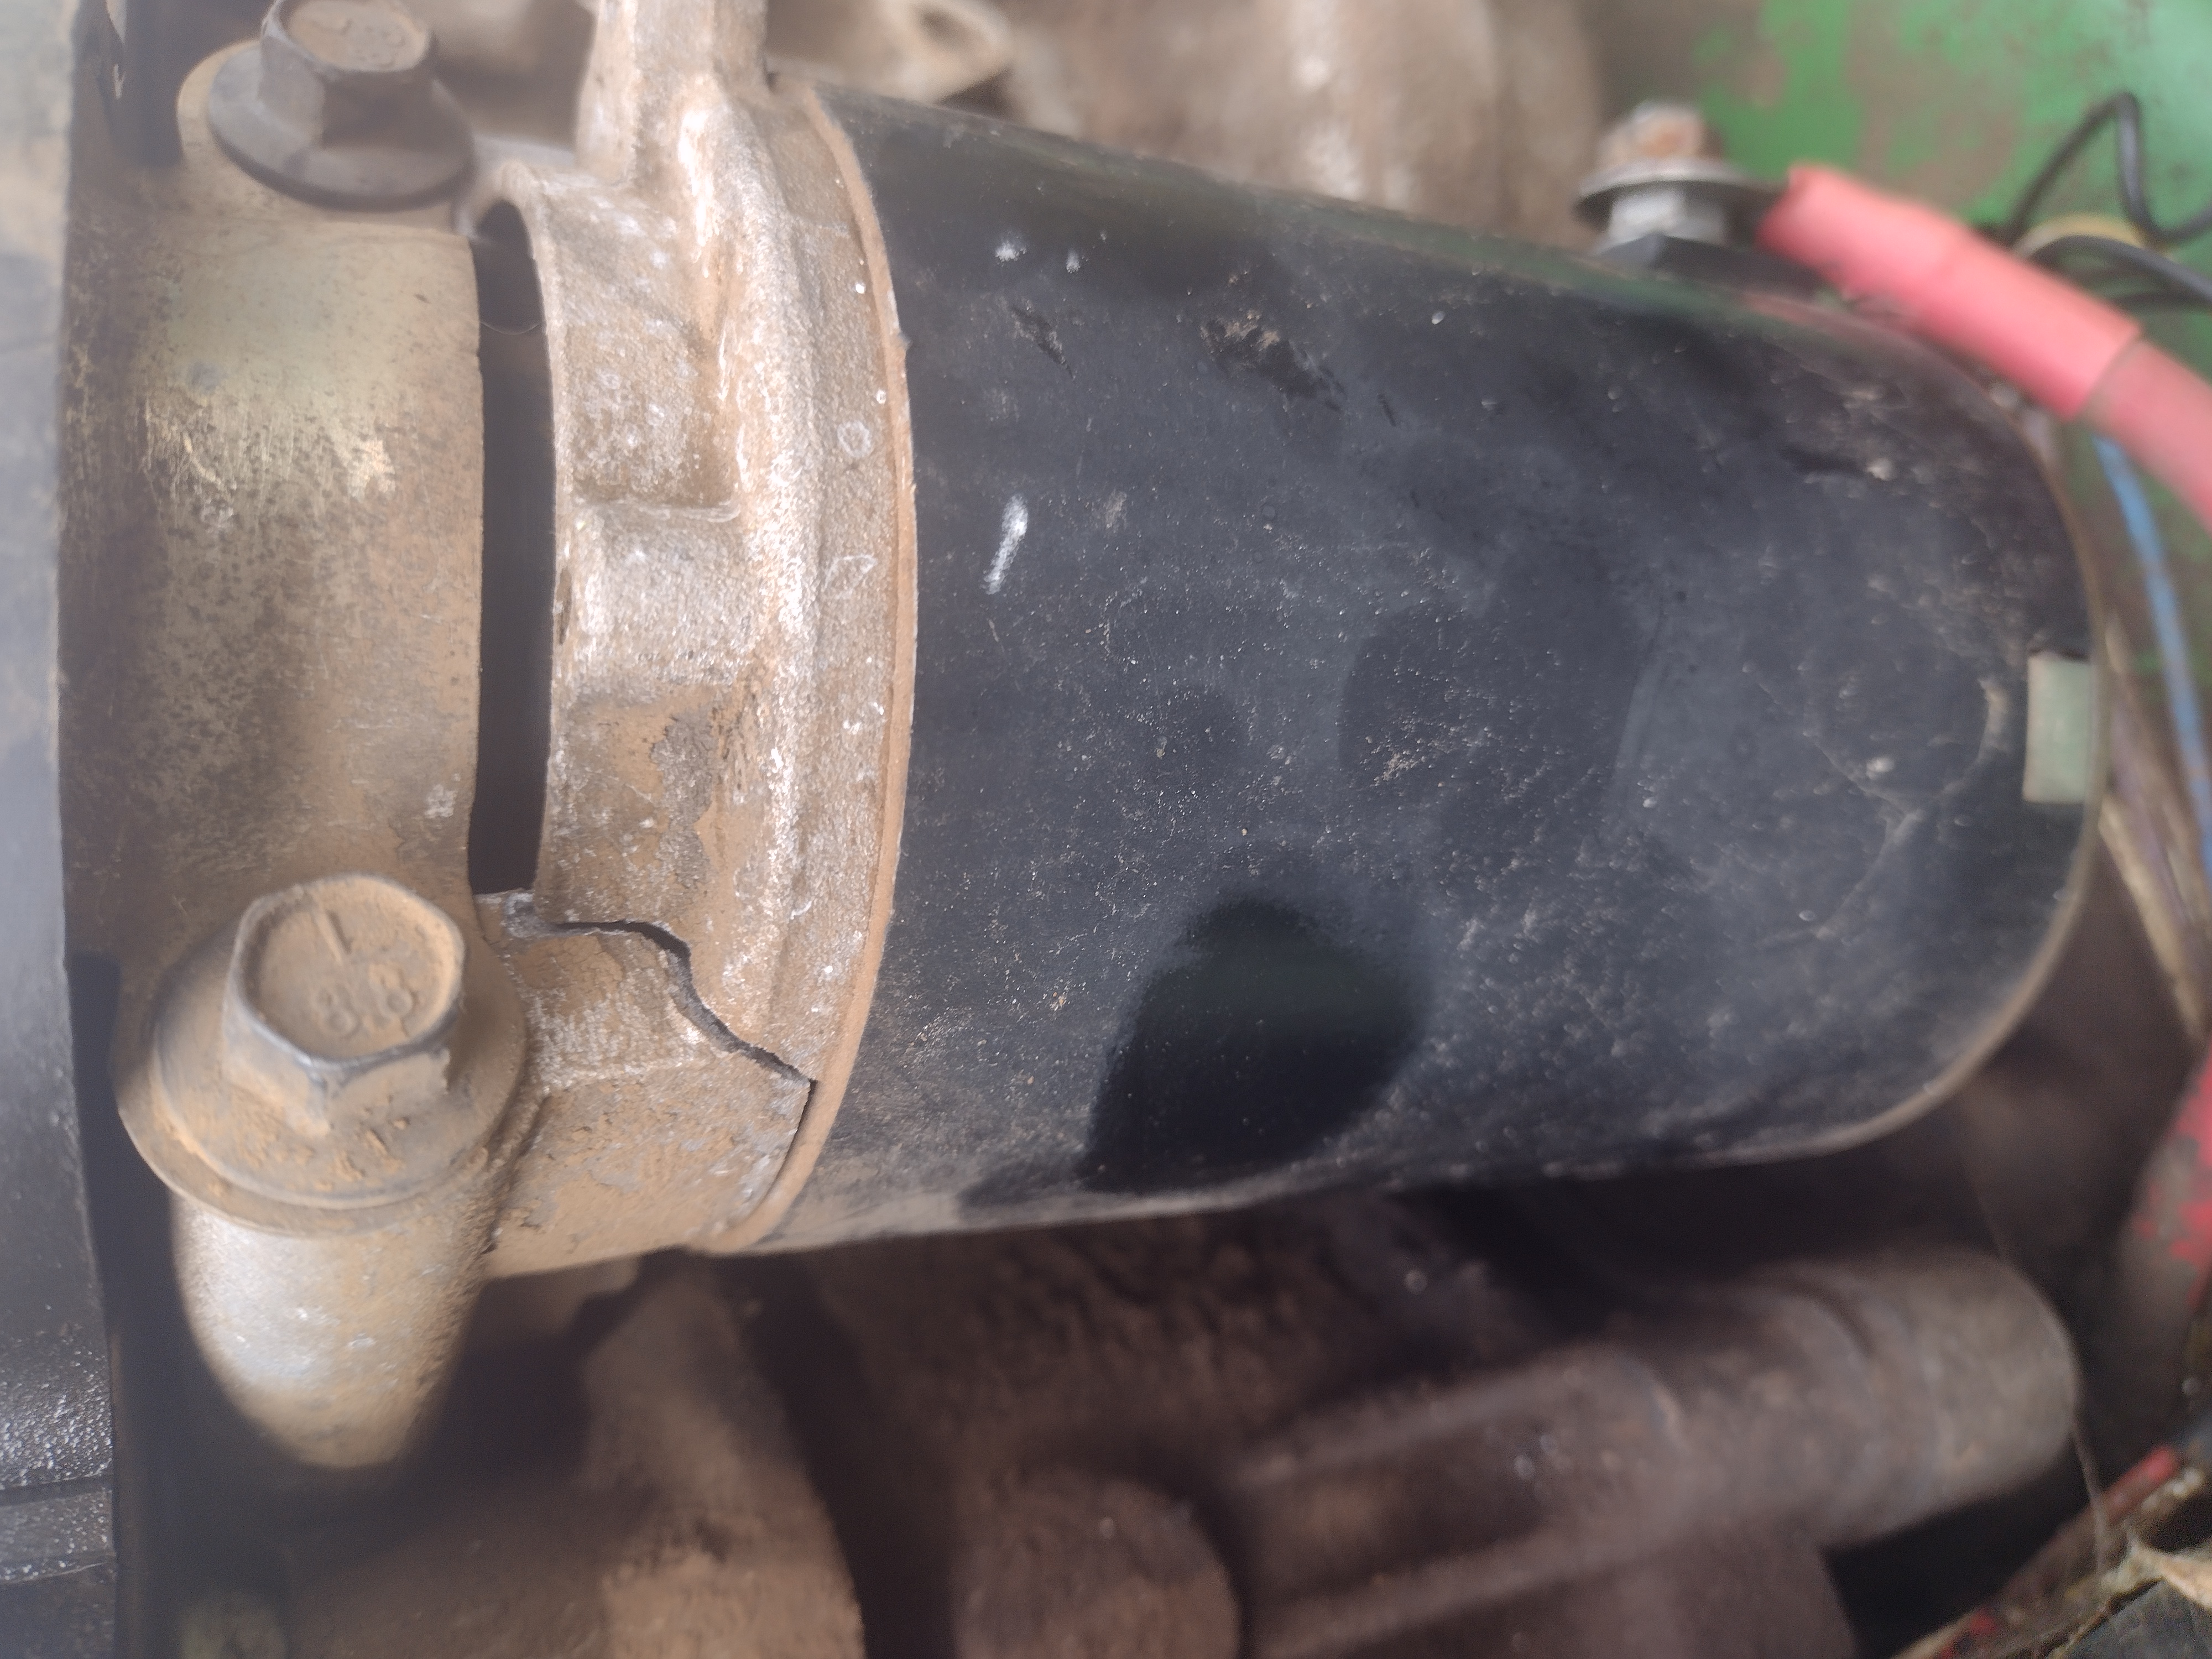
While I was scrubbing scraping and cleaning the engine I noticed a couple of problems that I am going to have to take care of.

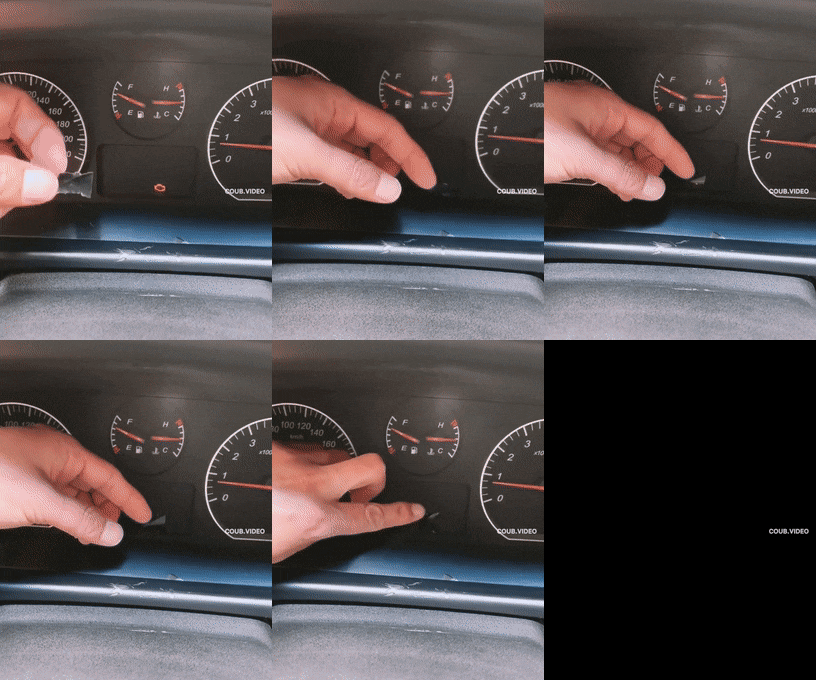
That ain’t good and neither is this,

The starter seemed to work when I jumped the solenoid the other day so I am going to hold off on that.

That smoked out voltage regulator is another story.

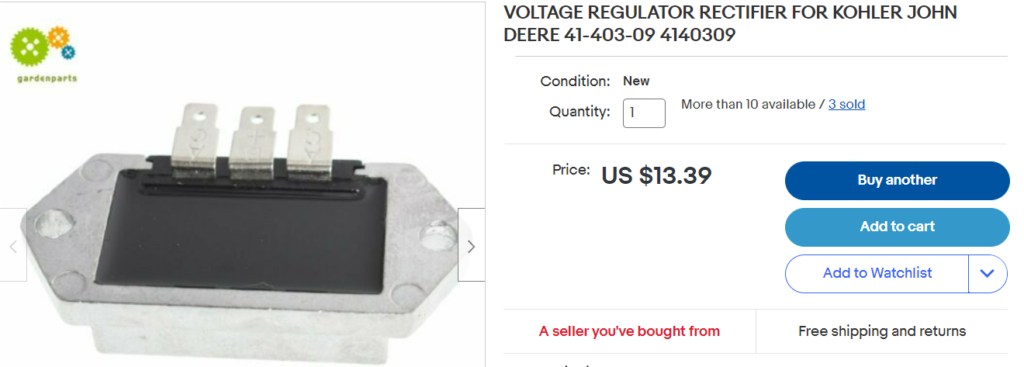
I got online and checked the local John Deere outfit and had another laughing fit when I saw what they wanted for one of those.

$105 plus tax.

Yeah FUCK THAT.

FleaBay here I come.

This is more like it.

Can you say MARK UP??!!

Holy shit.

I already had to order the switch that controls the electro-magnetic clutch for the mower blade assembly. The starter circuit also goes through that S.O.B .

The clutch circuit appeared to be working but I was getting juice from the Start position on the key switch going in but nothing coming out.

I see I got burned on that bitch too, I paid $40 something for it and they are less than $15 on FleaBay for cheap knock off’s.

Ah well.

While I was cleaning up all that oil I happened to have to take a look underneath the damn thing and found a pin missing that holds an arm for the height adjustment of the mower deck under the ass end,

More Fiddle Fartin’ but I managed to find a nut and a bolt that fit for now until I can find the right pin and retaining clip.

That will be easy enough.

Getting the deck lined up again took care of the problem with it interfering with the left front tire when turning.

Oh there is lots and lots more to do to this thing, trust me.

As much as it scares me, I am going to take a look see as to the availability of either e REPRO or a used hood for it too eventually.

The one on it is too fucked up to try and fix.

Not only is it broke to shit, there is a big hunk missing out of it and the mounting hardware and fixtures are gone too.

I figure if I can get this thing running and get the trailer fixed both for under $500 I will be doing good.

Even used John Deere tractors like that are expensive as hell around here and that trailer would run ya anywhere from $300 to $450 easy.

A comparable new JD riding mower isn’t going anywhere for less than $2,000.

Minimum.

It still remains to be seen if I can get that engine running but if it has decent compression then I will win eventually.

My buddy told me again earlier today that he saw it mowing the lawn next door to him last Summer so we shall see.

Food Grower Article #2

Back to the basics.

Some really great news, our Author has found all of the original pieces he wrote on an old Laptop he had forgotten about.

This will make things much easier.

This is important stuff here, the soil you have to use is the very basic foundation of any growing activities.

Crap soil will not grow the food you are going to need.

It can literally take years to supplement bad soil to get it up to optimal condition.

My thanks again to Food Grower for taking the time to share this very important information.

The foundation of it all, this thing called dirt

Hi Ho, Hi Ho

It’s Back to School We Go!!!

Caveat lector: The following is based on my experience, practices, likes, environment, ideas and successes or failures. Folks in other parts of the country, in other garden zones, and with other goals may, and probably do, do things different than I do. I am not telling you, you have to do it my way. This is what works for me. I also don’t know everything and I don’t grow everything. I’ll let you know when you ask me about something I don’t know or don’t grow. I will never try to snow you.

Dirt

It’s all around us, under our feet and buildings, sloping up to touch the clouds, in the air (at least during almond season) and apparently, according to my mother, in my ten year old ears “Land sakes boy, you got enough dirt in them ears to grow spuds. Get in there and wash your face.”

But, what is dirt? I’m not going to go all earth sciences on this but (you knew there was a but coming didn’t you?) we can’t avoid some science and fact finding in our pursuit of understanding our growing medium. This article is long for the simple fact this is complex topic. Even trying to keep it simple it’s still complex.

From the real world perspective of a food grower, dirt or more appropriate for our purposes soil, is a complex brew of bits of rock, sand, clay, silica, humus, organic matter, nutrients, organisms, moisture and microbial life all tangled together in a complex web. In balance this soil web is the root of sustaining life. Out of balance, well just cut your throat, it’s quicker than dying of starvation.

Before I move on I want to explore one of the above items in more detail – humus. A full definition and understanding of humus would most likely run to several pages and even then we would be left with questions. In a nut shell humus is what you get after the organic material in soil is completely broken down. Though characterized as being amorphous (without shape or form) it none the less contributes to the structure, fertility, porousness, and moisture retention of soil. You can feel and smell the difference between a poor soil and a soil rich in humus.

So why am I harping on humus? Humus is a vital part of a healthy soil. Also, though not fully understood, it is considered to be an inhibitor of some soil borne diseases and pathogens. Further, you can make it, as it is the desirable end result of a sound composting operation. Which, hopefully I’ll have the space to discuss at the end of this article.

In the last paragraph I used the term healthy soil. The contributors to a healthy soil are many. We need to understand them in order to determine our soil health and what modifications are needed when our soil health is poor. Until someone corrects me, what I feel are important to know are

– Base soil type – clay, sand, silt, peat, saline or combination thereof

– Essential nutrients – Nitrogen (N), phosphorus (P), Potassium (K), Calcium (Ca), Magnesium (Mg),

Sulfur (S), Zinc (Zn), Iron (Fe), Manganese (Mn), Copper (Cu), Boron (B) and Molybdenum (Mo)

(whew, I think I got most of them, there’s actually 16 in all)

– Organic content and humus

– Insect and microbial life

– pH level

– Moisture content

– Aeration

– Inorganic materials

Soil Types

Knowing your soil type will allow you understand the problems you may encounter when trying to grow food in it. Unfortunately there isn’t a whole lot you can do in the short term to change a poor soil type and even in the long term it can be quite a project. One means of dealing with a really poor soil is the utilization of raised beds and making the soil you fill them with. This doesn’t really change your soil type, just covers it over and I’ve previously dealt with its (raised beds) limitation in a truck garden situation. There are two places we use raised beds in our gardens, one is aesthetics, the other is for perennial plants like raspberries and blueberries as the raised bed provides better drainage. The beds for the berries don’t incorporate any structure to maintain shape and could more accurately be described as mounding.

To help you understand your soil type you can send a sample out to be analyzed by a lab or you can perform an old high school science project (real cheap). Dig down a few inches in your garden and collect between a ¼ cup and ½ cup of soil (more than ½ a cup is a waste and you’ll need a bigger jar). Pick out the bigger pieces of rock and organic debris. Dump this and two cups of water in a quart canning jar. It will help if you use an emulsifier (cheap alternative – liquid dish soap). Four or five drops is all you need. Shake the jar like mad for a minute or two and then set the jar down and let everything settle out. It may take a full day or even a little longer for this to happen. Unless you have a real odd soil you’ll see bands start to form in the jar as your curiosity gets the better of you and you take a peek now and again instead of waiting for the next day.

The layers in the jar will give you a rough idea of the components of your soil and the percentage of each. Small rocks and sand will be the bottom layer. Silt will be next and clay will be on top. If you have a lot of organic material in your sample it will settle at the very top or float on the water. Do not include the organic matter in the following calculations.

It is generally accepted that if 50% or more of the volume is sand your soil is classified as sandy. If over 50% is silt, you guessed it, you have a silty soil. If 25% or more of the volume is clay with a heavy silt deposit you have a clay soil. You can’t test for a peat soil this way and it’s probably true that if you have a peat soil type you already know it. Saline soil is another outlier because it more probably could be labeled a soil condition, rather than a soil type.

So what’s a good soil look like in the above test. If you have somewhere around 40% sand, 40% silt and 20% clay you have a pretty well balanced soil that would be considered a loamy soil. From this we can infer that loamy is not really a soil type, but more a soil blend.

Knowing the soil type will let you understand some of the problems it will give you. A clay soil can take a long time to get irrigated, yet when wet, it will hold moisture for a long time. Due to its density it can be difficult for air and nutrients to move through it as well. Sand has good drainage, probably too good as it will dry out quickly. It also has trouble holding on to the nutrients your plants need to grow. Silty soil is next to a good loam soil for growing but is easily eroded and when dry can be carried aloft by the wind. It can also manifest drainage problems.

Essential Nutrients

To understand the level of essential nutrients in your soil you need to send a sample to a lab to have it analyzed or purchase a test kit and do it yourself. Many of the test kits utilize a small sample of your soil, a chemical and a colored test strip. You prepare the soil sample, put it in water, add the chemical, wait for the reaction to occur and then compare the color of the sample with the test strip to get an idea of that particular nutrient.

Most of us are familiar with the big three, nitrogen (N), phosphorus (P) and potassium (K). The letters in parenthesis are the chemical symbol of the element. Nitrogen primarily drives foliage growth, phosphorus drives root and yield development and potassium helps develop a strong plant structure (stems and limbs) and supports flowering and fruit set.

I don’t want to bore you to death so I’ll just express inorganic fertilizers list each of the above as a three number grouping (i.e. 10,5,5) on the package. Nitrogen is first, phosphorus is second and potassium is third. Basically the numbers indicate how much of each you have in a given quantity of fertilizer. A twenty five pound bag of fertilizer labeled 10,5,5 would have 10%N, and 5% each of P and K. This is approximately 2.5 lbs of Nitrogen, and 1.25 lbs of phosphorus and potassium each.

Some organic sources for nitrogen are manures, worm castings, fish meal, blood meal and soybean meal. You need to be careful using manures to drive your nitrogen because fresh manure can be too hot (have too much nitrogen) and you’ll burn your plants. If you are going to use fresh manures it’s best to use them in the fall and till them in so they’ll have all winter to breakdown or use them on a patch of ground that is going to lie fallow for a year. It’s better if you compost all manures before you use them.

Phosphorus has two basic source forms, either mineral (rock dust) or bone (fish bone meal). The mineral forms last longer in the soil where the bone form is more readily available to the plant. Other organic sources are bat, pig and chicken manure (actually guano with bats).

Organic potassium sources are sheep manure, alfalfa or kelp meal, hardwood ashes and greensand.

A lessor known group of nutrients is Calcium (Ca), Magnesium (Mg) and Sulfur (S). Calcium is essential for building a strong cellular structure in the plant and supports the movement of nutrients to the plant. Magnesium is central to the atomic structure of chlorophyll. Sulfur helps plants with the formation of proteins. Different forms of sulfur perform different duties from an insecticide to altering soil pH. We’re focusing on its use as a nutrient here.

The above six elements are known as macronutrients. The rest of the elements could be considered to be trace elements. Their importance should not be overlooked however. An imbalance of any one of them can give you trouble in the garden. To avoid this article becoming overly long (which it already is) I’ll address them in the comments or another article if there is enough interest.

Once you understand what the various elements do, and by testing, know how much is present in your soil you know how much you need to add to correct your soil. Depending on how you go about amending your soil this can be a little of a guessing game. You have a get out of jail free card if you compost.

Organic content and humus

I’ve previously addressed humus in this article. Other organic content in your soil will be bits of plant residue, woody structure and the remains of small animals and insects. These all contribute to the structure and health of your soil, especially at the microbial level.

Insect and microbial life

A healthy soil will have a whole host of beneficial insects and microbial life that process your soil, have symbiotic relationships with your plants and perform many critical functions converting one thing to another. This is why we can’t overlook the detrimental impact of insecticides when we attempt to deal with insect pests. In many instances we can utilize cultural controls or a beneficial insect to deal with a pest and leave the good bugs alone by leaving the insecticide on the shelf.

pH level

In plain language soil pH is a measure of the acidity or alkalinity of your soil. It is measured on a range from -1 to 14. A pH of 7 is considered neutral. Lower numbers indicate a more acidic soil while higher numbers indicate a more alkaline soil. The vast majority of your garden plants will do well in soil with a pH between 6 and 7. The reason pH is important is because the more acidic a soil is, the more soluble most elements are. Eventually, elements like aluminum and manganese become too soluble, the plant suffers from toxicity and may even die. Highly alkaline soils lock up nutrients and elements and negatively impact the roots ability to take them in, plant health suffers as a result.

It is usually considered to be easier to raise your soil pH than to lower it. Dolomite lime is an effective means of raising the pH. You actually have several ways to lower the pH of your soil. The two I use are acetic acid for a short term response and elemental sulfur for a long term approach. If you can’t find acetic acid use 5% white vinegar instead. I use this in irrigation water to provide a quick response for plants needing a lower pH. It breaks down quickly in the soil though.

Moisture Content

Just as with virtually everything else in your soil, too much or too little moisture will be detrimental to your efforts. Some soils, notably very sandy soils and heavy clay soils, will negatively impact your ability to maintain a proper moisture content. While insufficient moisture content is readily recognizable by wilted plants and fruit drop, excessive moisture can cause problems as well, often long before the plant exhibits any stress symptoms and by then it’s too late. Raspberries are a good example, they like a lot of water but they don’t like to have wet feet. Your soil for raspberries (and many other crops) requires good drainage.

A problem with maintaining a proper moisture content is understanding how much water is required for certain plants. Many times you’ll read something like blueberries require 1~2 inches of water a week. Well how much water is that? The following will help you convert inches a time period to gallons a time period. I have input the following into a spreadsheet that makes it fast and painless to perform the conversions.

First some constants.

1 square foot is 144 square inches. 1 inch of water on one square foot = 144 cubic inches. There are 231 cubic inches of water in one gallon. It takes 0.623376623 gallons of water to cover 144 square inches 1 inch deep

Next calculate the square footage (in feet, dimensions less than 1 foot use the decimal value). Rectangle areas are width X length. Circular areas are pi X radius2 or 3.1416 * (radius squared).

Once you have the area, multiply it by 0.623376623. Then multiply this result by the number of inches of water.

The time period doesn’t matter. If your plant needs 2 inches of water per week you just need to perform the above calculations to figure out how many gallons per week you need to apply. If you water three times a week, divide that amount by three.

The following is for a blueberry plant having a root ball diameter of five feet

((3.1416 X 2.522) X 0.623376623) X 2

((3.1416 X 6.35) X 0.623376623) X 2

(19.94916 X 0.623376623) X 2

12.435 * 2 = 24.87 gallons of water per week.

Aeration

Your plant roots need air. Too much water can drown plant roots, heavily compacted soils will inhibit the movement of air to your plant roots, so can heavy clay soils. If your water problem comes from over watering then you need to cut down on your irrigation. If the excessive water is from another source (too much rain) then you may need to plant in a raised bed, or incorporate drain tiles in your ground. Heavily compacted soils or just heavy clay soils will benefit from amendments that open up the soil. Sand, perlite and compost are three things you can add to improve drainage and aeration.

Inorganic Materials

Rocks and man made waste are probably the two largest components of inorganic materials. Usually size determines whether it will have an impact on your gardening efforts. I try to remove all larger rocks, broken glass, metals and plastics from the soil as I encounter them.

Composting – Your get out of jail free card

There are probably as many opinions on composting as there are people that compost. There are all kinds of systems, bins, amendments, starters and gizmos for sale to help you compost. As far as I’m concerned you don’t need any of them.

When you compost you incorporate materials in a pile and let microbial action break down all the organic material to a rich humus. As stated way up near the top of this article, humus is very beneficial to your soil. A finished compost has a pH of right at 7. Most properly finished composts (somewhat dependent on base materials) will have a NPK of 0.5, 0.5, 0.5, a mild, yet well balanced, amount of essential nutrients. Finished compost will build and feed your soil over a long period of time. It will add to the structure of your soil and improve its drainage and moisture retentive qualities. While these sounds contradictory they’re not.

Composting requires a nitrogen component, a carbon component, oxygen and water. Reading the previous sentence you may get the impression you need four different things to compost. This is incorrect because all organic materials have nitrogen and carbon in their cellular structure and you can compost a single material, it just may not compost as quickly or efficiently as a pile incorporating multiple materials to maintain the proper ratio of carbon to nitrogen. The microbes that break down compost need about 30 parts carbon for every part nitrogen in your pile. You can research various materials to find out the actual carbon to nitrogen ratio each has in an effort to maintain the optimal amounts of each in your pile. I’ve spent time on this in the past but after composting for many years I’ve developed a more or less seat of the pants approach to it.

Rather than keep talking about it, here’s how I compost. I used green grass clipping for a primary nitrogen component. I use chopped wheat and barley straw for a primary carbon component. I use chicken manure for an additional nitrogen component and as an accelerator for the composting process. (you can use other manures)

I put down about a two inch deep layer of grass clipping right on the ground. This is usually spread over an area about six to eight feet wide by fifty feet long. Next I’ll spread about three inches of chopped straw on top of that. Next comes a heavy sprinkling of chicken manure over the whole thing.

Next I fire up my garden tiller and use it as a mobile agitator and run back and forth across the pile until it is mixed. Then I’ll toss on another layer of everything and then till across the pile again until it is thoroughly mixed. I’ll keep this up until my stack is around five feet tall (actually until it becomes hard to keep the tiller from falling off an edge). At this point I stop building the stack. Now comes the hard part. Using heavy silage forks we start rolling the pile to an area right beside our pile. As we roll the material, we spray the new pile we are building, heavily with water. We’ll roll the entire first pile into a new pile wetting every bit of it. At this point our initial work is done. We know we have watered it well enough if we have a little water seeping from the bottom of the pile.

We DO NOT maintain this moisture level throughout the process. After this initial wetting we strive to maintain about a 45% moisture content of the stack. The easiest way to determine this is the squeeze test. If you squeeze your compost and water drips out it’s too wet. It it is dry and crumbly and won’t stay together it is too dry. If you can squeeze it into a ball, no water drips out and it holds its form you have it just right. We will water our stack by spraying the outside of the pile and occasionally by forcing water into the stack. Additionally, every time we roll the stack we will add water as required. After our initial wetting, we usually use a fine misting nozzle for subsequent wettings.

I’ll monitor the stack temperature daily after a couple of days to make sure it doesn’t get too hot (an old long probe meat thermometer works great). I like to keep my stacks at around 140 ~ 145 degrees F. This temperature is high enough (132+ degrees) to kill most weed seeds and speeds the breakdown portion of composting. My max temperature is 150 degrees F. If I reach this temperature I’ll inject cold water to the stack and spray the outside of it to cool it down. Temperatures above 160 degrees F. will kill the microbes doing the work. If the stack temperature starts to run away and I can’t control it by water injection then we’ll roll the stack again. This has the added benefit of aerating the stack.

Once the temperature of the stack drops below 100 degrees F. we roll the stack. The temperature will start climbing again after a few days as the microbes kick up their activity. We’ll continue to monitor and roll the stack until we don’t get a temperature spike after rolling. At this point we leave the stack alone to finish out the process or cure, this period of time can vary from a few months to the next spring. A small tractor with a loader helps greatly in rolling the stacks but be aware you can do it all by hand should it become necessary.

Additional notes on composting

The above is by not, by any means, intended to convey the idea that you have to compost like I do. Composting is a highly complex subject and you can spend an inordinate amount of time in researching the various particulars and what is best for you. I’ve just reached the point in my life and gardening efforts where I just do it as opposed to researching every little aspect of it because I know my method works for me in my environment and soil.

Though we incorporate a lot of different materials from the garden in our stacks we never add any meat or meat byproducts to our stack.

The reason for using grass clippings and chopped straw is smaller particles break down faster. This holds true for all materials added to your pile, especially materials like corn stalks.

If for some reason we feel the microbial action is not as high as we like we will incorporate a layer of soil about ½ inch thick into our above mix ratios. This introduces microbes from the soil to the stack.

Chemicals, such as selective herbicides, may become locked in the material you add to your compost pile. Microbial action on your compost may then release these chemicals into your garden soil having an adverse impact on you growing efforts. Give this some thought if you use weed and feed type fertilizer on your lawn.

Til next time

foodgrower

It’s Coming

TPTB are so desperate to keep us off balance and busy to focus on their criminal activity that if they can’t get WW IV going , Aliens are going to be the next distraction on the menu.

You can take that to the bank, that place you used to keep something called money.

That stuff they are doing their damndest to make sure you don’t have any of.

Verily, The Mind Doth Boggle

Tweaker.

It had to be a Tweaker.

After work I went out and started working on the little John Deere riding lawnmower my buddy gave me last week.

I had already started in on it two nights ago trying to get the seized up steering to start turning.

An hour and a half, two cans of WD-40, some judicius smacking with a ball peen hammer and some persistence later, I does work again, kinda.

There are these things that maybe you have heard of called Grease Zerks?

Yeah, whoever had this thing before my buddy never had.

I got one King Pin to take some, the other one not so much but basically the whole mechanism was rusted up.

I got that broke free though.

So today I started in on the what I had already seen with some messed up battery cables and such.

I knew it was going to be a mess but I wasn’t prepared for what I ran across in the end.

Now let me tell you up front here, none of this is my buddy’s doing. I can absolutely, 100% guarantee that.

His neighbor gave the thing to him when he was moving away, my buddy just parked it and sat on it. He told me up front the thing had issues but he and I both know that I have some small talent for repairing things.

This one however, is one for the story books.

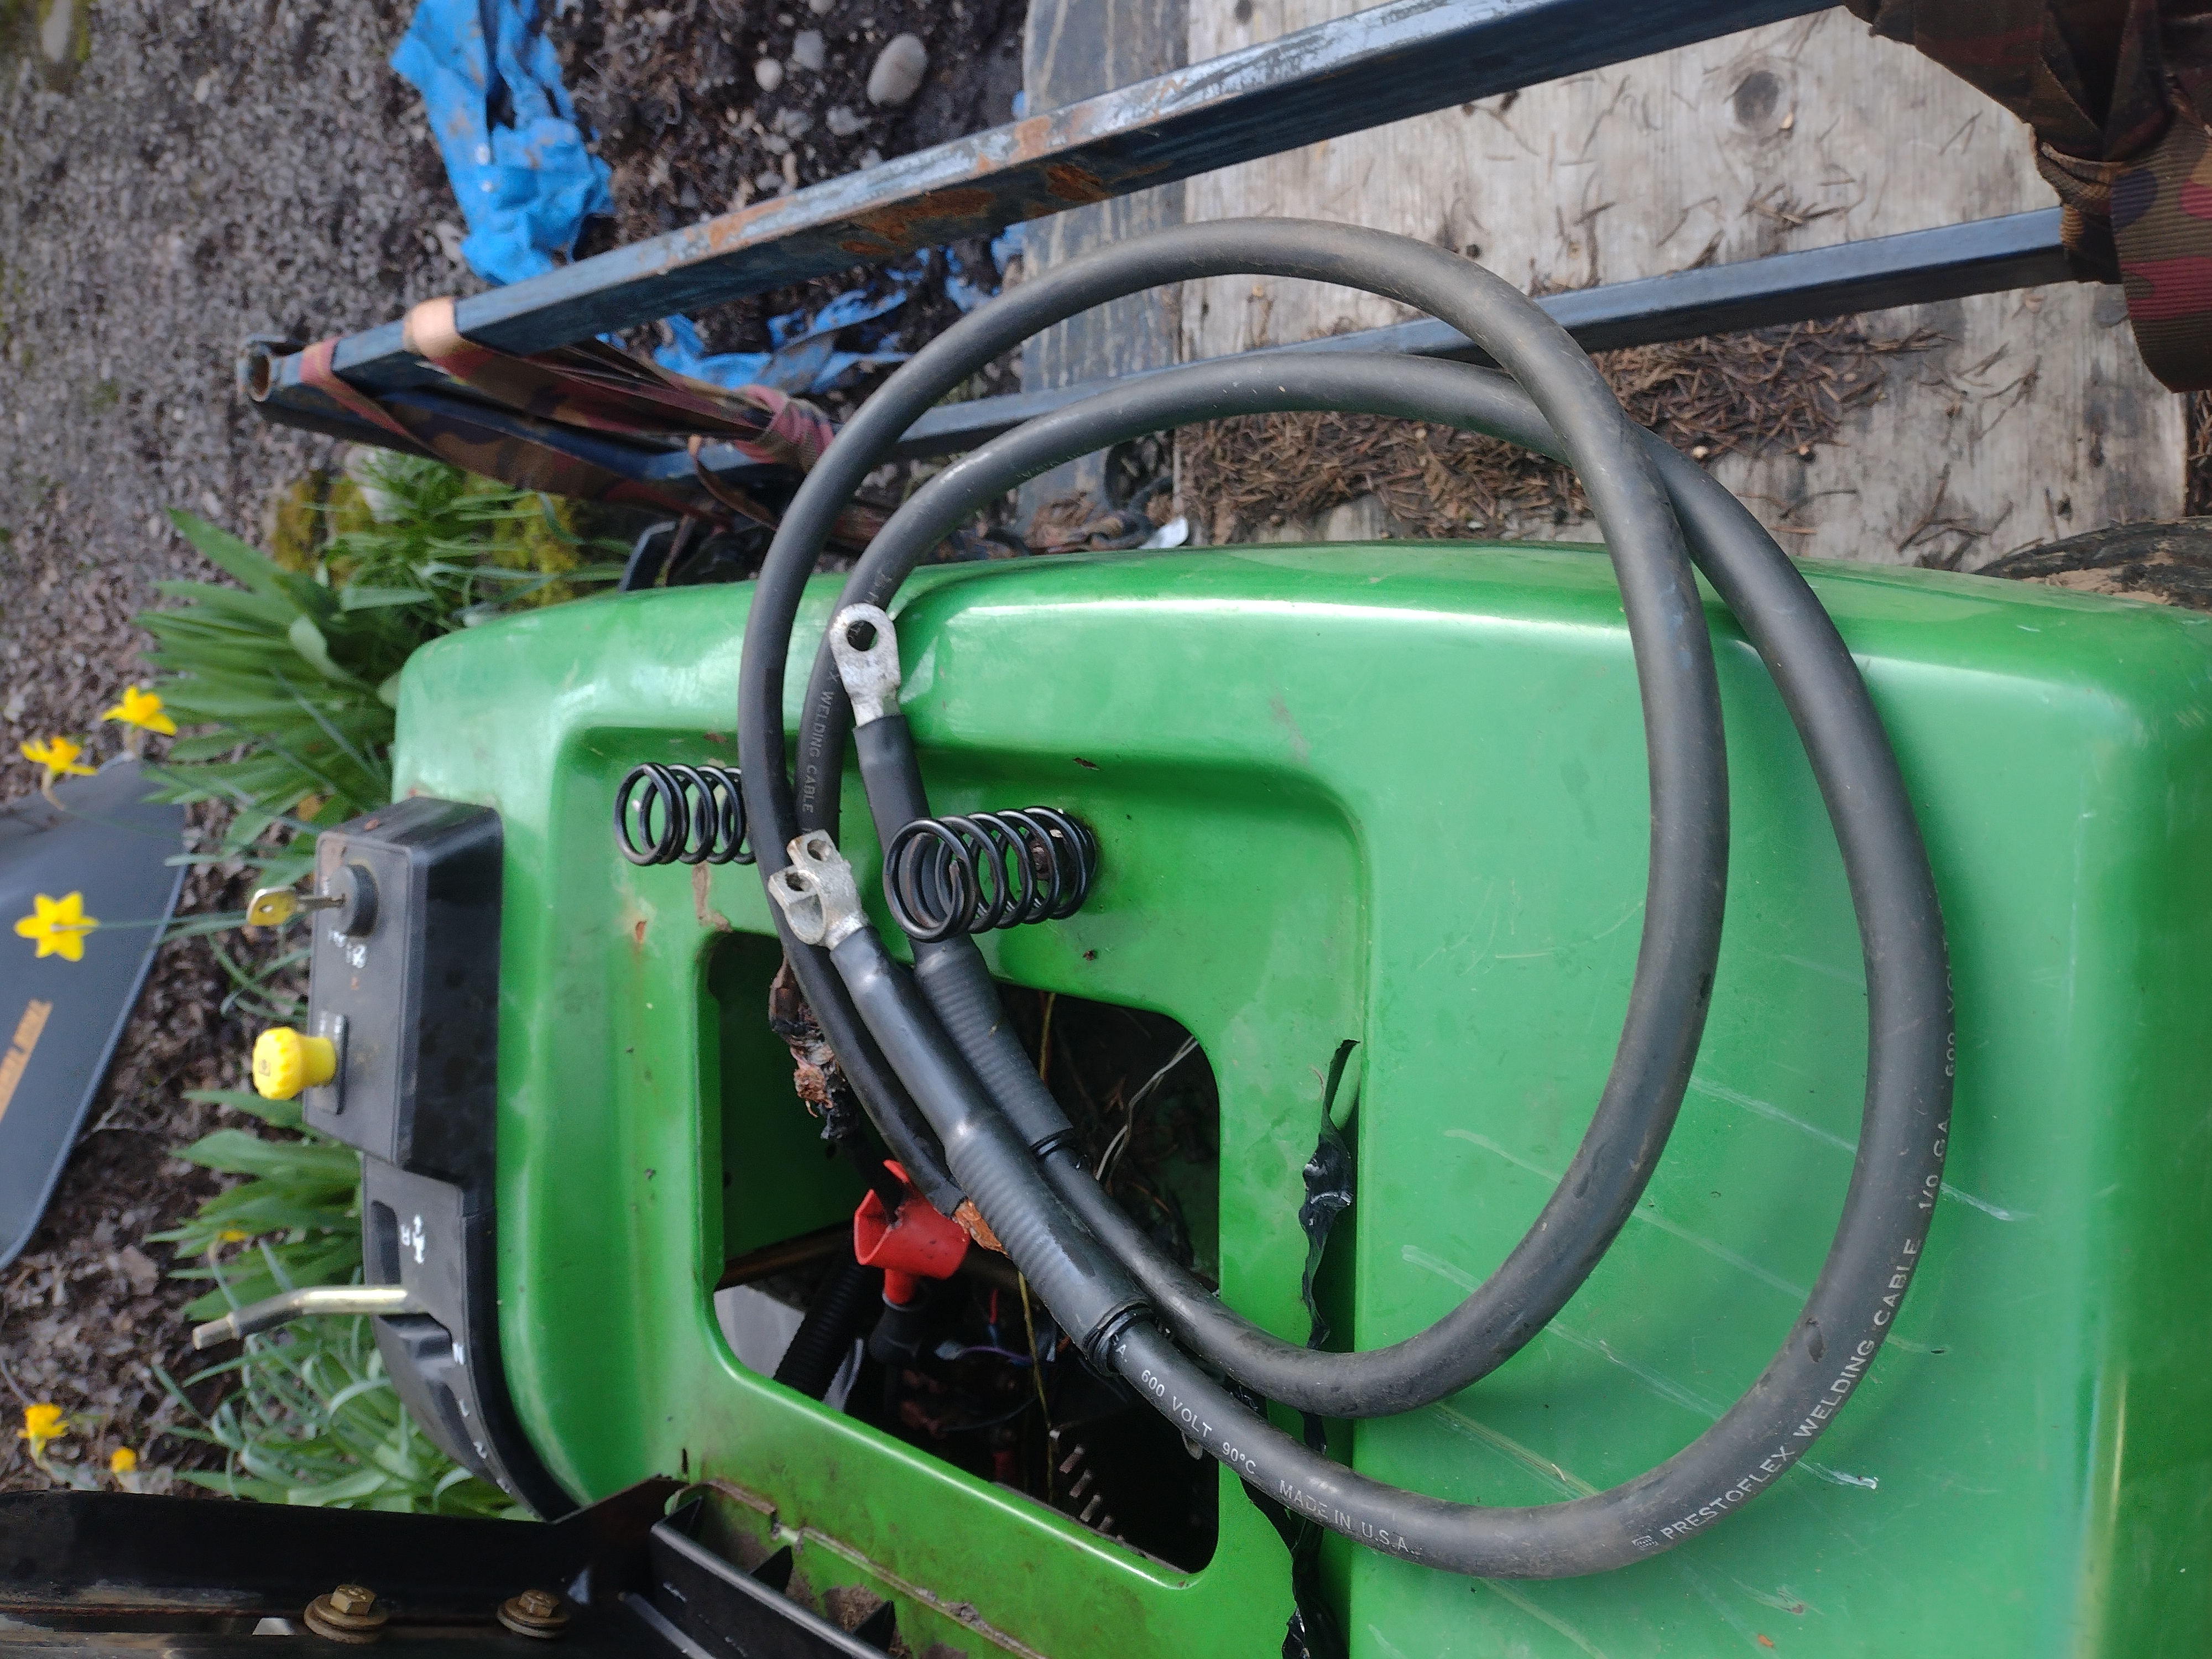
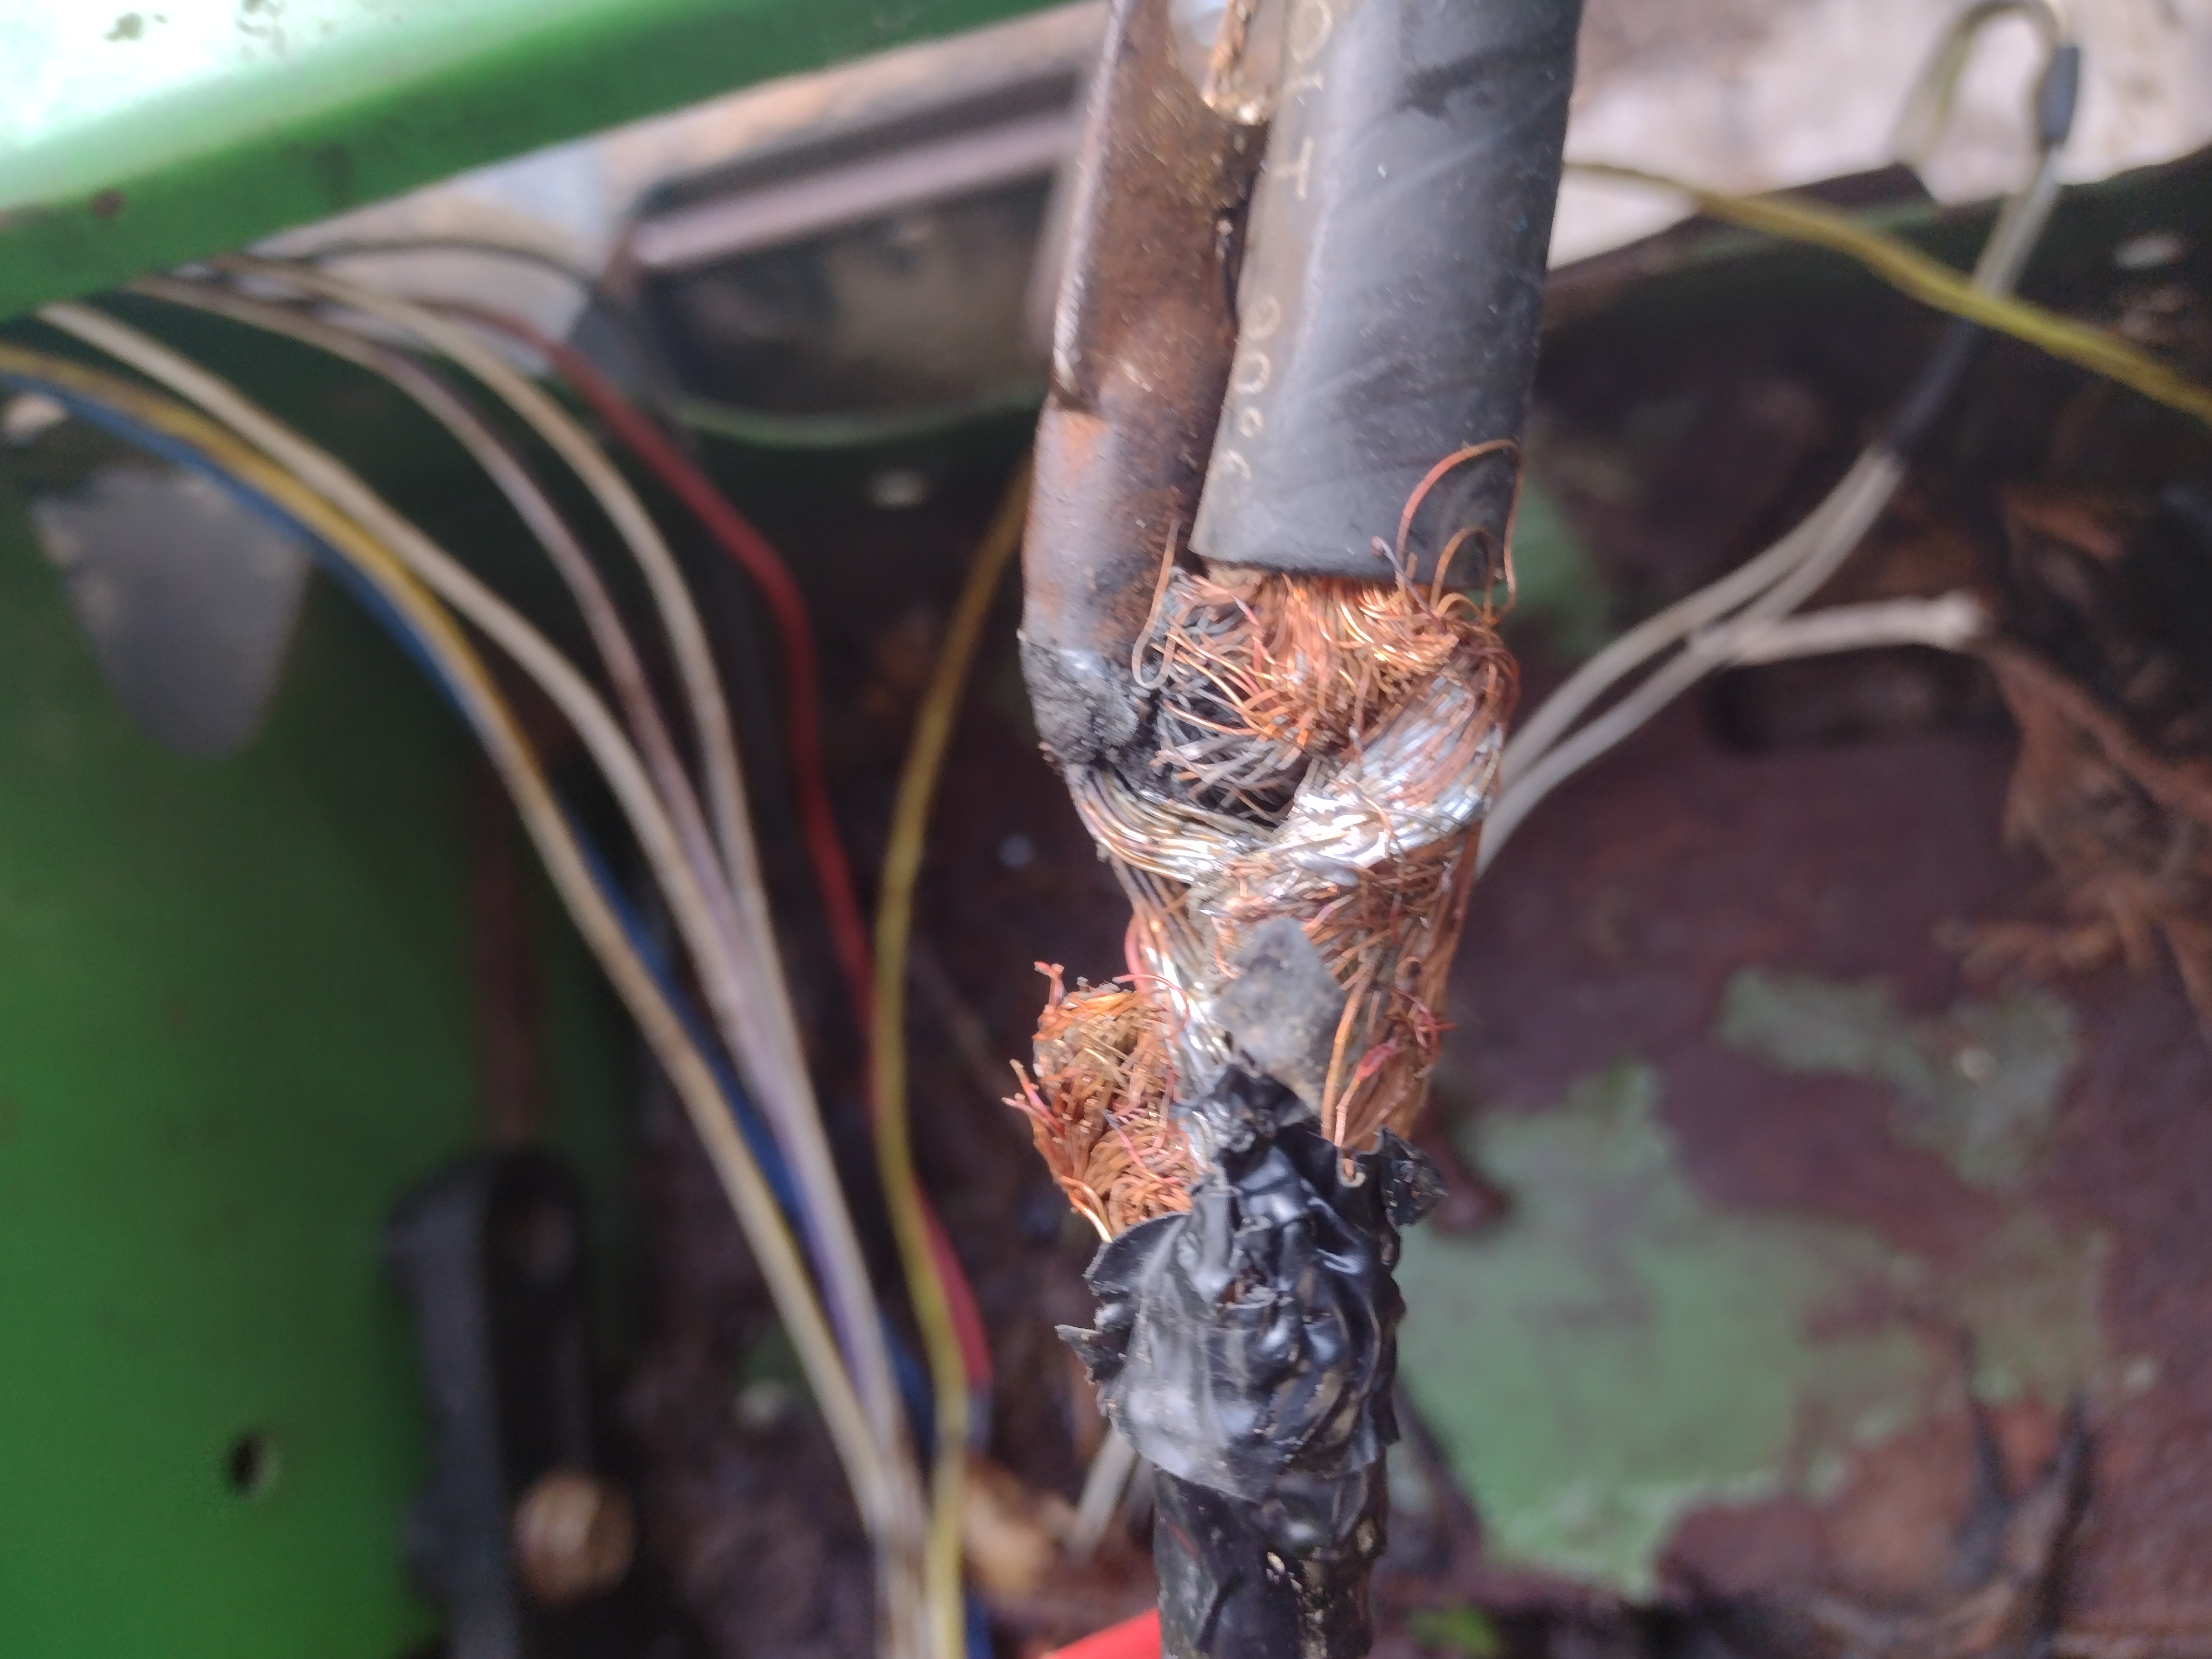
For starters, someone patched in A COUPLE OF FEET OF WELDING CABLE onto the original, dinky,12 inch long battery cables.

I found where they joined up wrapped in two full rolls of electrical tape and started cutting.

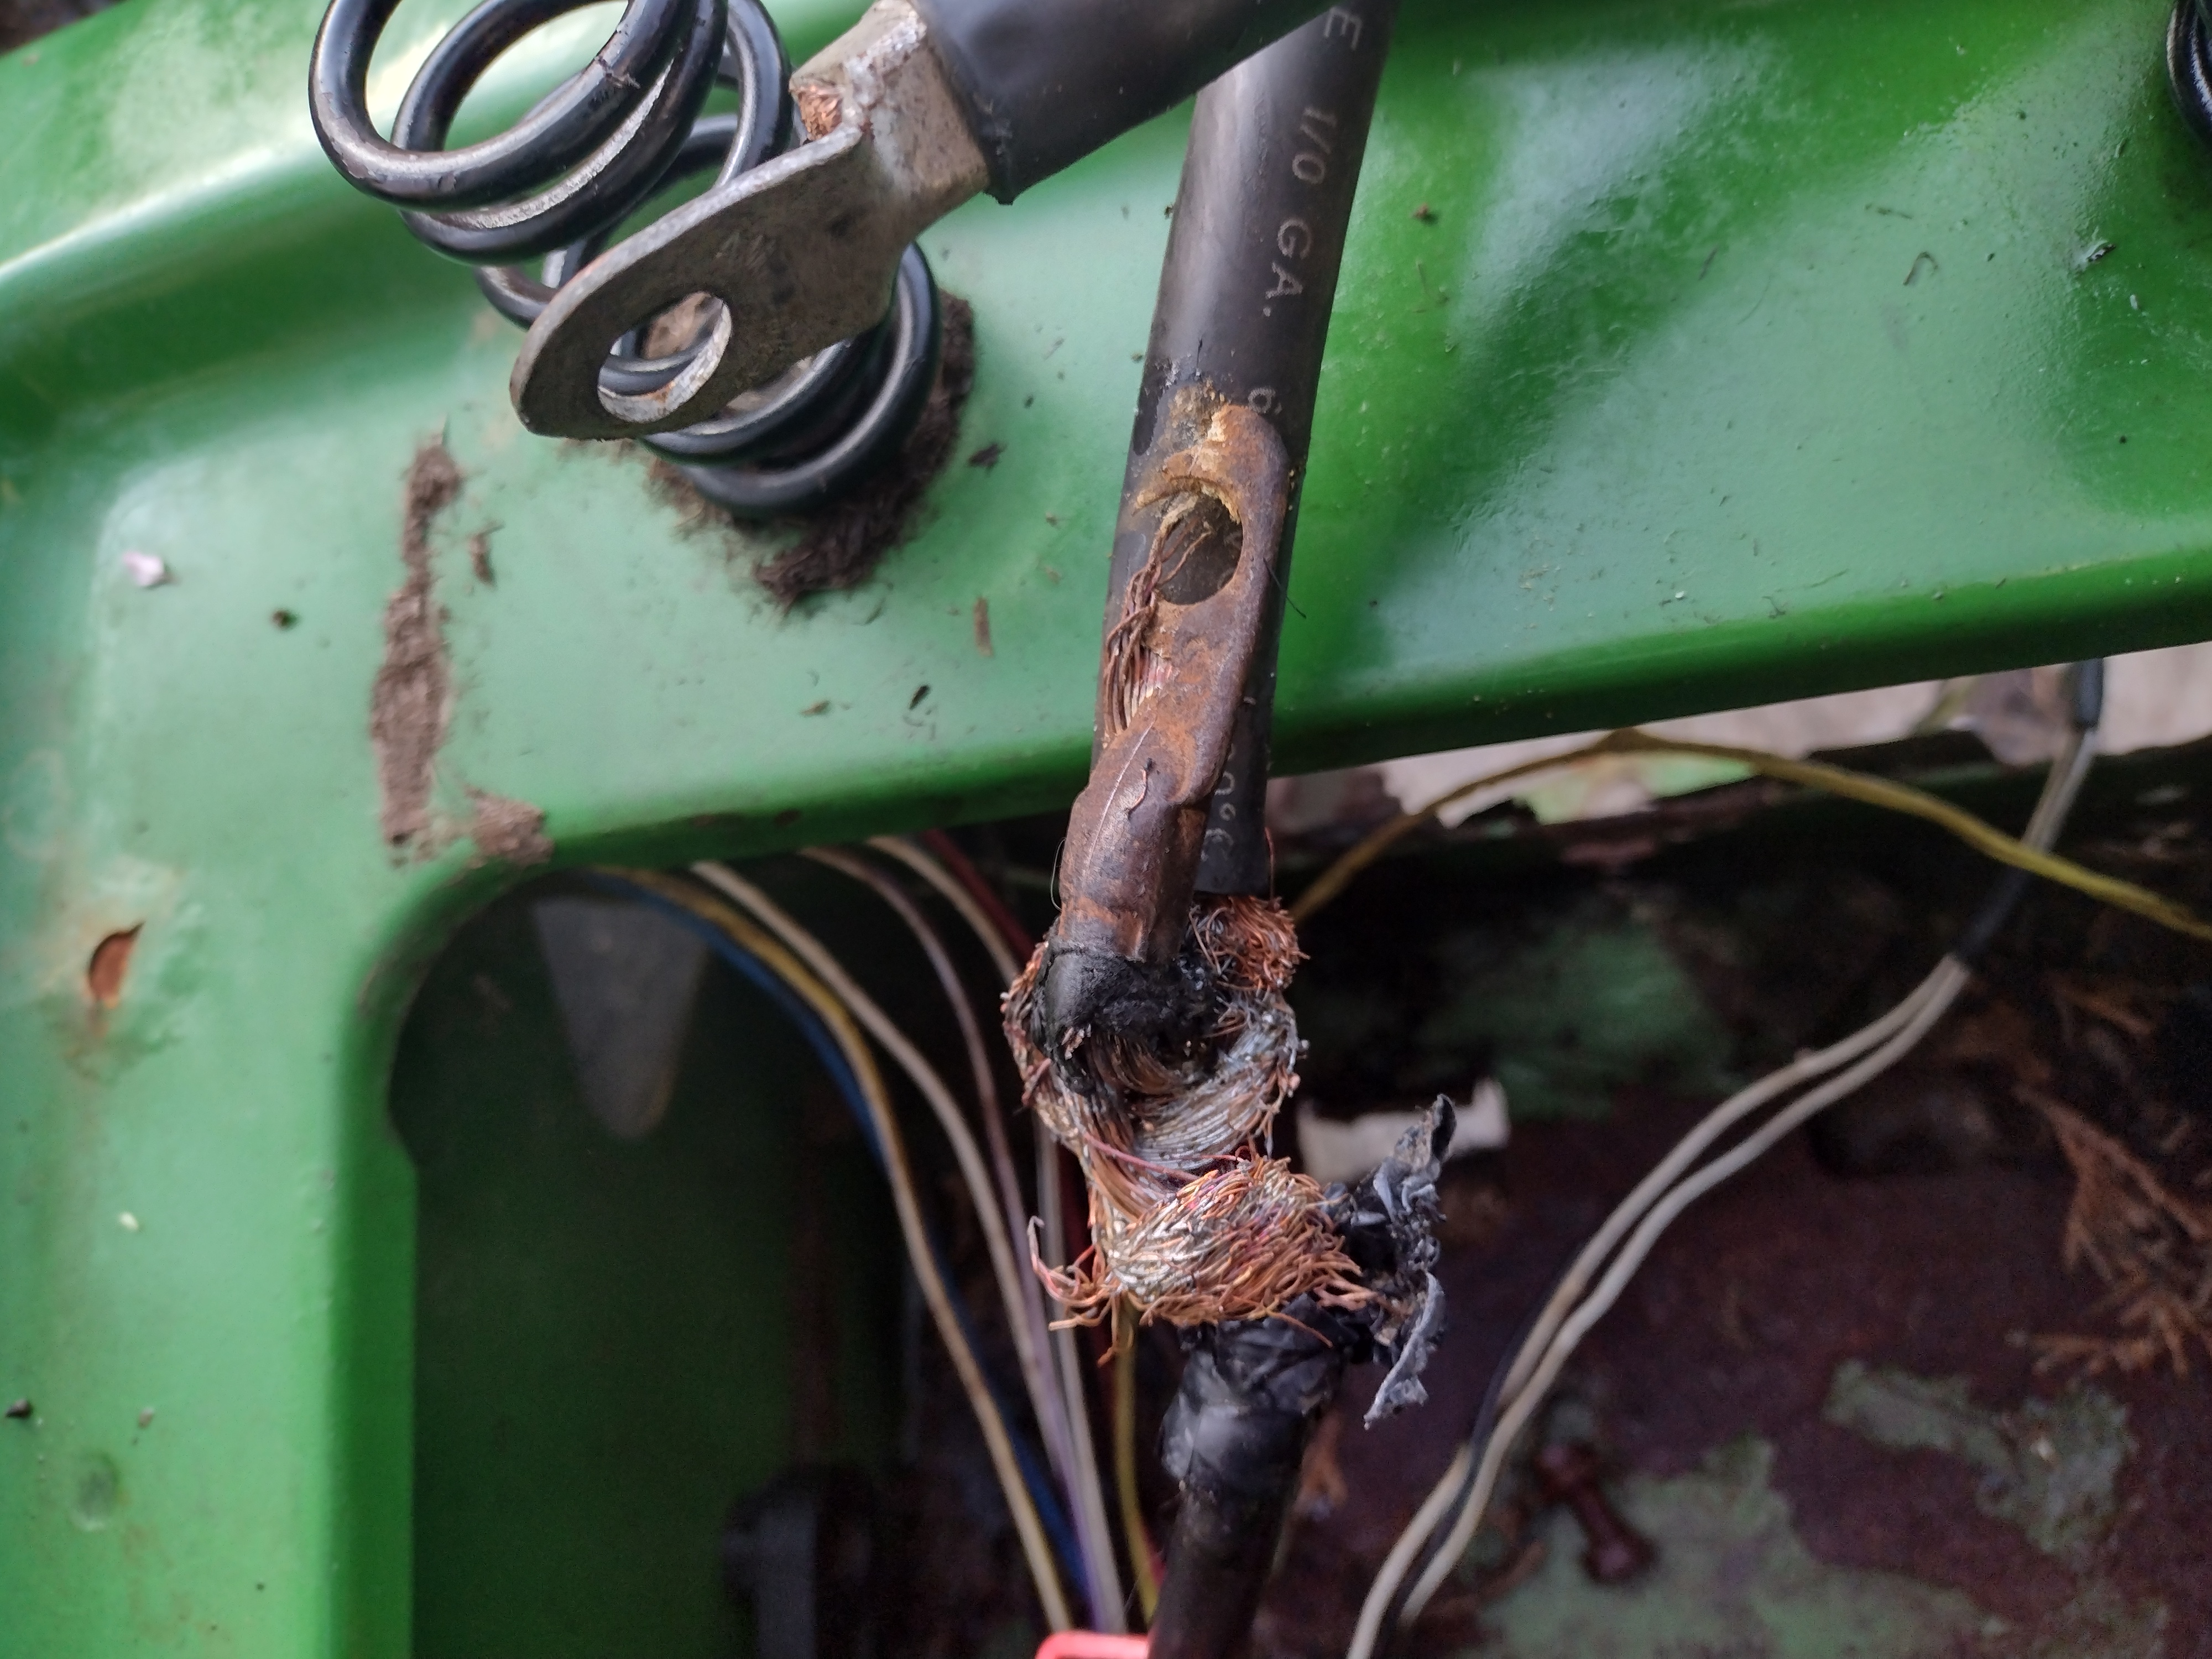
When I finally got the first one exposed to light my jaw dropped open.

What, In The Actual…..?

Behold! The Tweaker Special!

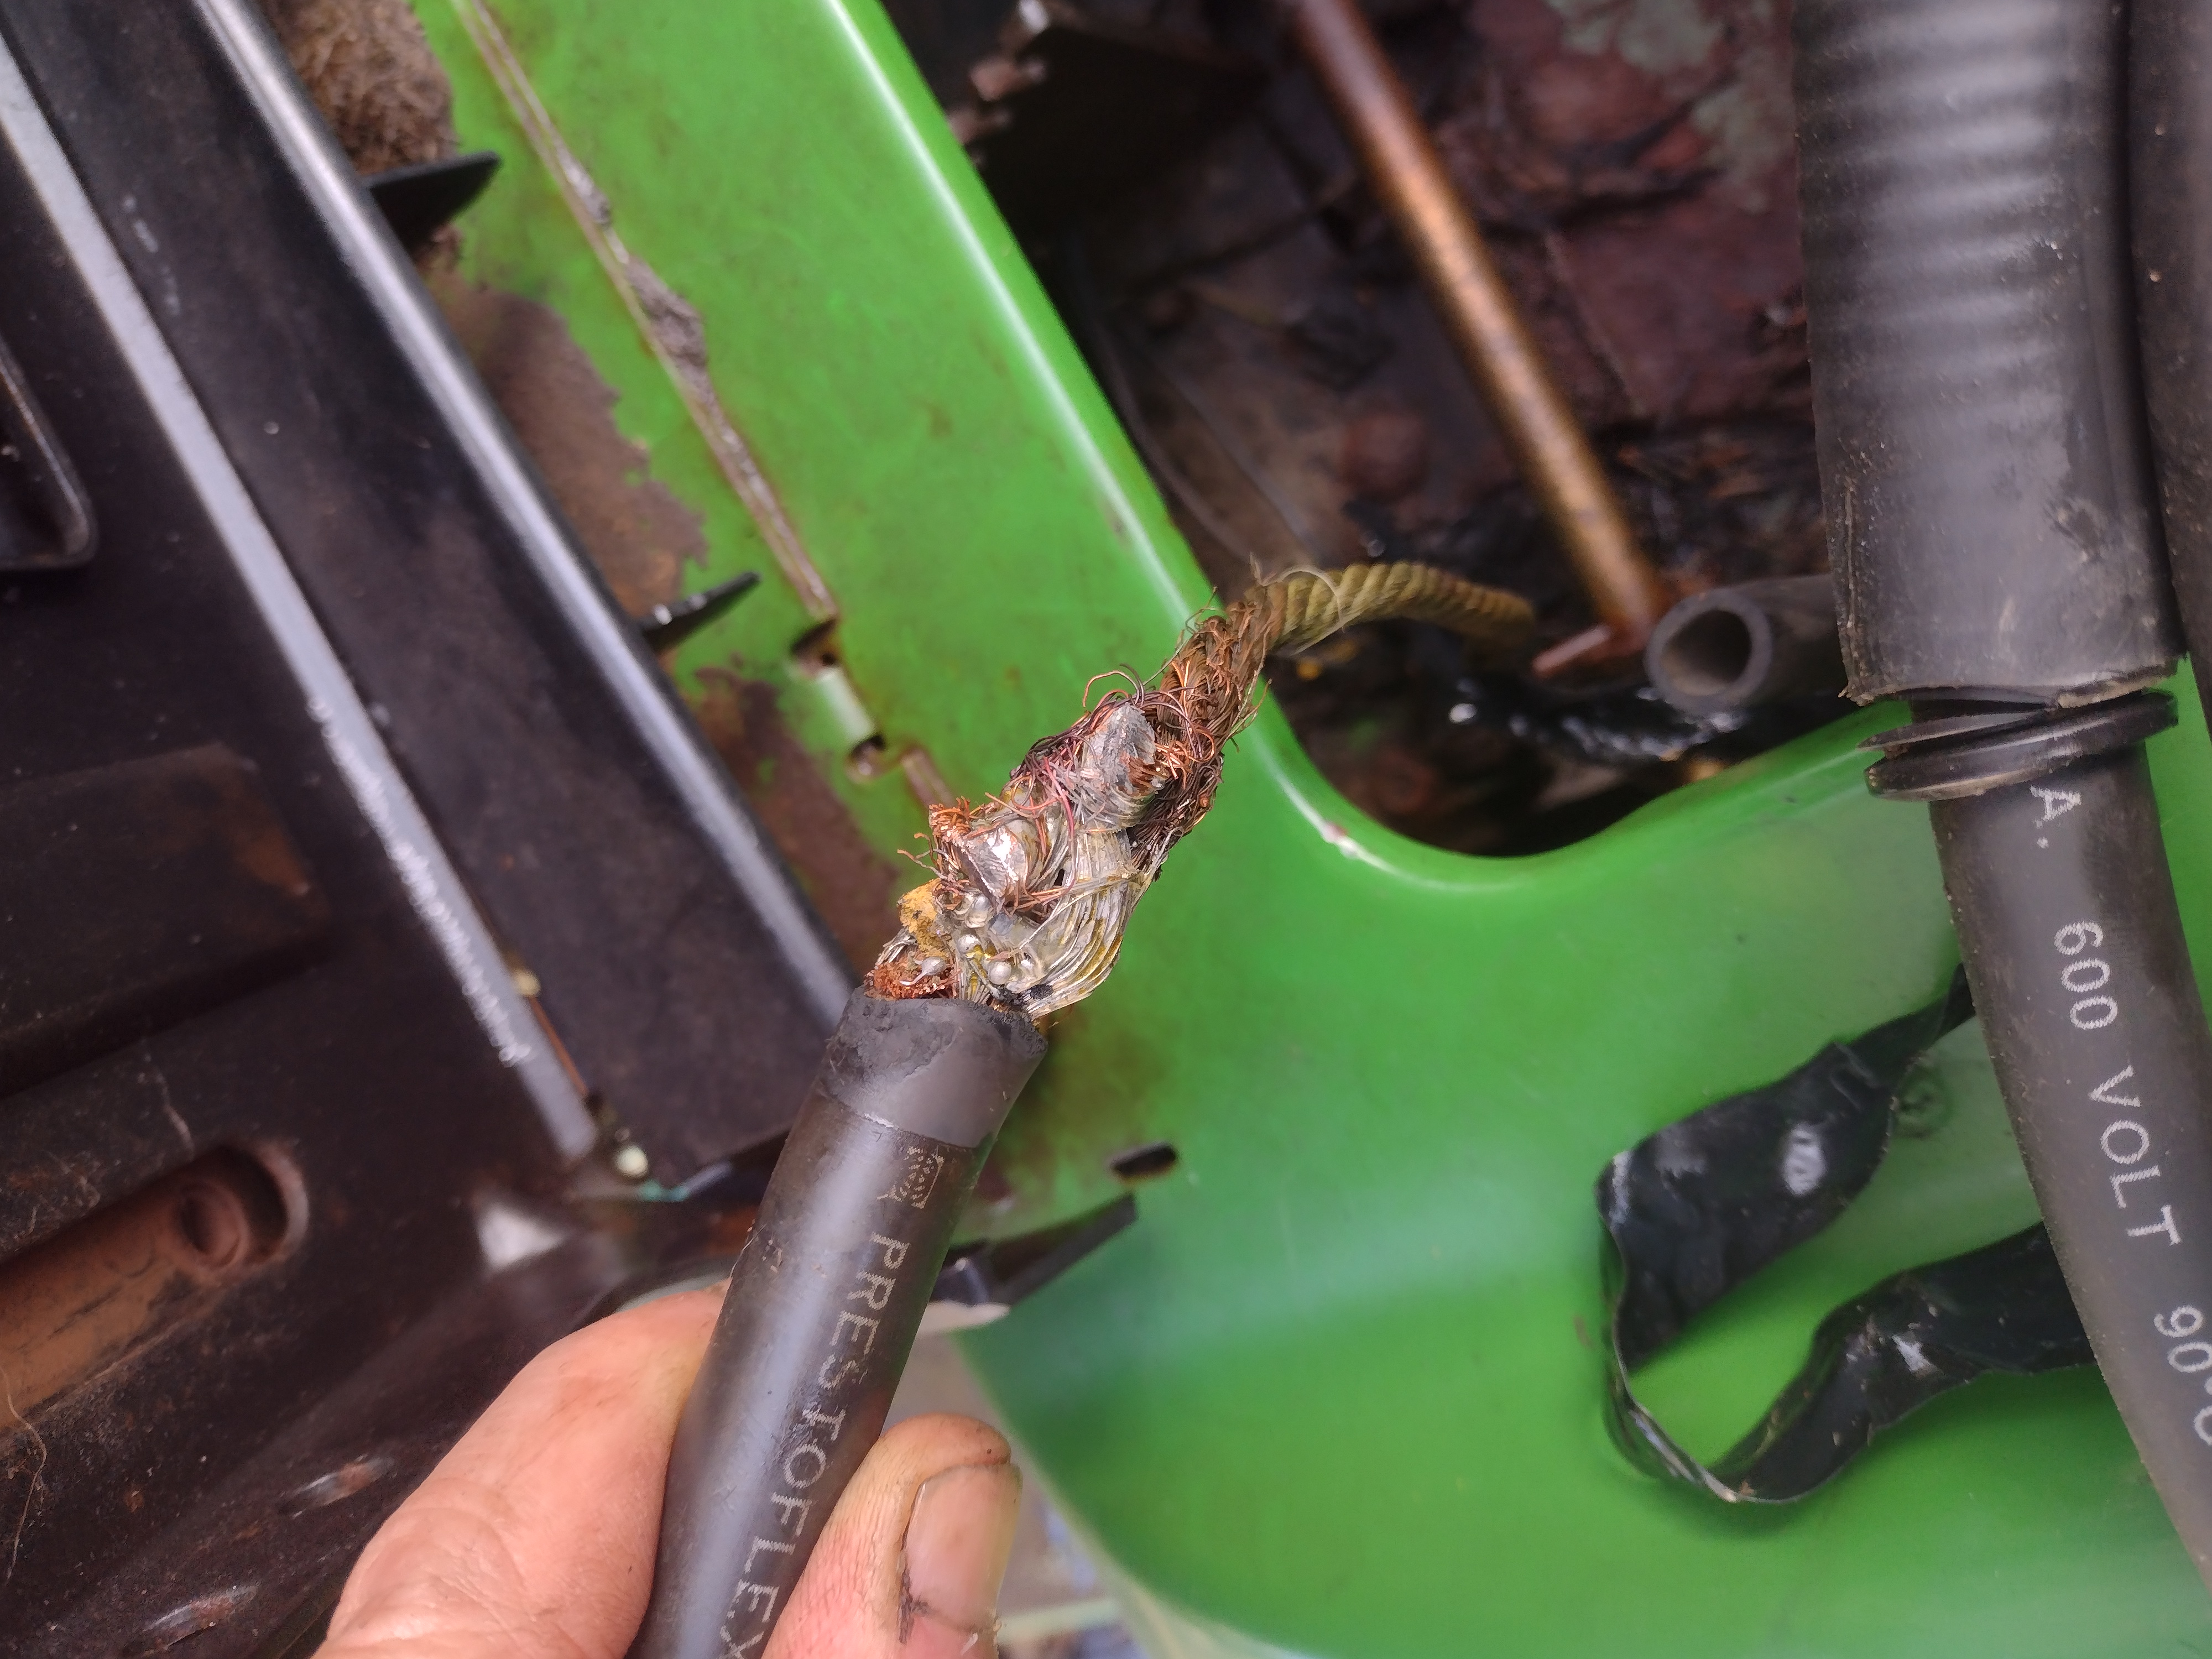
Then I got the other one opened up.

Holee What In The Hell Was The Thought Process Here Kind Of Crap Is This?!

You can’t go spend ten freaking dollars on a new pair of battery cables?

By the time whoever did this got done messing around here you could have WALKED to a parts house and back.

Sweet Mother Of God what a disaster.

So I took all that garbage out of there, ran up to the parts house, took that with me to show them because I know that there was no way that I could describe this disaster to them and I also knew they wouldn’t be able to comprehend just how bad it was without having eyes on.

Grabbed a new battery, they didn’t have the correct cables of course, bought a bunch of crap to cut down and crimp new ends on, got some fuel line and a filter and came home and put the damn thing back together.

There are still many wiring issues to deal with and I had to jump the solenoid but I did get the engine to spin over.

I have no idea if there is any spark or compression yet.

I know it isn’t getting any gas because I have the tank off.

But it did spin so At Least I know it isn’t seized.

One nightmare at a time thankyouverymuch.

Stay tuned, this promises to get quite entertaining.

Hopefully It Will At least Slow Them Down

With the price of gasoline these days, I figure my truck will hold $150 worth with a full 30 gallon tank.

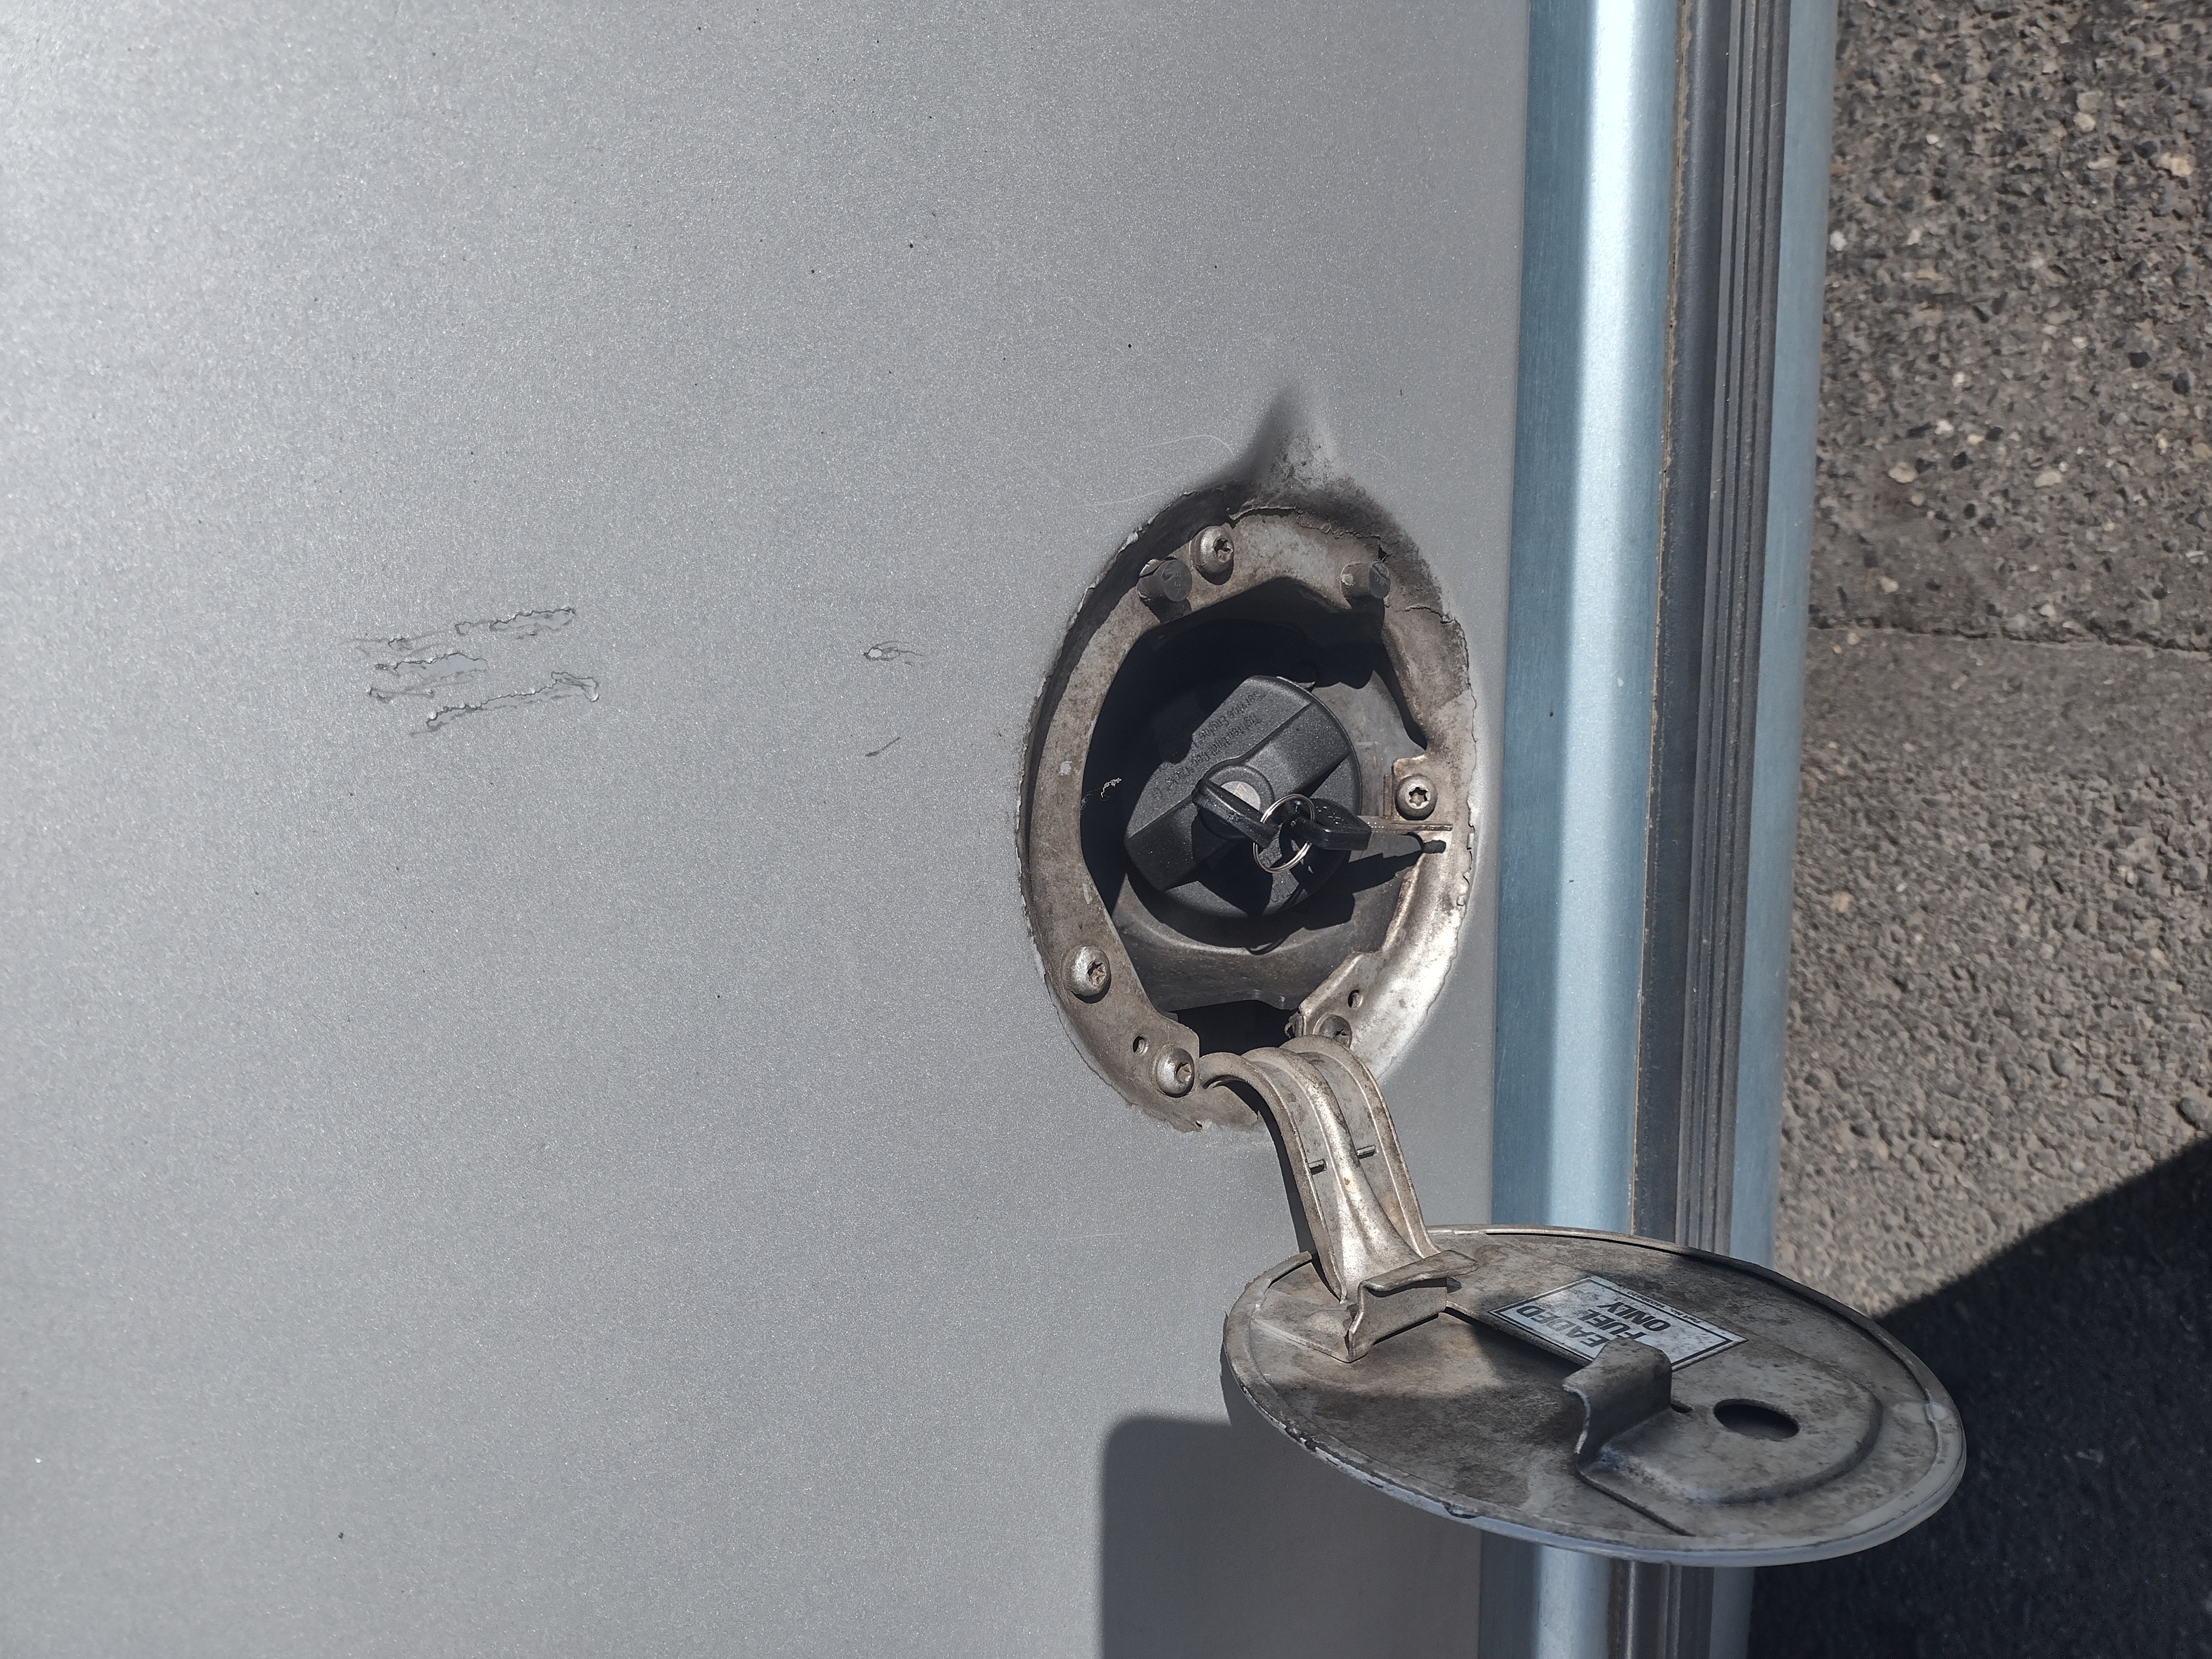
There isn’t much I can do about the thieving bastards selling the stuff but maybe spending $15 on a locking gas cap might at least slow down any thieving bastards wanting to siphon my tank.

Not much I can do though if they get brutal and just punch a hole in it.

A Special Treat! Food Grower Articles Resurrected!

This has been no small feat.

I’m almost positive that anybody who swings by here has already swung by Kenny’s place first.

I have absolutely no problem with that.

I do myself sometimes!

Knuckle Draggin’ My Life Away has literally been one of my favorites for years and years now.

As a matter of fact, to this day Kenny’s place is the top referrer in my stats page every day almost.

Since we all know and love Kenny for his razor wit and charm, you may recall a series of anonymously written articles he published several years ago about growing food that he kept a link to at the top of his page.

Then he moved to another platform that crapped out and he moved back to Blogger but those articles disappeared.

I know who wrote them.

I got in touch with Kenny, he couldn’t find them and I got in touch with the original author and he could only find a few.

We have been going back and forth for a couple of weeks in the background.

I was right in the middle of an Email exchange when I remembered that I had saved those on another laptop and then downloaded them onto a removable hard drive.

Some more searching but I did find quite a few of them. Long story short, I sent some back to the original author and he went through one, updated it and sent it back to me.

I figured as bad as things are looking that it would be a good time to spread that knowledge back around again in case anyone missed it the first go round.

So without further adieu, here it is, verbatim.

Food Grower Advice Pt1

Phil chased me down about re-posting the food growing articles originally shared through Ken at Knuckledraggin My Life Away on his old blog (current blog https://ogdaa.blogspot.com/ ). That original content and subsequent comments are now in the wind. A quick note to anyone trying to remain anonymous on the web, when Phil decides he wants to track you down, he finds you. The man is a pit bull on the hunt.

The time is rapidly approaching when if you don’t know how to raise and grow your own food you most likely will be going hungry. To clarify I usually differentiate between raise and grow where raising implies raising a food animal and grow implies growing plants. Most of these articles deal with growing a truck garden though I do have a few on raising livestock near the end.

Back to the articles, I didn’t author those original articles in any particular order, rather they were written as they came to mind. Hopefully these will be presented in a little more coherent order, especially for the beginner. Considering as how they are being presented in a different order they may reference an article that hasn’t been shared yet this time around.

Actual article

Food Growing Primer

Caveat lector The following is based on my experience, practices, likes, environment, ideas and successes or failures. Folks in other parts of the country, in other garden zones, and with other goals may, and probably do, do things different than I do. I am not telling you, you have to do it my way. This is what works for me. I also don’t know everything and I don’t grow everything. I’ll let you know when you ask me about something I don’t know or don’t grow. I will never try to snow you.

To successfully grow food you need a few things. In no particular order they are seed, soil, sun, water and time. This is excluding soil-less growing systems.

Seed

With few exceptions most the plants you grow in your garden will come from seed. Even if you purchase plants someone still started them from seed (there are other means and some of them will be shared in a future article). I believe there are three main problems starting your garden with purchased plants. After a collapse you most likely won’t be able to buy plants; using garden starts narrows the selection of what you have available to grow; using garden starts doesn’t give you any practice in starting your own plants from seed, which is a critical skill and can be harder than you might think at first blush. Another issue, implied by the above problems, is you can’t transport a selection of plants in a forced migration situation like you can a kit of garden seed.

There are several methods of starting plants from seed and we’ll be exploring my method in more detail. No matter which method you use, you need to be aware of the seed’s environmental needs for effective germination.

Soil

Just because you have dirt in your backyard doesn’t mean it will grow a garden. While some may be fortunate enough to have healthy, rich soil many of the rest of us have soils that have been abused and depleted. In some cases our soil suffers problems that are beyond what can be repaired in the short term. If this is your situation you may be better served by finding another location to situate your garden. It took me six years to go from dirt to soil in the spot where I’m gardening right now and there are still areas that need attention.

If your area is not beyond recovery then you build your dirt to soil by amending it. You can use commercially available amendments or you can roll your by composting. There are many facets to composting (and I’m sure this will disappoint a few) but I’m not going to cover composting in depth this time.

Sometimes your soil will grow what you want just as it is. Other times in order to grow what you want you’ll have to alter some aspect of the soil. Refer back to my last article about blueberries needing a low pH soil. In our area we have to alter the soil to lower its pH or the blueberry plants die. Other areas need to lime their soil to raise the pH. Just so you know, the vast majority of your plants will do fine in soil having a pH between 6.0 and 7.0. There are exceptions of course so don’t someone climb my ass about it. We’ll talk specifics when they come up.

There are many different ways to alter your soil and something to be cautious about is ‘conventional wisdom’. Rather than explaining all the ways you can be hurt by taking someone’s word about what you need to do to your dirt I’ll just put it this way. Never just do something to your soil. Always have a purpose to what you intend to do and understand what the result is going to be.

I once had a fellow come up to me and ask what I thought about putting Epsom salt in the soil. I told him it could be used to alter the magnesium and sulfur content of the soil, why? “Well my buddy told me to throw a handful in the bottom of each hole before I planted my starts. Now they are all turning brown and keeling over. What do you think is going on, could it be the Epsom salt?” Not knowing anything about what Epsom salts did, nor whether he even needed to alter his soil in any way he followed some conventional wisdom and killed his plants.

Other areas of importance for your soil is its actual base type – clay, sand, silt, peat, and alkaline (some say saline), how fertile it is, beneficial or harmful soil organisms and drainage to name a few.

Sun

OK, I fibbed, this would be more properly be labeled Environment, of which the sun is just one facet but environment didn’t flow as well as sun up above when I was listing things. Your environment is determined by a lot of factors and the sun is a critical part of it. Other aspects of importance are last frost date, first frost date, growing degree days, chill hours, soil, climate and weather, predators and micro climate factors. Just like Dennis Storhøi said to Antonio Banderas in the 13th Warrior, “Don’t worry little brother, there’s more”, well there’s more. We’ll look at some of these in more detail when required.

Water

It could be argued that water (and soil) are part of your environment and that would be correct. The reason water is listed separately is because we can alter its availability and character so easily to effect changes in our garden performance. While there are places where it rains just the right amount at just the right time to keep your garden healthy in most instances we either get too little or too much rainfall and need to irrigate or employ gardening techniques to compensate less than optimum rainfall.

Time

Time has two components to worry about. The amount of time you have to dedicate to your food growing and the amount of time your plants need to reach maturity so you can harvest them. If you can’t commit the time required to maintain your garden it will suffer, perhaps to the point of failure. If you attempt to grow plants that have a longer ‘days to maturity’ than you have growing season, your efforts will likewise suffer failure. If you really want to grow a plant requiring more time than you have growing season there are things we can do cheat mother nature.

…..

Now that we’ve covered some of the basics let’s delve into some specifics. I tossed out the Caveat lector up above and I want to restate it. This is what works for me. You may have environment, experiences, practices, culture, tastes and wants and so on that differ from me and what I do and that’s ok.

Starting your garden plants from seed

Over the years I’ve seen a lot of folks experience failure at starting plants from seed. They try to do what they think they should and when nothing happens they don’t understand why, get frustrated and sometimes they give up.

The absolutely first thing you need to do when starting plants from seed is understand the biology of the plant and its life cycle. That means you are going to need to crack some books (or get on the web) and study. Another option is to find an accomplished mentor and learn from them. As far as I’m concerned you have two basic means of starting a plant from seed. One is to direct sow the seed. This is where you put your seeds right into the soil where they are going to grow and trust mother nature to do her job. The other is to do what we call ‘start your seed’ to give it a leg up in the growing process. Starting your seed can vary from something as simple as soaking it before you plant it all the way to a multi-step process which may include one or more up pottings of the plant before you are ready to stick it in the ground.

The basic thing you are trying to achieve with any process is ensuring the seed is able to germinate. All seeds have specific requirements for germination to occur. Some of these requirements can be quite exotic, plants that are serotinous require the high heat from a fire to release their seeds. You need to be aware of the germination requirements for the plants you intend to grow. Usually on seed packets you’ve purchased the germination and planting instructions will be printed on the package.

You’ll read something akin to (this is an old flint corn I have) – “Direct sow when soil reaches 65-70°F. Plant seeds 1- 2″ deep, 4-6″ apart, in rows at least 36″ apart, in full sun. Plant in blocks of at least 5 rows. Germination in 10-14 days. When plants reach 4-6″ tall, thin to 8-12″ apart. 110 days”

I have to tell you I disagree with some of this, actually almost all of it. I’ll detail my disagreements shortly. Unless you know different, follow the instructions. Once you start propagating your own seed you need to record the germination and planting instructions so you know what the seed requires.

So what happens if you don’t follow the instructions listed on the package? For some crops like beans and corn the seed will swell with moisture, but because the temperature is too low for germination the cell walls burst and the seed rots in the ground. In other cases, some seeds will just sit there and seemingly do nothing. I have in the past overplanted an area that I felt had failed only to have, half way through the growing season, the original plants start popping up.

So what about my disagreement a couple of paragraphs up? For one, we hardly ever direct sow any of our seed any longer, even crops that are traditionally row crops. We also don’t seed heavy and then then thin out fifty percent or more of the plants.

I’m going to pick on corn for awhile because that’s what the above planting directions were for. If I wait for my soil temperature to reach 65~70 degrees most years I won’t be planting until well after the first of June. We usually have a damaging or killing frost by the first week of September. If I don’t plant until after the first of June and I have a killing frost by the first week of September I don’t have enough growing days for this corn to reach maturity.

Planting heavy and thinning is just a waste of money, time and seed. If you’re buying seed why waste your money by wasting 50% of your seed. That’s what the above instructions tell you to do. Why plant it and then waste time pulling it out? Once you start propagating your seed, especially if it’s grid down, seed will be much too precious to waste.

A couple more disagreements are, direct sowing your seed and then having to wait up to fourteen to eighteen days to see if you have a failure is a quick way to eat up huge block of growing time, waiting and waiting and waiting. The fourteen to eighteen days is greater than the ten to fourteen day germination period because it take a few day for the corn to sprout after it germinates. We also use different plant spacing, both in row and row separation.

“What’s a person to do?” you might ask. We have found that though corn needs 65~70 degrees F. to germinate it will grow in temperatures as low as 45 degrees F. One year I started some corn seed in the house in January. Once it germinated I put it in transplant tubes and stuck it in a back room that didn’t have any direct heat. The temperature averaged around 45~50 degrees during the day and never dropped below freezing during the night. The corn not only sprouted, it grew to about 3 inches tall over the next few weeks. I aborted the experiment once the tap roots were growing out of the transplant tubes. We only plant seeds that we know have germinated and are starting to grow a root. This has completely removed the need to overplant or interplant seed that has failed to germinate and grow. This time savings more than offsets the time to start our seeds.

Tips for jump starting your seed.

If you are going to direct sow there are some things you can do to give your seeds a jump start. For seed like corn (and beans) that are more or less dry and hard you can soak your seed. This speeds up the process that occurs naturally in the soil. There are a lot of opinions out there about the proper way to soak your seeds. Rather than list them I’ll just tell you how I do it and why I do it that way. One warning first, never soak your seeds in standing water deeper than one layer of seed. This is a quick way to drown your seed.

I use a tray with sides about two inches deep. Mine is actually a garage sale acquisition of a plastic serving tray set. I place a folded towel in the bottom and completely saturate it then I pour off the excess. Next I place a double layer of paper towels on top of that. Then I place my seed, one seed layer deep on the paper towel and cover it with two more layers of paper towel and another folded towel on top of that. I thoroughly wet the top towel and keep spraying the top towel on an as need basis to keep the towels damp but not over saturated. What this does is allow the seeds to draw moisture from all directions without running the risk of drowning the seed or having them dry out. This also allows you to control the temperature where the tray is and avoid germination failure by the seed being too cold. You’ll want to check your seed frequently because it will be ready to plant most of the time in less than a day or two (the previous statement applies to corn, beans take a little longer). You’ll know its ready by the swollen appearance of the seed.

I employ an additional step for my seed. I place my seed trays on a propagating heat mat. A heat mat is a device that provides a continuous and even amount of heat when it is plugged in. They are usually designed to provide around 80~100 degrees F. of heat. Some of them have a thermostat built in. As of today (9/19/15) a plain jane 20” X 20” propagating mat on Amazon is 28.75 + 8.00 shipping. At the end of this article are instructions for building a bigger one of your own for less.

“Why the extra layer of paper towels in your tray?” you ask. Seed that is started this way, especially on a heat mat, will quickly germinate and start growing a tap root. If you miss checking your seed before the root develops this helps keep it from growing through the cloth towel and instead of damaging the tap root trying to back it out of the cloth towel, you can simply tear the paper towel apart around the root with no damage to the root. Any excess paper towel will just go into the ground when you plant.

I go from dried corn seed in storage to germinated seed showing a root in about two or three days using this method. Depending on outside conditions I may direct plant this seed in the soil or I will put them in transplant tubes. Because corn doesn’t like to be transplanted, transplant tubes are a means of holding your germinated corn seed without having a disaster of tangled roots. I can hold corn for as much as two weeks before placing them in the soil. Instructions and discussion on transplant tubes are at the end of this article.

Here is the exact steps I use in starting corn, beans, cucumbers, squash (both summer and winter), peppers (both sweet and chili) and pumpkins. Note that not all of these are started at the same time. I may start my super hot chili peppers as early as the end of January/first of February while the corn doesn’t get started until around the first of May.

I start the seed as described above in a starting tray on a heating mat. I daily (many times twice a day) check for seed that is starting to sprout.

For corn and beans, if the soil and weather conditions warrant, I’ll direct sow the seed as soon as I see the root start to form. Corn is spaced every six inches in the row, in rows thirty inches apart. Beans are every eight inches in rows thirty six inches apart. I only grow pole beans and you should already have your trellis up by the time you plant. Notice I expressed should. I fail at this a lot and have grief every time trying to avoid damaging plants when setting up my trellis.

For all the others, and the corn and beans if conditions aren’t conducive to direct sowing, I’ll take the seed and place it in a transplant tube. All my tubes for these seeds are two inches in diameter. The height will vary based on what the plant is. Corn and pole beans are aggressive in producing a tap root. These tubes are generally around 3.5 inches deep. The tubes for the others are only about 1.5 inches deep. The reason for the shorter tubes on the others is to get more heat to the seed when they are placed on the germination mats (this is important for peppers, especially the super hots).

Once the seeds are in the transplant tubes they are placed in trays on the heat mats. I’ll check them every day. Regardless the weather conditions, once the beans have two true leaves they get stuck in the ground. Ditto the corn but its status is determined by seeing the tap root growing through the bottom of the tube. For all the others we start the up potting process. As soon as the tap root starts to grow through the tube they will get put into either a larger transplant tube or into square 4” pots. The up potting will continue until the plants can be set out.

An important side note here. If you have plants that are in pots, you need to gradually harden them off to outside conditions instead of taking them from the house or greenhouse and immediately sticking them in the ground. Hardening them off is to avoid extra shock, which they’ll suffer some of just from being transplanted. You accomplish hardening off by setting them out in a protected area for a few hours a day at first and slowly increasing the amount of time you leave them out each day.

This is probably enough for one article. It’s way too long but there is a lot of information to share.

foodgrower

Homegrown germination mat

Go to your favorite building supply or craft store and purchase an 18 foot rope light (important get one with incandescent bulbs NOT LED’s). This should run you around $13~$15. Now go out and scrounge up a piece of plywood or OSB from your scrap pile that is about ½ thick, 14 inches wide and 45 inches long, this is your base board.

Next cut 4 strips ½ inch thick X 2 inches wide X 40 inches long. Round both ends of the strip. Center and mount these spacing strips on your base board with a gap between them slightly wider than the thickness of your rope light.

Secure the spacer strips to the base board with screws and then wind the rope light around the spacers and fasten to the base board with the mounts included with the light. You now have a functioning heat mat that will hold a temperature of 85~95 degrees F. (at least mine do and I have several) for less than half the cost of a smaller commercial mat.

If you want you could mess with the dimensions of the wood and length of rope light to make your own custom size.

Home made transplant tube

Some plants like corn don’t transplant well (at least according to our experience) because they don’t like having their roots disturbed. To deal with this we use transplant tubes. These are tubes made from newspaper and filled with a growing medium. I strongly suggest if you make your own growing medium that you bake it for a few hours at 300 degrees F. We have an outside oven set up for these types of tasks.

Once you put your seed in the transplant tube it will start growing. When the time comes to plant it, you just dig a hole and stick the whole tube in the ground. The soil moisture will weaken the newspaper and the plant roots will easily grow through it. You have just transplanted your plant without it knowing its been transplanted (i.e. disturbing its roots).

As stated I make transplant tubes out of newspaper. I cut strips of newspaper, the dimensions dependent on how big a tube I want to make, and roll it around a can or jar and then crimp over the bottom.

A couple of important notes. Don’t use a piece of paper so long that you have more than two layers of newspaper wrapped around the outside. I try to keep the length of my paper just long enough to provide about an inch or so of overlap on one wrap.

I place a short fold at the top of the paper to reinforce the “top” of the tube. I make sure the width of the paper is only just enough to give me the depth (or height) of the tube I want + the short fold over at the top + just enough paper to crimp on the bottom giving a complete seal but not too thick. Larger diameter tubes require more “crimp over” material so take this into consideration.

I fill the tubes with growing medium, thoroughly wet it and slightly compact it. The fill height is usually about ¼ inch + planting depth of the seed below the top of the tube. I just eyeball this. I put the seed on top of the medium and then cover it with more medium. Keep a close eye on the bottom of the tubes as the plants will be growing in optimum conditions and they can grow really fast. When you see roots either plant them or up pot them.

Most of my tubes for first starting seeds are two inches in diameter. I have made and use newspaper tubes up to five or six inches in diameter and seven inches tall. The problem these larger tubes have is the weight of damp growing medium can easily burst the side of the tube. You need to handle them with caution to avoid that.

These larger tubes have two benefits that make them worth the hassle. One, they are really cheap, much cheaper than 4” pots. Two, when you transplant the plant, it doesn’t disturb the roots like happens when you pull the plant out of a 4” or 8” pot.


Thank you very much!

I will see about getting some more of these awesome articles dusted off and updated so I can post those also. Time is the big limiter here, the author is insanely busy 7 days a week. I am extremely grateful that he squeezed us in here.

At this point I am going to call this an Open Thread so have at it in the comments.

Death By A Thousand Cuts

As it gets worse and worse, there is no end in sight.

I had to swing across the bridge into Portland yesterday after work and then circle all the way back to the far side of Vancouver to a Wally World before coming home.

I had a couple of things catch my eyes as they popped out of my head.

Right at the I-5 bridge at Jantzen beach there is a shopping center on both sides of the freeway. There is a gas station on the East side I had to drive by.

Regular Unleaded was $4.99 a gallon.

I drove past that as I glanced at the gas gauge which was telling me I had just under a half a tank.

Nope.

Last week it cost me $90 for 20 gallons of gas and that isn’t even a full tank. I figure it’s going to cost me $150 to fill it if I let it go to 1/8th of a tank.

Stopped at a liquor store to get a carton of smokes. I was in there a week or so ago and found the ones I like for $65 a carton. Far and away cheaper than anywhere else.

Not today.

They don’t have them, or anything like them in King size and don’t plan on getting anymore. A carton of Marlboro menthols in King size was $95 fucking dollars.

Newports were $104!!

Are you fucking kidding me?!

I bent over and snagged some smokes because rush hour was just getting started and there was no way in Hell that I was going to drive around in that shit looking for something cheaper. I would have been stuck in bumper to bumper traffic.

Drove clear across Vancouver to pick up the Safety Glasses my new job says I gotta have.

Another $270.

Progressive BiFocal lenses don’tcha know.

That was an expensive hour or so.

I didn’t go grocery shopping with the Wifely Unit last Saturday and I’m probably better off because of it. Week before, one cart of groceries was $300.

The bastards are slowly choking us all to death.

All of us are getting price shocks every time we turn around.

I spend a lot of time keeping up with what is going on.

Everywhere I went on the tubes last night was someone else saying it is going to get much, much worse.

As in 10% inflation, PER MONTH.

We are looking at $10 a gallon milk and everything else is going to go through the roof also.

IF, you can find it.

The ripple effects of the Supply Chain fiasco, the Truckers strikes, the failing Farm production, we are in for a scenario that hasn’t been seen since WWII and the Rationing.

Quit putting it off people, get you a pantry going.

From what I am seeing, there isn’t any relief in sight until AFTER next year.

If we make it that long.

God help us.

Deathray…

3/21/22 6:09PM PST, I got an email from Deathray a few minutes ago, seems he was clearing snow off of his barn/shop about 10′ to 12′ off the ground and fell. He fractured his Right ankle with multiple fractures. He was airlifted to Fairbanks and he said he got some good drugs and is heading into surgery. He said he would update me tomorrow and I will pass that on. Send Prayers and thoughts!

Update: 8:14PM PST. I just got this from Deathray, “Just saw the surgeon. It is not a good situation. It is broken in many places and all kinds of pieces. Waiting for a cat scan. Spend night. He may do a surgery tomorrow just pinning stuff together to immobilize it. Can’t operate for at least a week or two. “

Update: 3/22 2:03PM PST Deathray emailed me and said he was going into surgery about 4:00 PM his time to stabilize his fractures. Said he was okay, bad night with pain. He had a great nurse last night but said the nurse today is an old burnout that should retire.

Update: 3/22 8:01 PM PST. Deathray got out of surgery and said this,

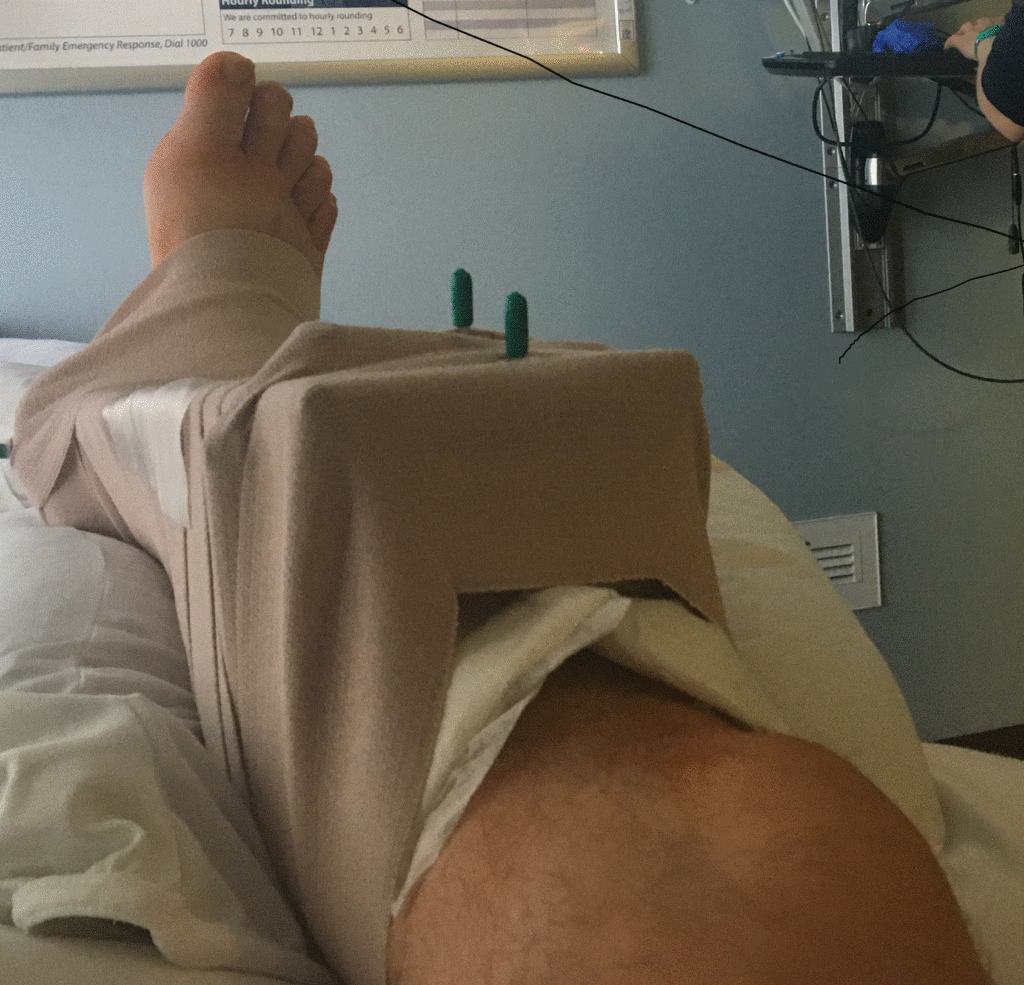
“So I’m out of surgery for the time being. This is some type of carbon fiber box that is held in place by pins that are running through the bones. They finally Gave me good drugs and for the first time since this happened I’m not chewing nails. Dr and I had a talk about that and I told him I wasn’t happy. Neither was he when he saw the swelling under the first cast. I’m thinking that I may actually get some sleep tonight.” 

Update 3/23 11:00AM PST, Called Deathray at the hospital and he is doing a little better, still sore and mostly pain-free, had a heart to heart with the surgeon and nursing care seems to have improved 100%. He is just waiting for the care plan to mature and waiting for a prognosis. He still needs yours prayers and well wishes.

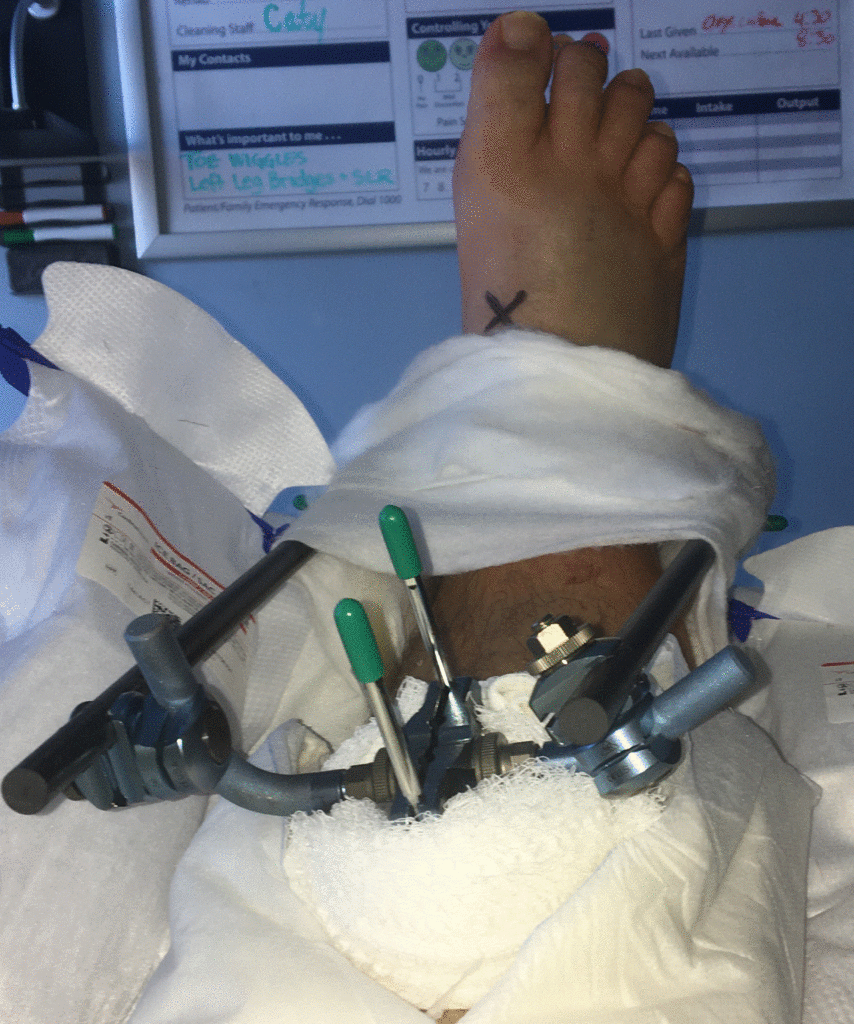
Update 3/23 8:36PM PST They took off the box and we can now see the hardware. Death is saying he is hurting, may be an infection or a reaction to bolts sticking in him…