
Back to the basics.
Some really great news, our Author has found all of the original pieces he wrote on an old Laptop he had forgotten about.
This will make things much easier.
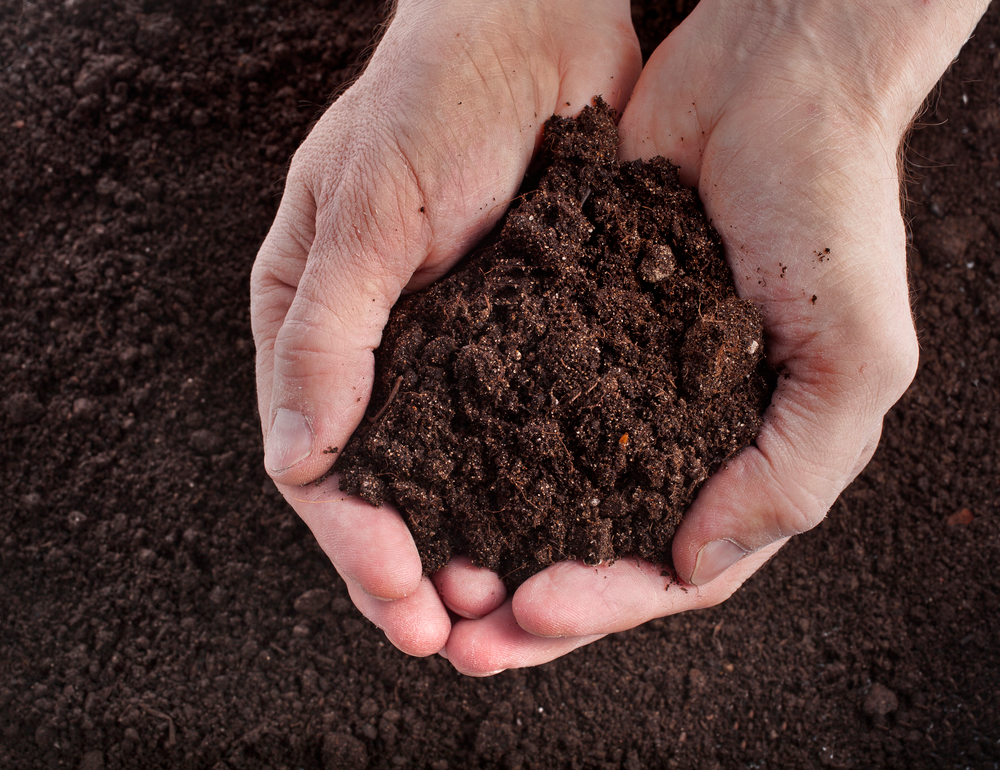
This is important stuff here, the soil you have to use is the very basic foundation of any growing activities.
Crap soil will not grow the food you are going to need.
It can literally take years to supplement bad soil to get it up to optimal condition.
My thanks again to Food Grower for taking the time to share this very important information.
The foundation of it all, this thing called dirt
Hi Ho, Hi Ho
It’s Back to School We Go!!!
Caveat lector: The following is based on my experience, practices, likes, environment, ideas and successes or failures. Folks in other parts of the country, in other garden zones, and with other goals may, and probably do, do things different than I do. I am not telling you, you have to do it my way. This is what works for me. I also don’t know everything and I don’t grow everything. I’ll let you know when you ask me about something I don’t know or don’t grow. I will never try to snow you.
Dirt
It’s all around us, under our feet and buildings, sloping up to touch the clouds, in the air (at least during almond season) and apparently, according to my mother, in my ten year old ears “Land sakes boy, you got enough dirt in them ears to grow spuds. Get in there and wash your face.”
But, what is dirt? I’m not going to go all earth sciences on this but (you knew there was a but coming didn’t you?) we can’t avoid some science and fact finding in our pursuit of understanding our growing medium. This article is long for the simple fact this is complex topic. Even trying to keep it simple it’s still complex.
From the real world perspective of a food grower, dirt or more appropriate for our purposes soil, is a complex brew of bits of rock, sand, clay, silica, humus, organic matter, nutrients, organisms, moisture and microbial life all tangled together in a complex web. In balance this soil web is the root of sustaining life. Out of balance, well just cut your throat, it’s quicker than dying of starvation.
Before I move on I want to explore one of the above items in more detail – humus. A full definition and understanding of humus would most likely run to several pages and even then we would be left with questions. In a nut shell humus is what you get after the organic material in soil is completely broken down. Though characterized as being amorphous (without shape or form) it none the less contributes to the structure, fertility, porousness, and moisture retention of soil. You can feel and smell the difference between a poor soil and a soil rich in humus.
So why am I harping on humus? Humus is a vital part of a healthy soil. Also, though not fully understood, it is considered to be an inhibitor of some soil borne diseases and pathogens. Further, you can make it, as it is the desirable end result of a sound composting operation. Which, hopefully I’ll have the space to discuss at the end of this article.
In the last paragraph I used the term healthy soil. The contributors to a healthy soil are many. We need to understand them in order to determine our soil health and what modifications are needed when our soil health is poor. Until someone corrects me, what I feel are important to know are
– Base soil type – clay, sand, silt, peat, saline or combination thereof
– Essential nutrients – Nitrogen (N), phosphorus (P), Potassium (K), Calcium (Ca), Magnesium (Mg),
Sulfur (S), Zinc (Zn), Iron (Fe), Manganese (Mn), Copper (Cu), Boron (B) and Molybdenum (Mo)
(whew, I think I got most of them, there’s actually 16 in all)
– Organic content and humus
– Insect and microbial life
– pH level
– Moisture content
– Aeration
– Inorganic materials
Soil Types
Knowing your soil type will allow you understand the problems you may encounter when trying to grow food in it. Unfortunately there isn’t a whole lot you can do in the short term to change a poor soil type and even in the long term it can be quite a project. One means of dealing with a really poor soil is the utilization of raised beds and making the soil you fill them with. This doesn’t really change your soil type, just covers it over and I’ve previously dealt with its (raised beds) limitation in a truck garden situation. There are two places we use raised beds in our gardens, one is aesthetics, the other is for perennial plants like raspberries and blueberries as the raised bed provides better drainage. The beds for the berries don’t incorporate any structure to maintain shape and could more accurately be described as mounding.
To help you understand your soil type you can send a sample out to be analyzed by a lab or you can perform an old high school science project (real cheap). Dig down a few inches in your garden and collect between a ¼ cup and ½ cup of soil (more than ½ a cup is a waste and you’ll need a bigger jar). Pick out the bigger pieces of rock and organic debris. Dump this and two cups of water in a quart canning jar. It will help if you use an emulsifier (cheap alternative – liquid dish soap). Four or five drops is all you need. Shake the jar like mad for a minute or two and then set the jar down and let everything settle out. It may take a full day or even a little longer for this to happen. Unless you have a real odd soil you’ll see bands start to form in the jar as your curiosity gets the better of you and you take a peek now and again instead of waiting for the next day.
The layers in the jar will give you a rough idea of the components of your soil and the percentage of each. Small rocks and sand will be the bottom layer. Silt will be next and clay will be on top. If you have a lot of organic material in your sample it will settle at the very top or float on the water. Do not include the organic matter in the following calculations.
It is generally accepted that if 50% or more of the volume is sand your soil is classified as sandy. If over 50% is silt, you guessed it, you have a silty soil. If 25% or more of the volume is clay with a heavy silt deposit you have a clay soil. You can’t test for a peat soil this way and it’s probably true that if you have a peat soil type you already know it. Saline soil is another outlier because it more probably could be labeled a soil condition, rather than a soil type.
So what’s a good soil look like in the above test. If you have somewhere around 40% sand, 40% silt and 20% clay you have a pretty well balanced soil that would be considered a loamy soil. From this we can infer that loamy is not really a soil type, but more a soil blend.
Knowing the soil type will let you understand some of the problems it will give you. A clay soil can take a long time to get irrigated, yet when wet, it will hold moisture for a long time. Due to its density it can be difficult for air and nutrients to move through it as well. Sand has good drainage, probably too good as it will dry out quickly. It also has trouble holding on to the nutrients your plants need to grow. Silty soil is next to a good loam soil for growing but is easily eroded and when dry can be carried aloft by the wind. It can also manifest drainage problems.
Essential Nutrients
To understand the level of essential nutrients in your soil you need to send a sample to a lab to have it analyzed or purchase a test kit and do it yourself. Many of the test kits utilize a small sample of your soil, a chemical and a colored test strip. You prepare the soil sample, put it in water, add the chemical, wait for the reaction to occur and then compare the color of the sample with the test strip to get an idea of that particular nutrient.
Most of us are familiar with the big three, nitrogen (N), phosphorus (P) and potassium (K). The letters in parenthesis are the chemical symbol of the element. Nitrogen primarily drives foliage growth, phosphorus drives root and yield development and potassium helps develop a strong plant structure (stems and limbs) and supports flowering and fruit set.
I don’t want to bore you to death so I’ll just express inorganic fertilizers list each of the above as a three number grouping (i.e. 10,5,5) on the package. Nitrogen is first, phosphorus is second and potassium is third. Basically the numbers indicate how much of each you have in a given quantity of fertilizer. A twenty five pound bag of fertilizer labeled 10,5,5 would have 10%N, and 5% each of P and K. This is approximately 2.5 lbs of Nitrogen, and 1.25 lbs of phosphorus and potassium each.
Some organic sources for nitrogen are manures, worm castings, fish meal, blood meal and soybean meal. You need to be careful using manures to drive your nitrogen because fresh manure can be too hot (have too much nitrogen) and you’ll burn your plants. If you are going to use fresh manures it’s best to use them in the fall and till them in so they’ll have all winter to breakdown or use them on a patch of ground that is going to lie fallow for a year. It’s better if you compost all manures before you use them.
Phosphorus has two basic source forms, either mineral (rock dust) or bone (fish bone meal). The mineral forms last longer in the soil where the bone form is more readily available to the plant. Other organic sources are bat, pig and chicken manure (actually guano with bats).
Organic potassium sources are sheep manure, alfalfa or kelp meal, hardwood ashes and greensand.
A lessor known group of nutrients is Calcium (Ca), Magnesium (Mg) and Sulfur (S). Calcium is essential for building a strong cellular structure in the plant and supports the movement of nutrients to the plant. Magnesium is central to the atomic structure of chlorophyll. Sulfur helps plants with the formation of proteins. Different forms of sulfur perform different duties from an insecticide to altering soil pH. We’re focusing on its use as a nutrient here.
The above six elements are known as macronutrients. The rest of the elements could be considered to be trace elements. Their importance should not be overlooked however. An imbalance of any one of them can give you trouble in the garden. To avoid this article becoming overly long (which it already is) I’ll address them in the comments or another article if there is enough interest.
Once you understand what the various elements do, and by testing, know how much is present in your soil you know how much you need to add to correct your soil. Depending on how you go about amending your soil this can be a little of a guessing game. You have a get out of jail free card if you compost.
Organic content and humus
I’ve previously addressed humus in this article. Other organic content in your soil will be bits of plant residue, woody structure and the remains of small animals and insects. These all contribute to the structure and health of your soil, especially at the microbial level.
Insect and microbial life
A healthy soil will have a whole host of beneficial insects and microbial life that process your soil, have symbiotic relationships with your plants and perform many critical functions converting one thing to another. This is why we can’t overlook the detrimental impact of insecticides when we attempt to deal with insect pests. In many instances we can utilize cultural controls or a beneficial insect to deal with a pest and leave the good bugs alone by leaving the insecticide on the shelf.
pH level
In plain language soil pH is a measure of the acidity or alkalinity of your soil. It is measured on a range from -1 to 14. A pH of 7 is considered neutral. Lower numbers indicate a more acidic soil while higher numbers indicate a more alkaline soil. The vast majority of your garden plants will do well in soil with a pH between 6 and 7. The reason pH is important is because the more acidic a soil is, the more soluble most elements are. Eventually, elements like aluminum and manganese become too soluble, the plant suffers from toxicity and may even die. Highly alkaline soils lock up nutrients and elements and negatively impact the roots ability to take them in, plant health suffers as a result.
It is usually considered to be easier to raise your soil pH than to lower it. Dolomite lime is an effective means of raising the pH. You actually have several ways to lower the pH of your soil. The two I use are acetic acid for a short term response and elemental sulfur for a long term approach. If you can’t find acetic acid use 5% white vinegar instead. I use this in irrigation water to provide a quick response for plants needing a lower pH. It breaks down quickly in the soil though.
Moisture Content
Just as with virtually everything else in your soil, too much or too little moisture will be detrimental to your efforts. Some soils, notably very sandy soils and heavy clay soils, will negatively impact your ability to maintain a proper moisture content. While insufficient moisture content is readily recognizable by wilted plants and fruit drop, excessive moisture can cause problems as well, often long before the plant exhibits any stress symptoms and by then it’s too late. Raspberries are a good example, they like a lot of water but they don’t like to have wet feet. Your soil for raspberries (and many other crops) requires good drainage.
A problem with maintaining a proper moisture content is understanding how much water is required for certain plants. Many times you’ll read something like blueberries require 1~2 inches of water a week. Well how much water is that? The following will help you convert inches a time period to gallons a time period. I have input the following into a spreadsheet that makes it fast and painless to perform the conversions.
First some constants.
1 square foot is 144 square inches. 1 inch of water on one square foot = 144 cubic inches. There are 231 cubic inches of water in one gallon. It takes 0.623376623 gallons of water to cover 144 square inches 1 inch deep
Next calculate the square footage (in feet, dimensions less than 1 foot use the decimal value). Rectangle areas are width X length. Circular areas are pi X radius2 or 3.1416 * (radius squared).
Once you have the area, multiply it by 0.623376623. Then multiply this result by the number of inches of water.
The time period doesn’t matter. If your plant needs 2 inches of water per week you just need to perform the above calculations to figure out how many gallons per week you need to apply. If you water three times a week, divide that amount by three.
The following is for a blueberry plant having a root ball diameter of five feet
((3.1416 X 2.522) X 0.623376623) X 2
((3.1416 X 6.35) X 0.623376623) X 2
(19.94916 X 0.623376623) X 2
12.435 * 2 = 24.87 gallons of water per week.
Aeration
Your plant roots need air. Too much water can drown plant roots, heavily compacted soils will inhibit the movement of air to your plant roots, so can heavy clay soils. If your water problem comes from over watering then you need to cut down on your irrigation. If the excessive water is from another source (too much rain) then you may need to plant in a raised bed, or incorporate drain tiles in your ground. Heavily compacted soils or just heavy clay soils will benefit from amendments that open up the soil. Sand, perlite and compost are three things you can add to improve drainage and aeration.
Inorganic Materials
Rocks and man made waste are probably the two largest components of inorganic materials. Usually size determines whether it will have an impact on your gardening efforts. I try to remove all larger rocks, broken glass, metals and plastics from the soil as I encounter them.
Composting – Your get out of jail free card
There are probably as many opinions on composting as there are people that compost. There are all kinds of systems, bins, amendments, starters and gizmos for sale to help you compost. As far as I’m concerned you don’t need any of them.
When you compost you incorporate materials in a pile and let microbial action break down all the organic material to a rich humus. As stated way up near the top of this article, humus is very beneficial to your soil. A finished compost has a pH of right at 7. Most properly finished composts (somewhat dependent on base materials) will have a NPK of 0.5, 0.5, 0.5, a mild, yet well balanced, amount of essential nutrients. Finished compost will build and feed your soil over a long period of time. It will add to the structure of your soil and improve its drainage and moisture retentive qualities. While these sounds contradictory they’re not.
Composting requires a nitrogen component, a carbon component, oxygen and water. Reading the previous sentence you may get the impression you need four different things to compost. This is incorrect because all organic materials have nitrogen and carbon in their cellular structure and you can compost a single material, it just may not compost as quickly or efficiently as a pile incorporating multiple materials to maintain the proper ratio of carbon to nitrogen. The microbes that break down compost need about 30 parts carbon for every part nitrogen in your pile. You can research various materials to find out the actual carbon to nitrogen ratio each has in an effort to maintain the optimal amounts of each in your pile. I’ve spent time on this in the past but after composting for many years I’ve developed a more or less seat of the pants approach to it.
Rather than keep talking about it, here’s how I compost. I used green grass clipping for a primary nitrogen component. I use chopped wheat and barley straw for a primary carbon component. I use chicken manure for an additional nitrogen component and as an accelerator for the composting process. (you can use other manures)
I put down about a two inch deep layer of grass clipping right on the ground. This is usually spread over an area about six to eight feet wide by fifty feet long. Next I’ll spread about three inches of chopped straw on top of that. Next comes a heavy sprinkling of chicken manure over the whole thing.
Next I fire up my garden tiller and use it as a mobile agitator and run back and forth across the pile until it is mixed. Then I’ll toss on another layer of everything and then till across the pile again until it is thoroughly mixed. I’ll keep this up until my stack is around five feet tall (actually until it becomes hard to keep the tiller from falling off an edge). At this point I stop building the stack. Now comes the hard part. Using heavy silage forks we start rolling the pile to an area right beside our pile. As we roll the material, we spray the new pile we are building, heavily with water. We’ll roll the entire first pile into a new pile wetting every bit of it. At this point our initial work is done. We know we have watered it well enough if we have a little water seeping from the bottom of the pile.
We DO NOT maintain this moisture level throughout the process. After this initial wetting we strive to maintain about a 45% moisture content of the stack. The easiest way to determine this is the squeeze test. If you squeeze your compost and water drips out it’s too wet. It it is dry and crumbly and won’t stay together it is too dry. If you can squeeze it into a ball, no water drips out and it holds its form you have it just right. We will water our stack by spraying the outside of the pile and occasionally by forcing water into the stack. Additionally, every time we roll the stack we will add water as required. After our initial wetting, we usually use a fine misting nozzle for subsequent wettings.
I’ll monitor the stack temperature daily after a couple of days to make sure it doesn’t get too hot (an old long probe meat thermometer works great). I like to keep my stacks at around 140 ~ 145 degrees F. This temperature is high enough (132+ degrees) to kill most weed seeds and speeds the breakdown portion of composting. My max temperature is 150 degrees F. If I reach this temperature I’ll inject cold water to the stack and spray the outside of it to cool it down. Temperatures above 160 degrees F. will kill the microbes doing the work. If the stack temperature starts to run away and I can’t control it by water injection then we’ll roll the stack again. This has the added benefit of aerating the stack.
Once the temperature of the stack drops below 100 degrees F. we roll the stack. The temperature will start climbing again after a few days as the microbes kick up their activity. We’ll continue to monitor and roll the stack until we don’t get a temperature spike after rolling. At this point we leave the stack alone to finish out the process or cure, this period of time can vary from a few months to the next spring. A small tractor with a loader helps greatly in rolling the stacks but be aware you can do it all by hand should it become necessary.
Additional notes on composting
The above is by not, by any means, intended to convey the idea that you have to compost like I do. Composting is a highly complex subject and you can spend an inordinate amount of time in researching the various particulars and what is best for you. I’ve just reached the point in my life and gardening efforts where I just do it as opposed to researching every little aspect of it because I know my method works for me in my environment and soil.
Though we incorporate a lot of different materials from the garden in our stacks we never add any meat or meat byproducts to our stack.
The reason for using grass clippings and chopped straw is smaller particles break down faster. This holds true for all materials added to your pile, especially materials like corn stalks.
If for some reason we feel the microbial action is not as high as we like we will incorporate a layer of soil about ½ inch thick into our above mix ratios. This introduces microbes from the soil to the stack.
Chemicals, such as selective herbicides, may become locked in the material you add to your compost pile. Microbial action on your compost may then release these chemicals into your garden soil having an adverse impact on you growing efforts. Give this some thought if you use weed and feed type fertilizer on your lawn.
Til next time
foodgrower
While not detailed, this is definitely comprehensive. Good advice and information!
Cederq will need to buy some plastic or wax tomatoes to hang from his plants.
I’m glad I started building my soil 40 years ago To this day I have critters grazing and enriching that same soil . But ya know what ? One nearby nuke and it’s all gone ! FJB
one way to get a bit of a head start on soil building, find a tree cutter, ask them to drop off chips . beer helps a lot in this. cold six pack for a load of chips. just enough beer to get back with and hopefully not enough to get busted with.
that and if you can talk the local coffee shop to saving grounds for ya, that is a big win ! and if you have or know of anyone with a wood stove, asked for the wood ash.
wood ash is great stuff, mixed with urine and you have the next best thing to miracle grow. back in the 1980’s some ag school got big bucks from the dept. of state to come up with a way 3rd world shitholes could improve the soil after the normal slash and burn way they did things. wood ash and piss is what they came up with. no shit. this came out in a letter of sorts that we should teach the locals as a way to improve the farming there. did some do gooder shit with sam back then. (don’t ask ) anyway
it seem a bit basic to me, improve the soil and increase the food yield.
horse manure is best to get the old stuff and turn in the soil before you plant anything. grandma let her chickens run thru her garden for the most part.
kept them away from anything that grew red fruit though.
another thing I tried was to use horse manure in one of my rain barrels that I set up for the garden,, like half a barrel worth and drain some of the “water” off the top like to water the plants after they started a bit, seem to work.
I also used raised beds, with wire mesh to keep the critters out. cats and dogs are not good for your garden. cats see a raised bed as a litter box just for them.
dog piss will burn EVERYTHING. that was growing. that and one of them found out carrots grew in the ground and started digging them up for a snack.
a good dog, but I didn’t want him doing that !
the writer is right about the soil, without good soil, you not going to be able to grow food. leaves are good too, just mix green (grass clipping) with leaves (brown) for a good mix. this is something that takes some time to do right and it is never ending too. one more thing, when you find some good info and there are tons of it on the web, either print it if you can or get some copy books from the dollar store and write it down. we all forget shit all the time, having notes to look back on can be a big help. or at least it has helped me out with things like this.
i think I have spent over a couple of hundred bucks on books about this over the years, and after having a few computers crash on me, I rather have the hard copy books on things I need to know about.
just wish my dad was still around as he knew a lot about this stuff, he grew up in the hills where they had to do everything themselves back in the time of FDR as he called it. gardening is going to be the way we will feed ourselves here soon, it is also a way to make friends nearby as well. get people to work together as we will to get thru this coming shit show. back in the city, I used to trade fresh veggies for stuff with the local store, that guy loved fresh veggies ! a bag of tomato’s for a gallon of milk or a pound or two for lunch meat. no shit !
like everyone else here, just trying to get by in a world we don’t understand or know anymore. wish you guys and gals well in the coming madness.
just wish I had the room to grow barley though,,, already know how to make the still. oh well.
I would only use wood chips in the walkway, not on the vegetables themselves. Wood chips do have nitrogen , but, they also are carbon and that locks up your nitrogen for the first several inches while it’s trying to decay. Those first several inches are where you’re trying to get your roots of your vegetables started.
I burn 4 cords of wood a year and my mineral content is high in my garden soil from the wood ash.
Rest of the advice is pretty solid.
one more thing about beer bribes, use a good beer, not bud !
I had great luck with molsen and other good beers.
this I found out from the tree guys, so I started keep a few six packs in the basement fridge as it is set up a bit colder than the upstairs one.
the look on their face when they open a ice cold beer on a hot day is worth it, and they remember to bring chips !
hey, they have to dump them anyway, so. if they can get a cold beer for their trouble. seems to work out. they also dropped off some firewood time to time as well. always a good thing ! bribing guys with cold beer always works or it has for me so far.