I can’t believe I didn’t remember about these things!
I have been racking my brain for over a freaking MONTH, trying to figure out how to mount the 220 Volt motor that an EXTREMELY GENEROUS reader gave me, ALONG WITH a freaking VFD, underneath the bench to upgrade my Smithy 3 in 1 machine with.
Over a month actually.
The poor guy probably thinks I forgot all about it.
Not by any stretch of the imagination actually.
As we all know, I have been busier that a one armed paper hanger in a hurricane but this little issue has been there in the back of my mind, tickling my subconscience this whole time.
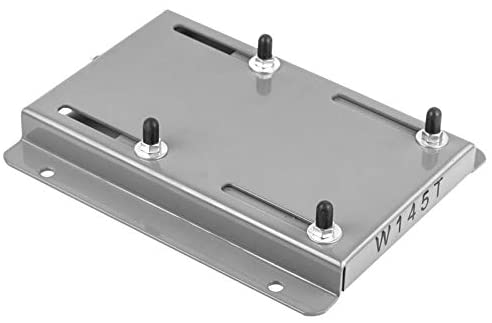
As I was searching for something completely unrelated, I stumbled across this mounting bracket that you can just freaking buy, to solve this very problem!
$45 plus whatever that prick Bezos wants for shipping, it’s already ordered as I type this.
When it gets here, it will be a matter of taking some measurements and welding two pieces of flat bar across the back of the bench to the uprights , drilling a couple holes and mounting the bracket!
Since the adjuster is already built in there will be no muss and no fuss.
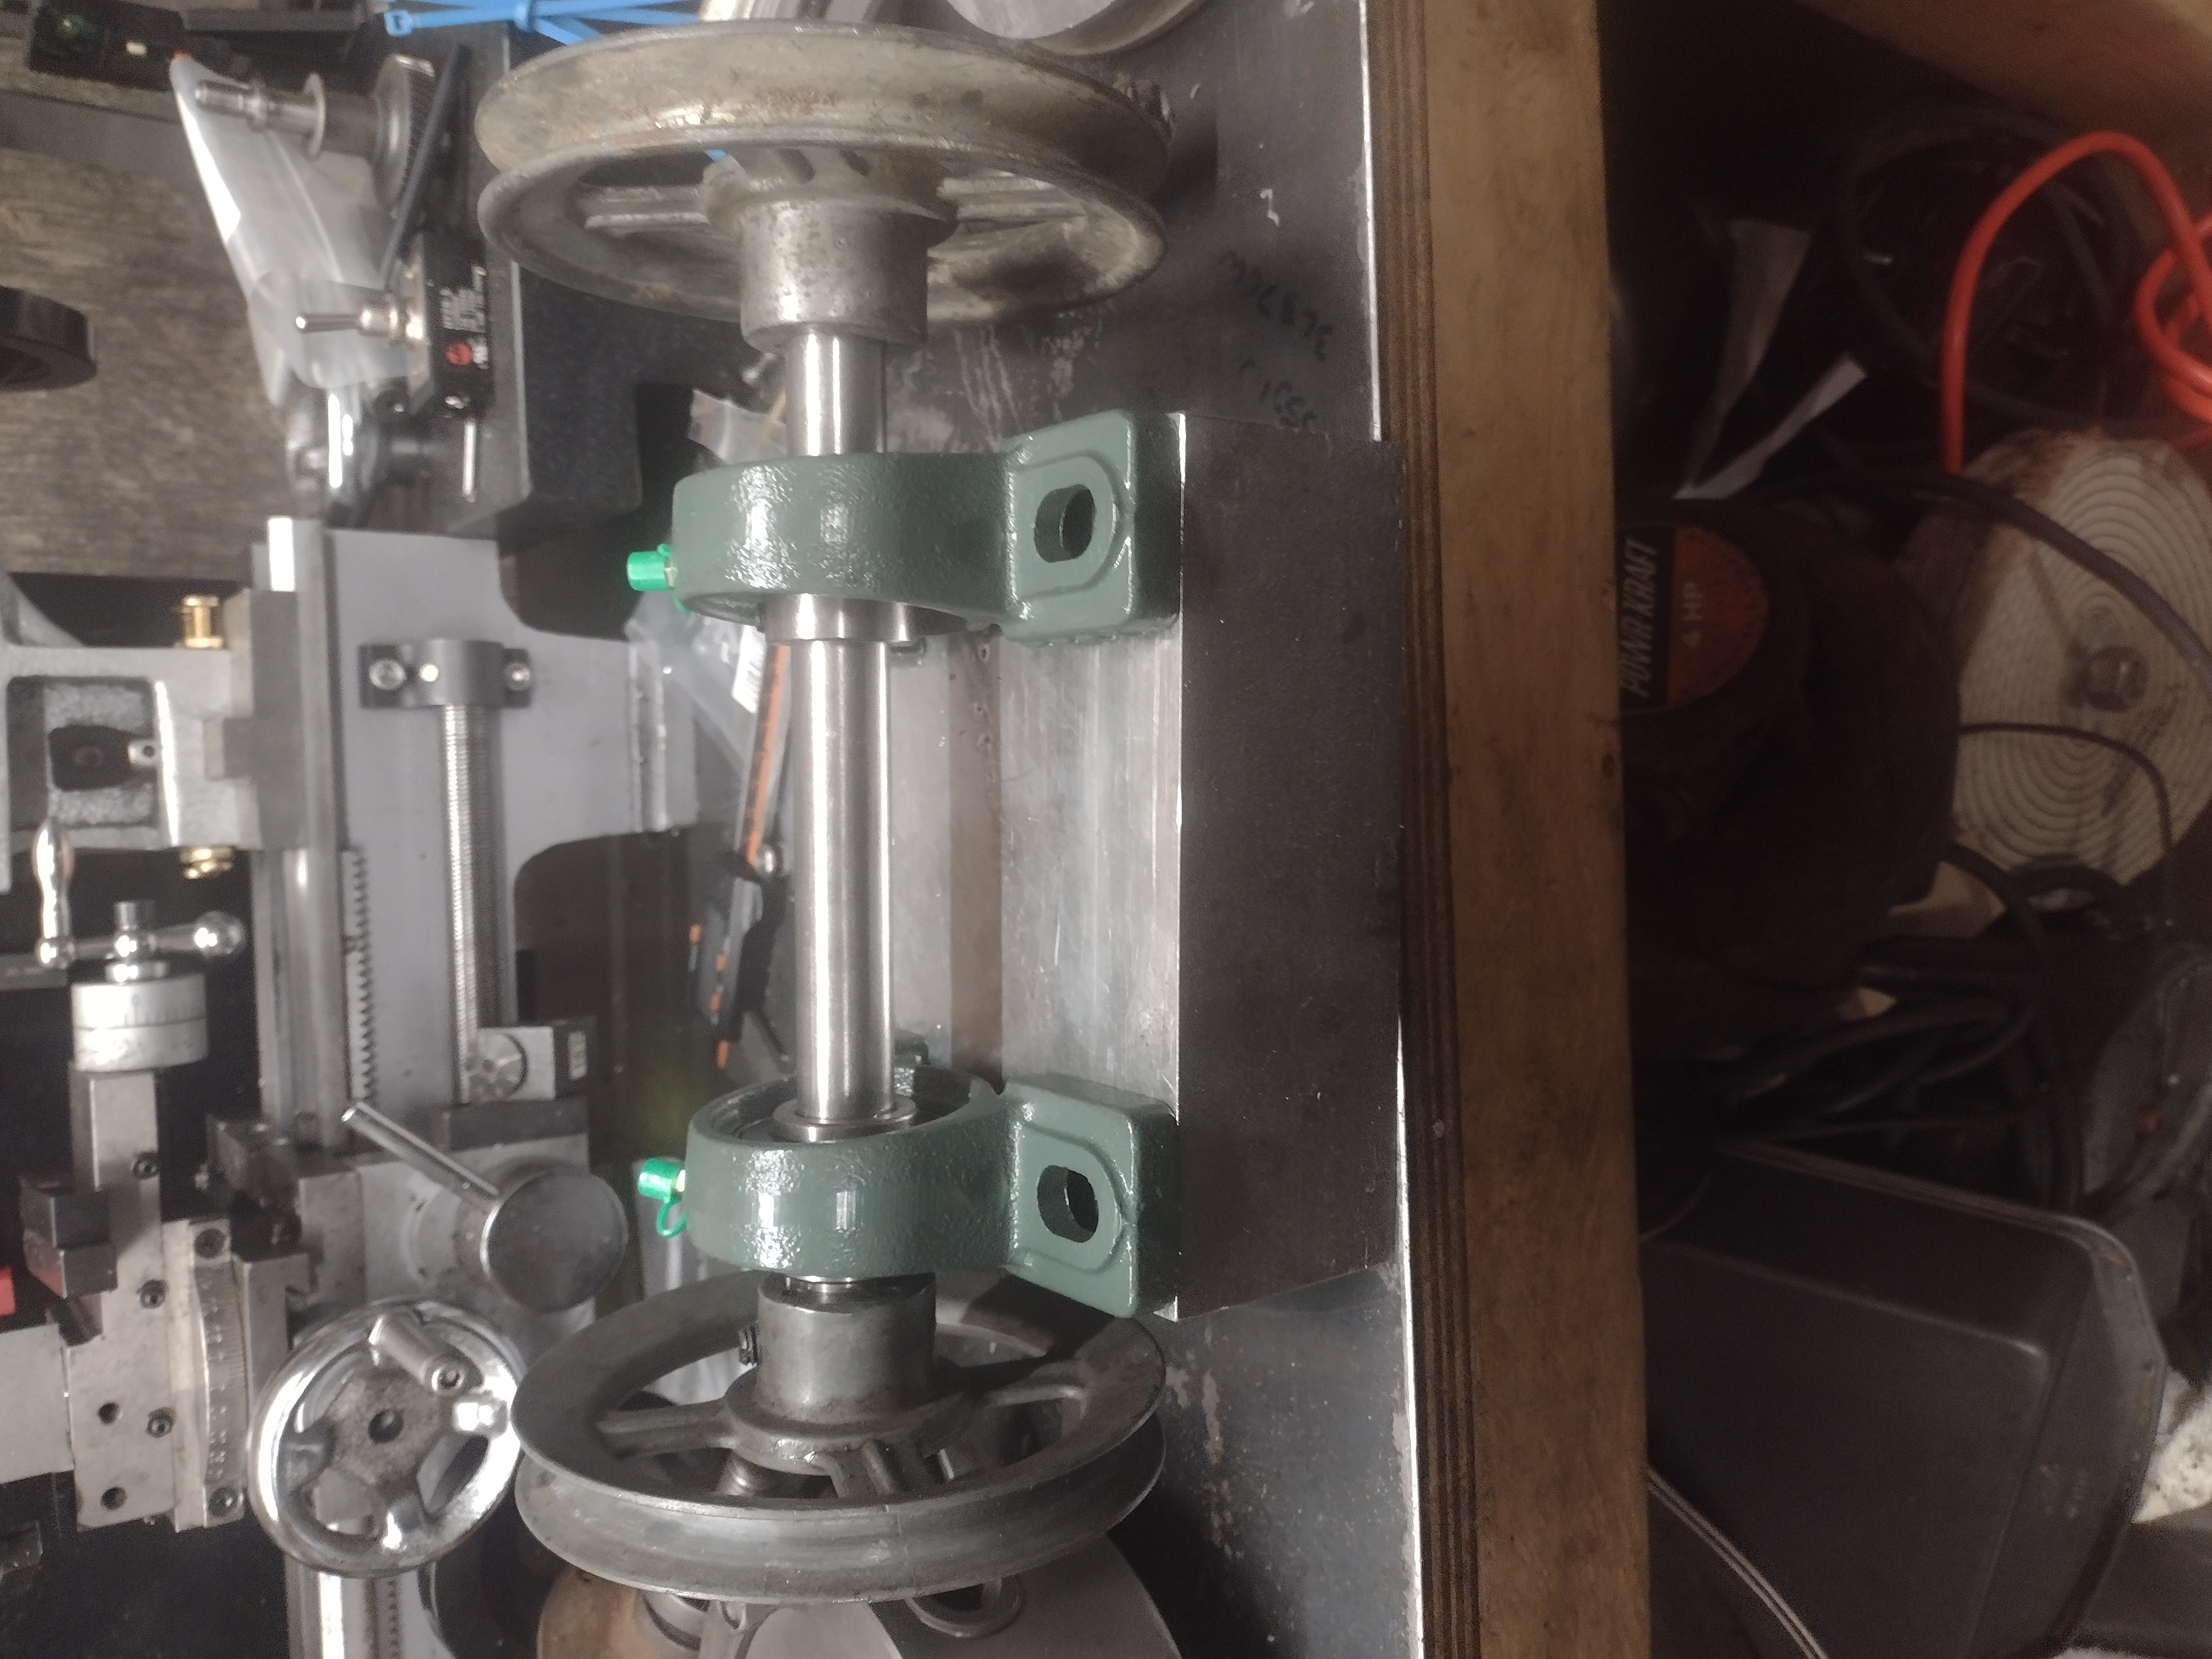
After that it will be figure out which pulleys I need for this thing,
cut a hole for the belt, drill some holes to mount the block, figure out where I want to mount the vfd and done!
It will be at least a week before the bracket assembly gets here, don’t worry, I have more than plenty to keep me busy in the mean time but I am stoked that there was such a simple cure for my problem.
My very sincere thanks to the author for continuing to send me these files so that I can share them with you.
I will put links to all the previous articles at the bottom so that you can go back and save these critically important files.
Cutting / Suckering / Layering / Grafting
We’ve taken a look at collecting and starting plants from seeds but many garden plants don’t use seeds as a primary reproductive means. These are methods of plant propagation where we don’t normally grow the plants from seed or it’s easier or more economical to propagate them using one of the above methods than growing them from seed. These methods also circumvent the inbreeding depression issue. In some cases plants can be propagated using more than one of the above methods, grapes are an example where they can respond equally well to layering, grafting and cutting depending on the growers objective.
Huge volumes of written material exist for each of these. The following is intended to make you aware of the subject, not become an authority on the subject. You should view the following information as a starting point for your own research.
Cuttings Of the plants we grow (as in our personal garden, not the royal we) the ones we propagate by cuttings are potatoes, blueberry plants, rhubarb and horseradish. In tropical regions there are many plants used for food that can be propagated by cuttings but these are outside my knowledge base. There are also many ornamental plants that are propagated in this manner but being a non food plant they are outside the scope of this article.
With hardwood plants like blueberries success in rooting cuttings comes from understanding the types of stem cuttings. There are four and they are herbaceous, softwood, semi hardwood and hardwood. These terms represent the growth stage of the host plant material and is key to whether the cutting successfully roots.
Two of the stages, semi hardwood and hardwood are our focus for blueberries. Semi hardwood cuttings are taken from current years growth as it is nearing full maturity. This growth resists bending and breaks when stressed. The best time to make these cuttings is mid July to fall. Hardwood cuttings are taken from dormant, fully mature canes or stems. Hardwood cuttings are very firm, don’t bend much before they break. The time to make these cuttings is late fall through early spring. Most of the time we utilize semi hardwood cuttings because the environment is more moderate than in the dead of winter and we seem to have better success with cuttings that are a little more supple.
Before we continue I suppose I should mention the three types of cutting cuts, they are straight, mallet and heel. The most common is straight and it is just as its name implies, a straight cut across the stem. This is the cut we use in our blueberry cuttings and is the one you’ll be most likely to use.
A couple of general notes about propagation by cuttings is to make sure you select healthy, unstressed, disease free host plants. Try to avoid plants that you have recently fertilized. Also, make sure your cutting tool is sharp (razor sharp) and sterile to avoid the potential of spreading disease. A mixture of one part bleach to nine parts water is a good solution for sterilizing your cutting tool before you make cuttings. If you are not positively sure about your plant stock being disease free, dip your knife blade between every plant (preferably between every cutting) to avoid the potential of transmitting disease among and between plants.
For our blueberry plant propagation we take cuttings of semi hardwood from our plant about three or four inches long near the terminus of the cane. I like to select canes slightly smaller in diameter than a common pencil. If your cutting is carrying a load of leaves, strip off the lower leaves leaving only two or three at most. It is important to keep the cuttings moist until you have them in your rooting medium. I’ll generally use a damp towel folded over on a cookie sheet and slip the cuttings between the folds.
You’ll want to put your cuttings in a low fertility sterile medium with good drainage. I use one part masons sand (available at most any building supply), one part peat and one part perlite. I do take the time to bake the sand for around an hour at 200~300 degrees before I use it (be sure to let it cool before you use it) to ensure it’s sterile. I put this in trays three inches deep and wet it well. You should do all this prep before you take your cuttings.
The cuttings are then dipped in vitamin B12 (helps promote rooting, there are other rooting aids) and then placed about an inch to one and a half inches into the growing medium. If you make multiple cuttings from the same stem make sure you insert them the right way up (buds or leaves pointing up), and yes, this is a fairly common mistake with cuttings. The spacing between the cuttings should be far enough apart to allow sunlight to reach all the leaves of all the cuttings. Keep the cuttings and growing medium moist but not saturated. It’s better to mist them a couple times a day than to soak them every few days. If you can avoid having the cuttings in a high temperature area with 65~85 degrees F is about ideal.
Roots should begin to form anywhere from two weeks to two months depending on conditions. Once roots form we plant our rooted cutting in pots and up pot them a few times before we set them out. The largest we’ll go with up potting is one gallon pots. Don’t loose sight of the fact that blueberries are an excellent container plant to raise. In our experience you’ll want around a seven gallon planter at a minimum if you are going to container grow them. In extremely cold environs you may need to protect the pot from freezing conditions to avoid damage to the roots.
Cutting potatoes for seed pieces involves cutting the potato so there is at least a king eye on each piece. Personally I like to have at least three or four eyes on each seed piece. You can also grade your potatoes so you are using single drops as your seed. These are small potatoes around three quarters of an inch to two inches in size that are planted whole not cut, I lean towards single drops around an inch and a half in size when I use them. You cut seed pieces just prior (two or three days max) to planting. Probably the biggest mistake I see, when people are unsure of what they are doing, is to cut the seed pieces too small. You need to have enough potato to feed root and sprout growth and avoid having rot spoil the whole piece. Once you cut your seed pieces you need to leave them out to ‘skin over’ the cut. If you immediately plant your cut seed pieces you have a high potential for the seed piece to rot. You can use a material like Captan to coat your cut seed pieces and this is what I used back when I raised seed potatoes. It is not an organic control and it most likely will not be available after a collapse so it’s better if you just let your pieces skin over.
With rhubarb you need to carefully dig up the plant or a portion of the plant root. Clean most of the soil away from the root and then using a sharp knife split the crowns. These are readily recognizable as they will terminate in a bump at the top of the root ball. I generally try to encompass at least three crowns and a healthy portion of root for each cutting. Remove any portions of the root and crown that doesn’t look healthy. I let my cuttings skin over for about a day before I plant them.
Horseradish is very similar to rhubarb except you also have the option to make root cuttings as well as splitting the crowns. Root cuttings will be pieces of the side roots about six inches long about as thick as a pencil. I’ll be honest with you, I have better luck with splitting the crown than root cuttings.
Suckering Think raspberries and you have suckering in hand for most cane berries. Propagation with suckers is quite easy. Dig a sucker a safe distance from the main root of the plant (with raspberries I usually maintain a minimum distance of 14~ 20 inches). You can either bare root your suckers or keep some soil around them. If temperatures are high or the wind is blowing and you decide to bare root them, have a bucket of water close by to drop them into. I prune my sucker stock back to no more than 18 inches tall, then I dig it. Usually I maintain soil around the root, and in my garden as soon as I dig a sucker I plant it. It means a little more walking between source and planting rows but the transplants do much better the sooner they are stuck in the ground. I try to select suckers with canes between a quarter inch and half inch diameter for planting.
Just as with everything else, select the healthiest stock you have. I plant suckers in the early fall or late spring with early fall being my preference. Planting in the fall will give you quite a bit of jump over planting in the spring. There is an old gardeners adage for many perennials that goes, year one they sleep, year two they creep, year three they leap. Raspberries certainly follow this pattern. The first year you plant them most their energy will go to the root. They will send up a few primocanes. The second year they will send up more primocanes and you should notice a substantial amount of suckering going on. The third year you have a nearly mature planting that will require some maintenance but that is a topic for another article.
Layering Layering is similar to suckering except the roots are usually forming on the opposite end of the cane. Marionberries are a perfect example of a good candidate for tip layering. In late summer cover a portion of the primocane near the end of the cane with a light covering of soil. It doesn’t need to be a very large area that you cover. The plant will start developing roots at the covered area. Once roots have formed you come along and cut the cane off behind the roots and you have a new rooted cane for starting a new plant. Our Marionberries are so aggressive in layering that I seldom have to bother with covering any of the cane to have some of them root and every year I have rooted canes I simply cut off and dispose of. If the stem of the plant species you want to layer is too stiff to lay along the soil you can use pieces of wire shaped as large staples to hold it down.
Runners Plants like strawberries send out runners galore. At some point the runner will form a daughter plant. Often times the same runner will form more than one daughter plant. It is our practice to cut off all the daughter plants behind the first one. This increases the amount of energy it gets from the mother plant and helps keeps our beds from becoming overcrowded. Once the runner forms a daughter plant that develops roots, you cut off the runner and transplant the daughter plant. This is a very easy propagation method in that the grower doesn’t need to do anything until the new plant has formed. We usually let our plants overwinter and then plant the daughter plants in the early spring.
Grafting Grafting is a means of growing a desirable yield of one plant on the rootstock of another. Apples are a great example of this and I can remember as a youngster going to my grandfathers house and he had several varieties of apples all growing on the same tree. Grafting involves placing a scion (a healthy, dormant piece of the last years growth having from one to four buds on it) underneath the outer bark and into the cambium layer of another rootstock plant. In most cases spring is the best time to graft. There are several methods of grafting and tons of material that include diagrams available on the web so rather than duplicate that effort here I’ll let you use your favorite search engine to explore this topic more. Do take note of the fact that you can’t graft between different species, you need to graft apples to apples, pears to pears, grapes to grapes and so on, apples to pears won’t work. You are always welcome to hit me up in the comments section if you want.
Here are the links to all the previous articles to date.
Once again my apologies. There just aren’t enough hours in the day sometimes.
This one is at least a week late.
Saving Seeds
Again, this is what we do, other folks will most undoubtedly do it differently than we do, and that’s ok. It is also beyond the scope of these articles (and my knowledge or gardening experience) to cover every plant grown for food, in fact I’m only going to cover a few broad groups of plants in this article. It is my hope that this information will spur you on to perform your own research and build your own knowledge base.
Processing Seeds The general procedure we follow is to collect the seed, open air dry it (thoroughly), refrigerate it, then freeze it.
Collection and Drying Because we marked the plant, limb or specific fruit we were going to use for seed it is a fairly simple matter to avoid harvesting our seed plants until we are ready to collect our seed specimens for processing. Hopefully you’ve done the same so you know what you are saving. Regardless which species of plant we are collecting all collected seed goes into individual containers marked to indicate their genealogy.
During the collection process you will want to evaluate your seed plants and reject any that have undesirable traits. Lettuce that bolted early would be a good candidate for rejections because you want to propagate plants that stand well. A badly formed and small pepper would be rejected over one that has good conformity and size. Just use some common sense and you’ll do fine.
You can loosely group your plants into two groups for seed collection, wet seeds (tomatoes, cucumbers, watermelon and squash for some examples) and dry seeds such as onions, beans, beats, corn and peppers (there are exceptions such as Tabasco peppers but they are still treated as a dry seed). Wet seeds need to be washed before they are dried.
With peppers (both sweet and chili) we pick the whole pepper and then slice through it from side to side. We do not remove the seeds yet. We then hang the peppers to dry. For some reason and I’ve never bothered to research it, we have better success from our pepper seeds if we let them dry in the pepper pod before we collect them. The purpose in cutting through the pod is to allow a more even and quicker drying.
Pole beans and corn present a little problem for us in that the weather usually turns before they have the opportunity to completely dry on the vine or stalk in the garden.
With beans our solution is to cut the bean vines off just above the ground and then hang the whole vine(s) in the shop to finish drying. As the bean pods mature they will turn from a rich green color to a brownish white (at least the varieties we grow) and have a leathery texture to them. We usually cut them off at this point to avoid the wet fall weather wreaking havoc on them. They are not ready to harvest for seed until the outside of the bean pod is dry and crumbly. This is also the method we employ for the beans we raise for dried beans.
With corn we leave the ears on the stalk until the last possible moment. Corn for seed needs to mature far longer than the corn you harvest for eating or preserving. You will need to protect these ears from damage by animals as they’ll be some of the last things for them to forage on in your garden. Once we harvest them we’ll strip the husks back to the base of the cob and then string them up to finish drying. They will be ready to remove from the cob when the kernels have pulled back from each other and you can easily remove them from the cob. We test with our thumbnail as well. If we can leave a crease in the kernels they need to dry longer. Once they are ready for removal from the cob we strip them by hand into individual containers.
Tomato seeds require some further processing in that we ferment our tomato seeds. Fermentation is not required to store tomato seeds but we have much better success in storing seeds when we do, enough so it’s worth the extra effort. Fermentation offers the benefits of killing some of the bad bacteria that can spoil seed, it mimics what happens in nature when an overripe tomato falls to the ground and rots thereby removing the germination inhibitors present on the seed. Another benefit to fermenting tomato seeds is during the fermentation process bad seeds will generally float to the top while good seeds will sink to the bottom. This isn’t 100% true but close to it and every little bit helps, especially when you go hungry if your efforts don’t pan out.
The lazy mans method of seed fermentation – Take an overripe tomato, scoop out the seeds and all the surrounding goo into a shallow container. Remove the big chunks of pulp and flesh. Pour remainder into a glass jar. Add distilled (or at least non chlorinated) water to about an inch or so above the seeds. Place a jar lid (minus the ring) on the jar and let the whole mess set for a few days in a warm location. A light colored/white film will begin to develop on the surface. This tells you the fermentation process is working right. After a few to several days, we usually let it go until the film is fairly substantial, pour off the film and the fluid underneath it leaving just the good seed behind in the bottom of the jar. Wash the remaining seeds in a fine mesh strainer or piece of screen and place in a labeled container.
Tomatoes are about the only wet seed we ferment. With cucumbers, summer squash (and relatives) we leave the fruit on the plant until it is way beyond overripe and actually beginning to rot. It is at this point we collect the seed and wash it.
With pumpkins and winter squash we don’t collect the seed until we get ready to use them for food so they may not get processed for seed for a few to several months.
Plants like beets, carrots and onions can drive you crazy collecting the seed because they are biennials. You’ll either need to heavily mulch the beets and carrots in place in the garden to keep them from winter freeze damage or carefully dig up some mature plants and overwinter them in trays of clean sand (kept above freezing) for replanting the next season so they can flower and produce seed. Once beets have gone to seed you can collect the blossoms to dry. Once dry rub them between your palms separate out the seed. For all intents and purposes carrots are identical in process. It can take between forty and sixty plants at a minimum to maintain genetic diversity. Onions for seed can be stored just like the rest of your onions, just keep track of your seed onions so you know what ones to plant next spring. Once they flower and have gone to seed cut the flower pods off the top the stalk and then drop the flower pods in a brown paper bag to finish drying.
Once you have collected your seed it is essential that you thoroughly dry it. Some seed such as beets and onions and mustard have a dried seed once you strip them from the spent flowers. Others such as peppers, tomatoes, cucumbers and so on get placed on drying racks and are air dried. As far as timing goes several factors can affect how long they are on the racks. I’ll let them go until I think they are dry then give them another week or two just to make sure.
Some plants you will want to grow will not have seeds but tubers you’ll need to collect. Potatoes are the perfect example. When you dig your spuds lay them out to dry. Do not wash them. After a few days of drying and hardening store them as you usually would. Keep in mind that potatoes break dormancy once they get above 47 degrees F. We usually will grade out the tubers we intend to use for seed and store it apart from our eating potatoes. You do not want to let your potatoes freeze and storage temperatures near freezing can lead to several other problems involving the conversion of starches to sugars and the reverse.
Refrigeration and Freezing A lot of folks just store their seed in a dark, cool and dry place. We employ some extra steps. After our seed is completely dry we’ll refrigerate it for a week or two and then we freeze our seed. We believe refrigeration and then freezing mimics nature and the refrigeration period helps the seeds go completely dormant. We place our seed in manila envelopes, labeled with year and genealogy, then in a partitioned cardboard box. We then wrap a black plastic trash bag around the cardboard box and close it with a twist tie. We have been able to germinate seed that is ten years old using this method of storage.
A few notes on our methods:
You can not dry your seed in sealed containers, the moisture needs somewhere to go.
We differ from a lot of folks in that we don’t store our seeds in airtight containers.
You need to dry your seed before you freeze it. Otherwise you’ll rupture the cells walls and your seed will not be viable.
If we ever lose the power grid we’ll go back to storing our seed in a cool, dark, dry place and just not store it for as long.
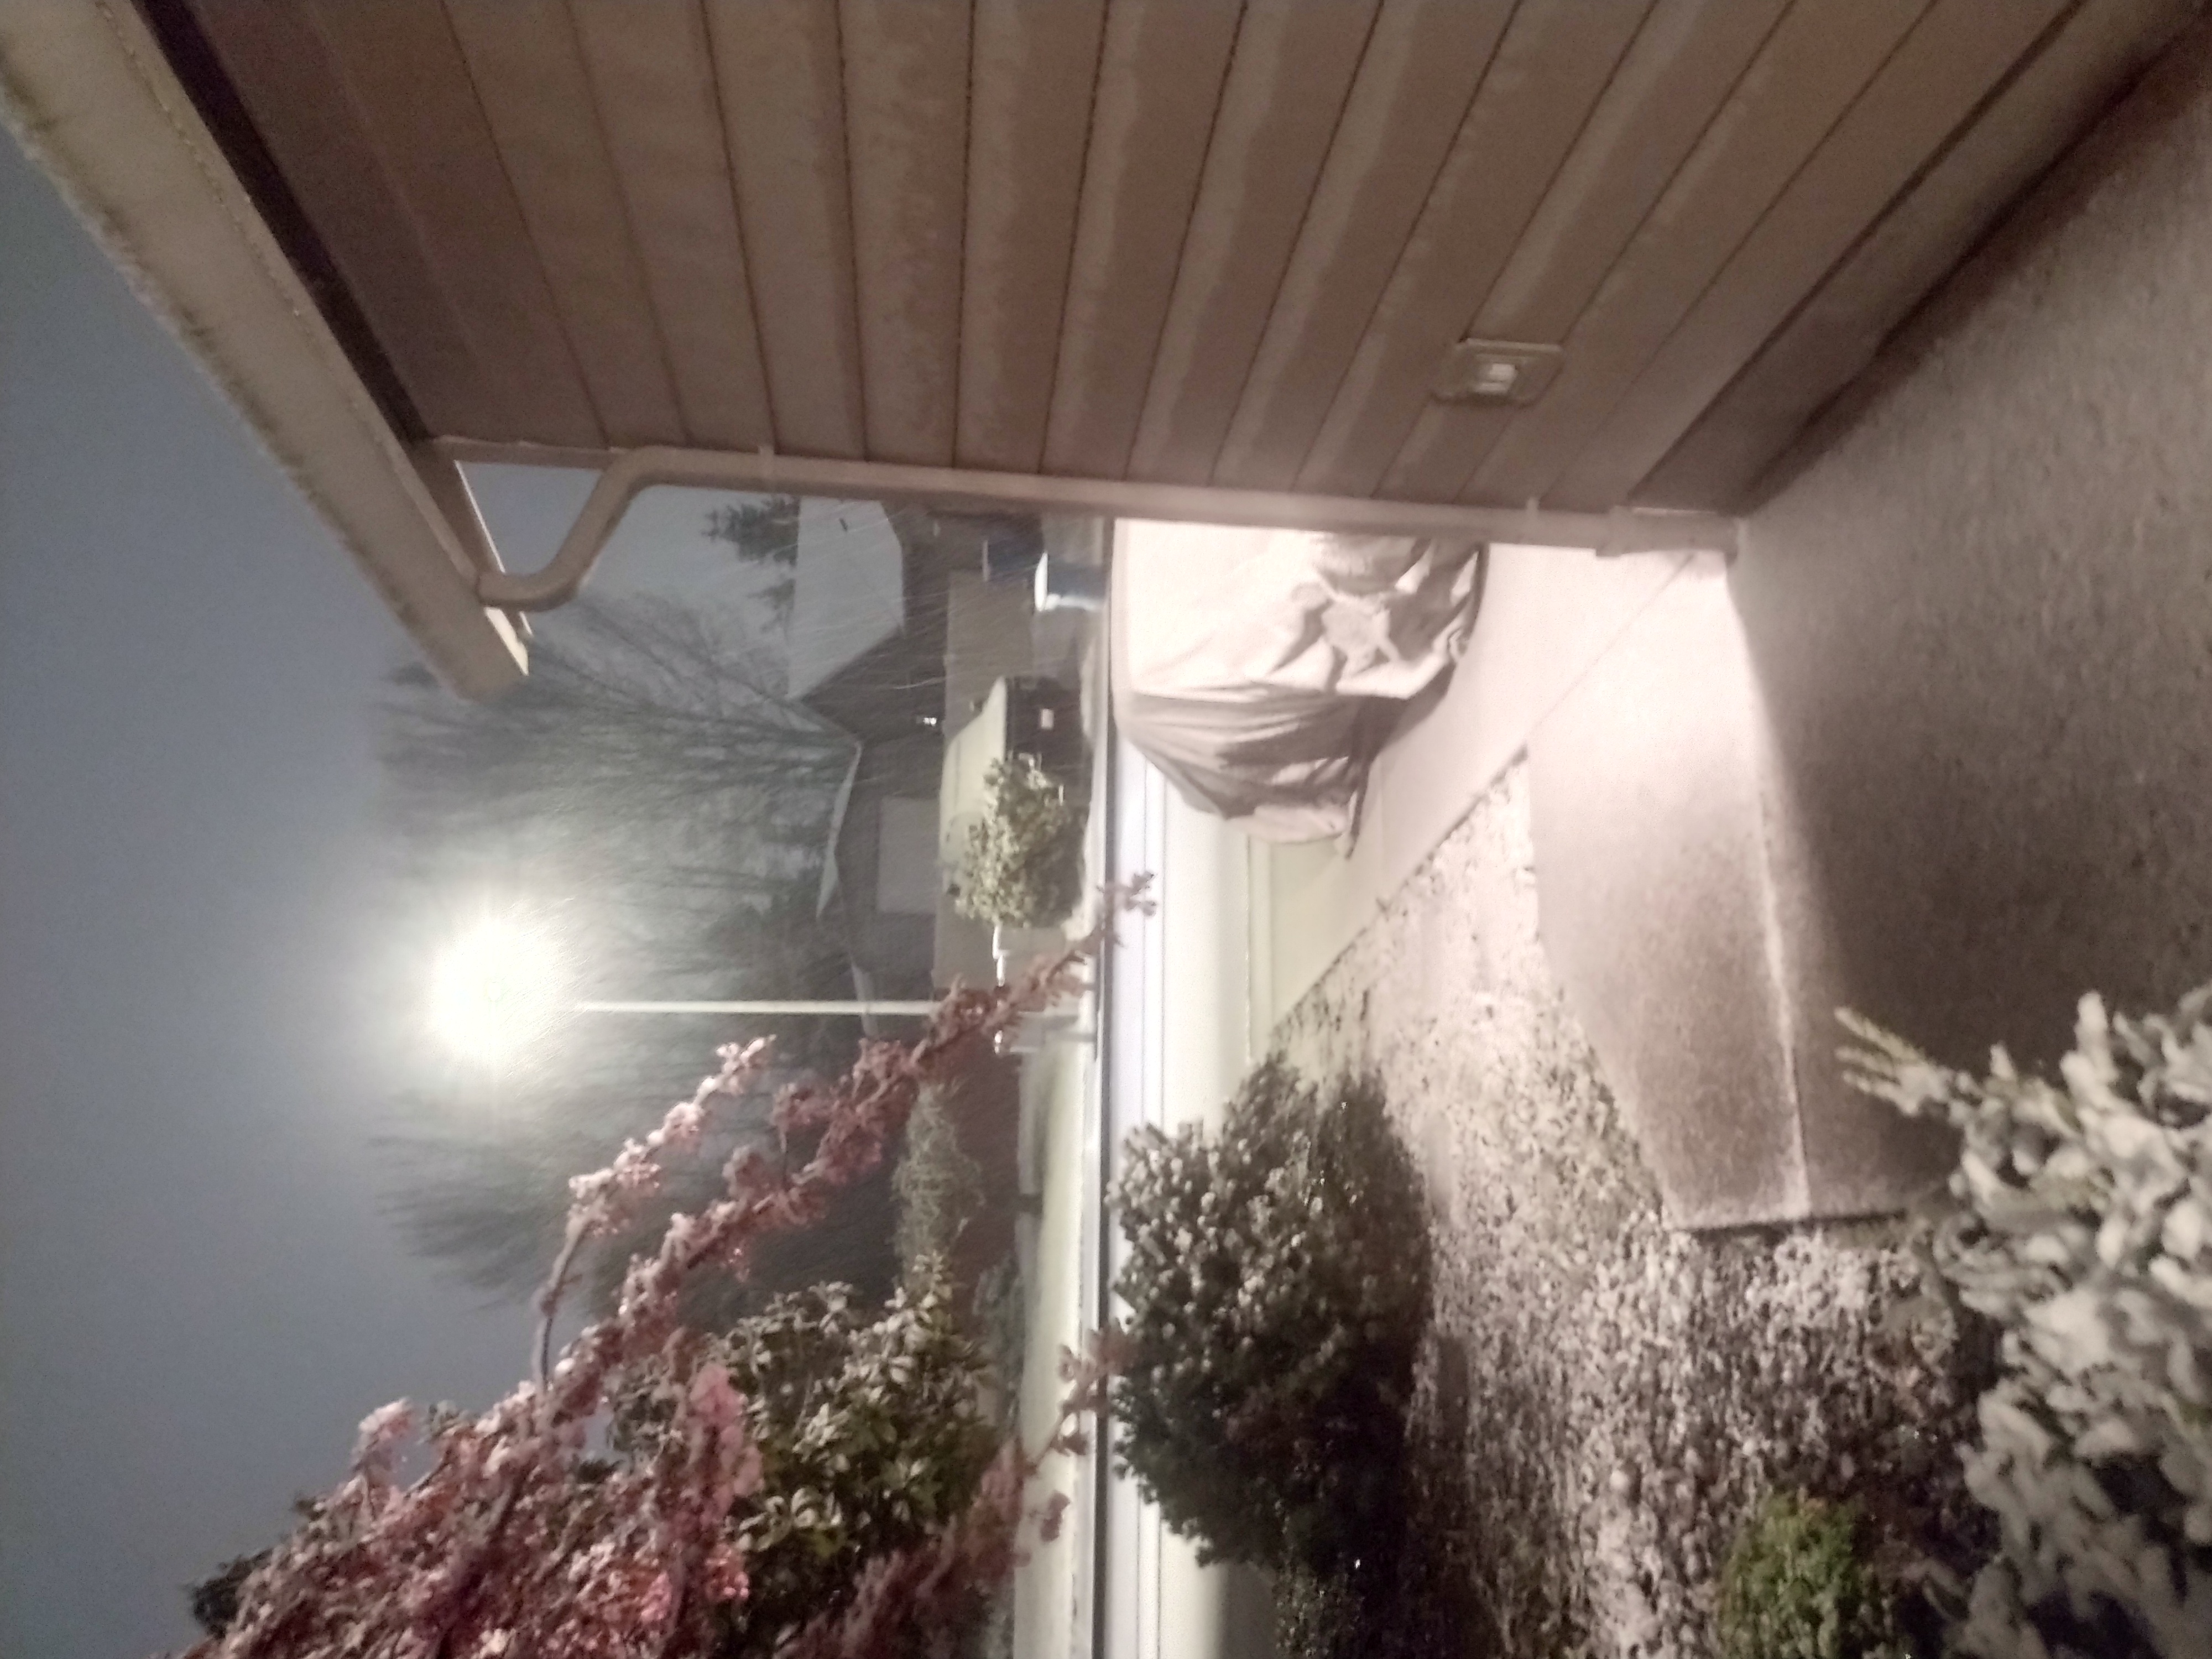
Went out to have a smoke with my coffee before work and found this.
And it’s still coming down.
The back tires on the truck are overdue to be replaced as is, they spin just pulling away from stop lights when it’s wet and The Wifely Unit was supposed to drive over to Sandy to take care of her Dad for the week.
That ain’t gonna happen now. I will probably wind up taking her and dropping her off after I get home.
Assuming I can get to work and back. There are going to be unlimited morons out there, I can feel it.
I gotta go.
Thanks again Grog, the insulated coveralls have been broken out. I am leaving way early to give myself plenty of time.
April 11th and it’s snowing.
The next asshole who opens his mouth and Global Warming comes out…..
I got a text message from one of the Sister In Laws this morning at 0830 stating that the battery in her car was dead.
This is the same one who was complaining about her battery a week ago.
She is obviously not smart enough to take care of this on a Saturday, her day off, when most places are open, eh?
No, let’s wait until Sunday Morning and then call Phil and make it his problem.
Fuck me runnin’, this is why it’s illegal to bitch slap people.
Because it should be legal in instances such as this.
It starts out with her wanting to know if there is anybody, on a Sunday mind you, that will come to your house and change out a battery.
WTF?
The ONLY outfit that I know of that does that shit is Triple A.
Fuck no, she don’t have that, of course.
After I explain that, I tell her that Auto Zone will change out your battery in their parking lot if you can get it there.
Of course this still means that I have to drive the fuck over there and jump start the fucking thing.
I thought about all this for about ten whole seconds and said fuck all this bullshit, I’m not dealing with the potential of the thing dying on the way over to the nearest Auto Zone, or them not having the right battery and then me having to go jump start the fucker again, I’m just going to go buy a fucking battery, drive over there and change the motherfucker out in her damn driveway, because again, she is too fucking stupid to take care of this shit on her own.
Now the Wifely Unit chimes in and calls me stupid for doing this and yadda yadda yadda.
Fuck this noise, see ya later.
I go get the battery, drive over there and the very first thing thing I get to do is fuck around with massive corrosion on the hold down clamp, then clean the gross terminals, swap the fucking battery out, test the charging system, have her start it and shut it off and have her try it again.
Nothing.
Not a click, nothing.
I check the connections and they are good. The battery is good, try it again.
Vrooom, it fires right up.
Repeat this a couple of times and it did it again but then started right up on the second try.
Then it started up several times in a row.
I dunno if she has an ignition switch acting up or if she just wasn’t pushing the clutch pedal down far enough.
Either way, I tells her I am done here.
The old battery was older than shit and it was definitely bad so it needed changing either way.
Of course I chewed her ass for not taking care of this shit yesterday and waiting to dump it in my lap on a Sunday morning.
Like I don’t have enough shit to deal with.
She ate the core charge for my trouble so there is that. Then she did pay me in cash for the battery.
I told her flat out that if she has anymore trouble with the fucker that she is on her own. I absolutely do not have time to fuck with it.
After I got back from Horror Freight earlier, I drug out a bunch of tools and “shop consumables”, you know, those things you get charged out the ass for by repair shops like rags, brake clean, that kind of shit, and went at it.
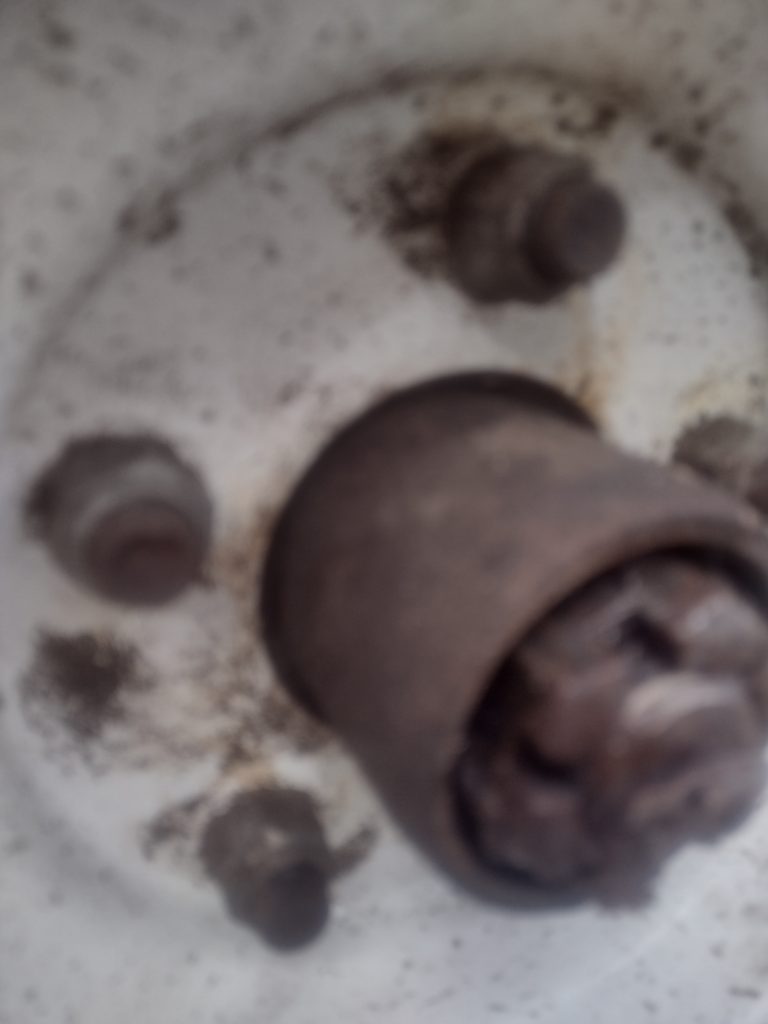
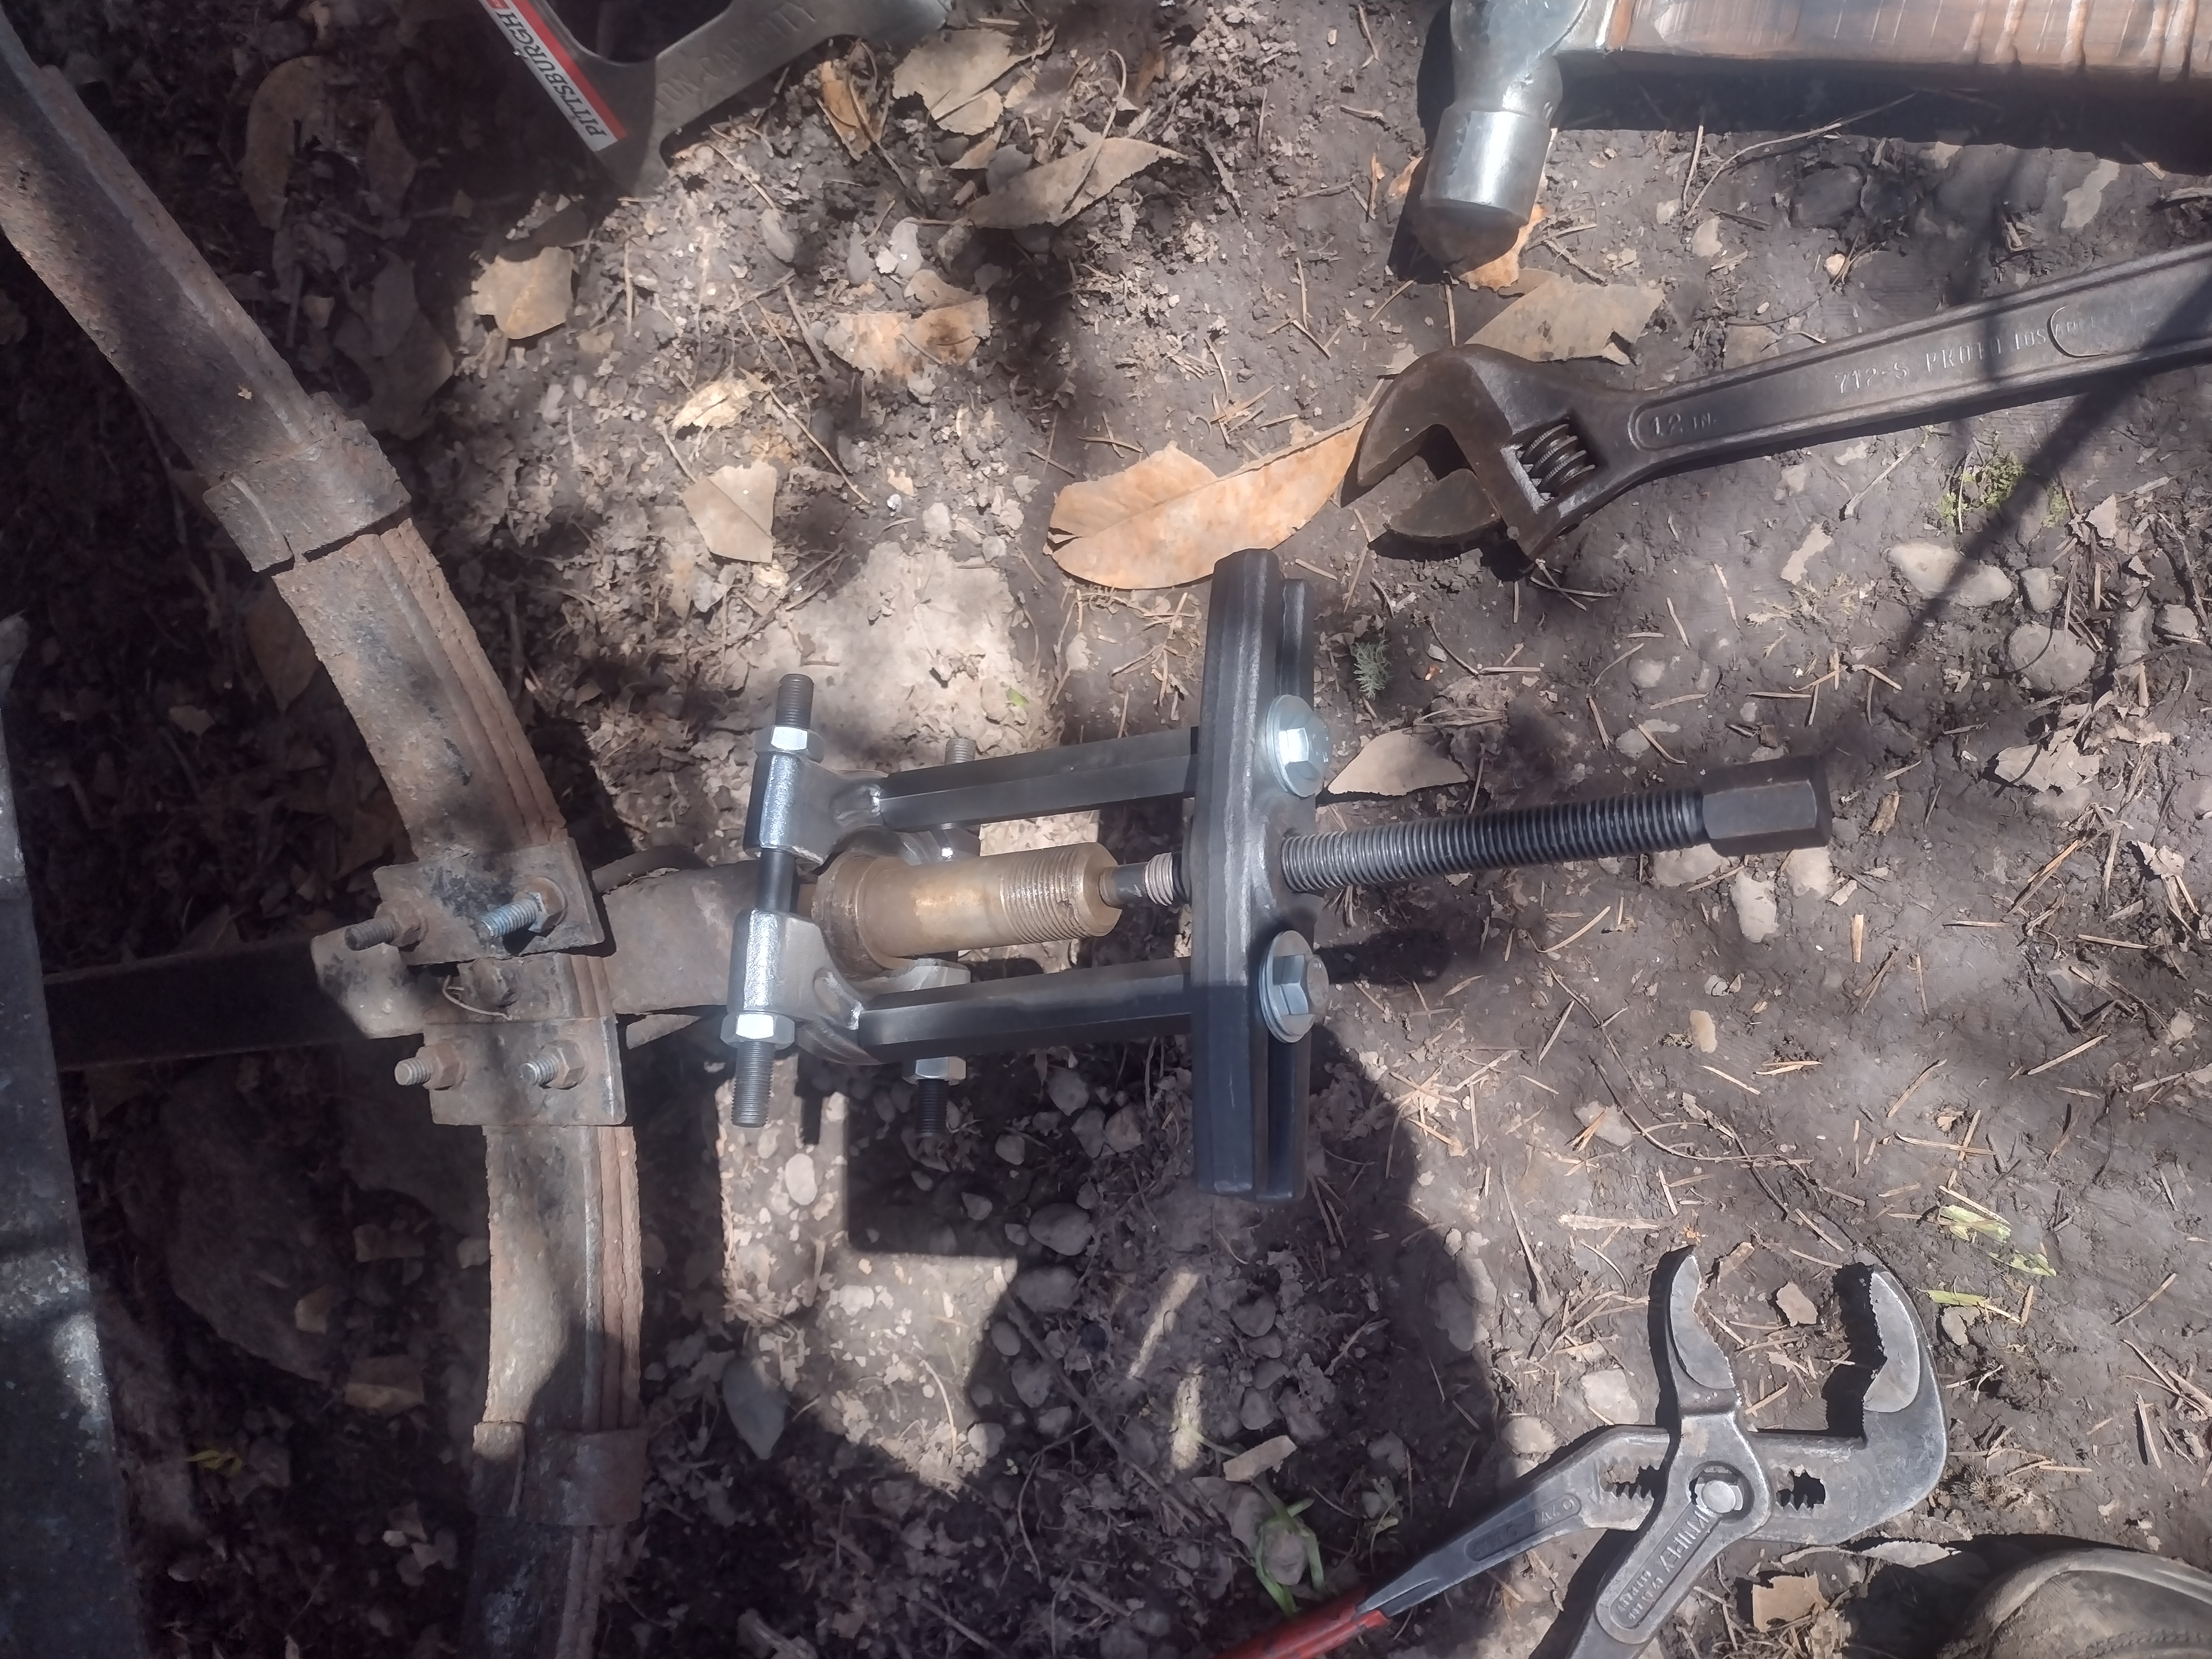
The very first thing I see is more Shit That Bubba Did, right out of the gate.
The picture is blurry but if you look closely, you will notice that some COMPLETE FUCKING MORON PUT THE LUG NUTS ON BACKWARDS.
The cones are sticking out, instead of in like they should be.
Ye Olde Snap On 1/2 inch drive air powered bolt snapper made short work of that shit and off the wheel came.
I redid the other side first with the new hub but because I just did it last weekend, I didn’t have any problems with that.
This side however, was pretty much exactly like that one was the first time.
Completely FUBAR.
To wit,
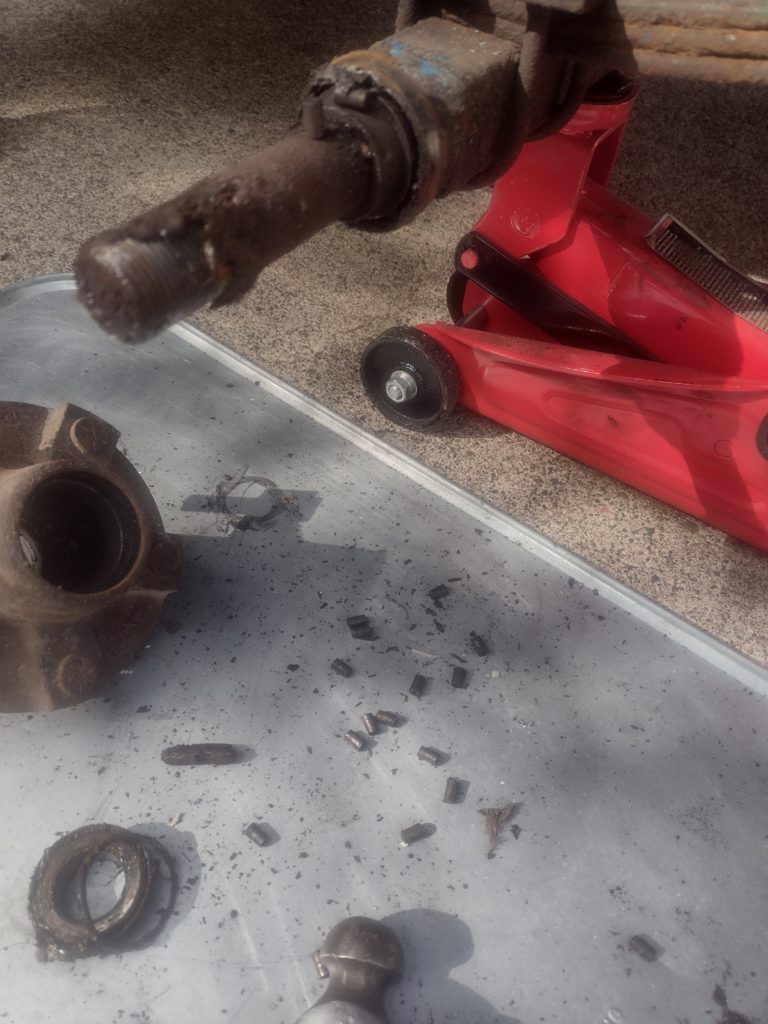
After I finally got the wheel and hub off, I was greeted with this shit.
The inner bearing on this side was fucking GONE also.
Sigh.
Go back in the garage and dig the bearing puller kit back out, rinse and repeat.
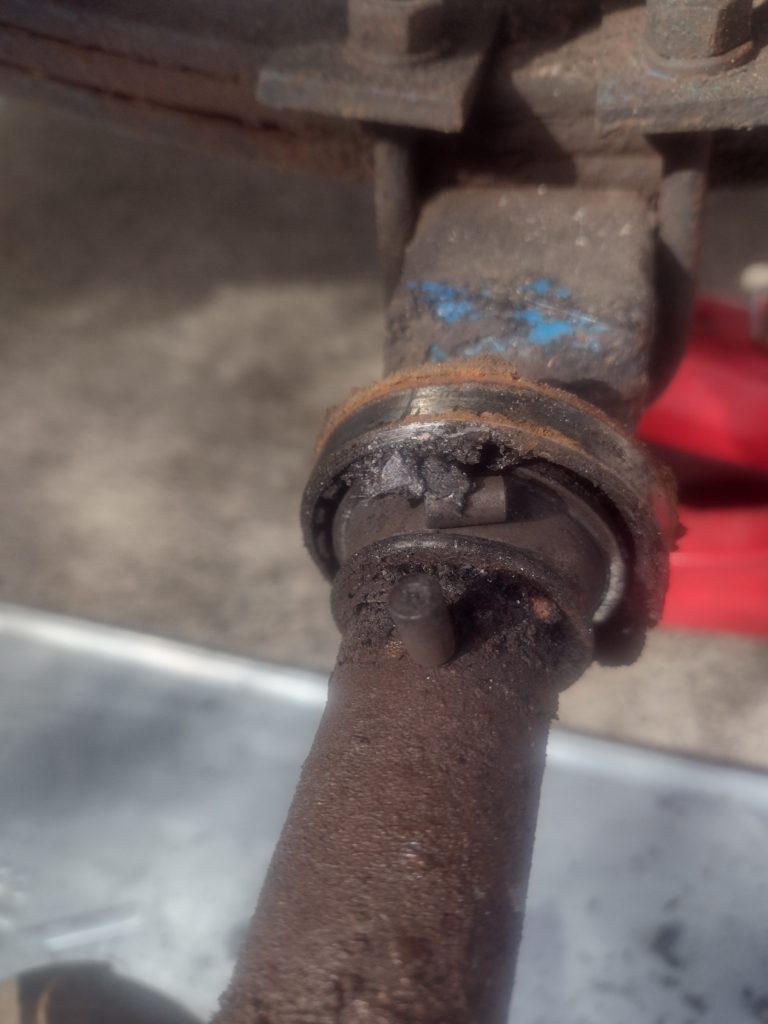
This one came off HARD.
After I got it off finally and got the spindle cleaned off I saw why.
Big grooves gouged in the spindle.
It took a long time and a bunch of emory cloth to get that shit smoothed back out.
I messed with this little project for a good two hours easily.
The whole time it is overcast, cold, windy and off and on raining with some hail thrown in just for fun.
It would start in and I would have to beat a hasty retreat back into the garage and wait until it blew over before I could go at it again.
Eventually I got the little sonofabitch put back together though.
And wouldn’t you know it, because that’s the way it works for me, LITERALLY five seconds after I got the last lug nut tightened up, started to snag the socket off the air gun so I could start putting stuff away, the clouds parted and the Sun came out.
If you look in the background you can see the Sun shining off the brand new crop of bright yellow Dandelions that I get to attack soon.
But that part is done.
I win again.
Naturally, right after I got done cleaning everything up and was putting the last tool away, the Fed Ex guy shows up with the little plastic fenders I was waiting on.
Someone up there has a wicked sense of humor.
Fuck that, they can wait.
I’m not sure I have the flat bar I need to make the brackets out of anyway.
It actually was a good thing I decided to wait.
Twenty minutes later the clouds came back, the sky opened up and it just hailed like a motherfucker for a good ten minutes straight.
That tapered off and turned to rain and that went on for another twenty minutes.
It ain’t no joke when they say that if you don’t like the weather around here just wait ten minutes, especially this time of year.
So I did manage to get something done before the deluge.
I still have a shit ton of things I need to get done.
I just got back from the parts house because I ran out of shop rags and I needed a real short 10 mm bolt to put a cart back together with that been sitting in the bed of my truck for two weeks.
Then the mowers, then…
Yard Work.
Oh My God the yardwork that needs doing around here.
Then there is also this motor and VFD that keeps calling my name.
I swear that I am going to wind up working on that after ten at night if I ever want to get that done.
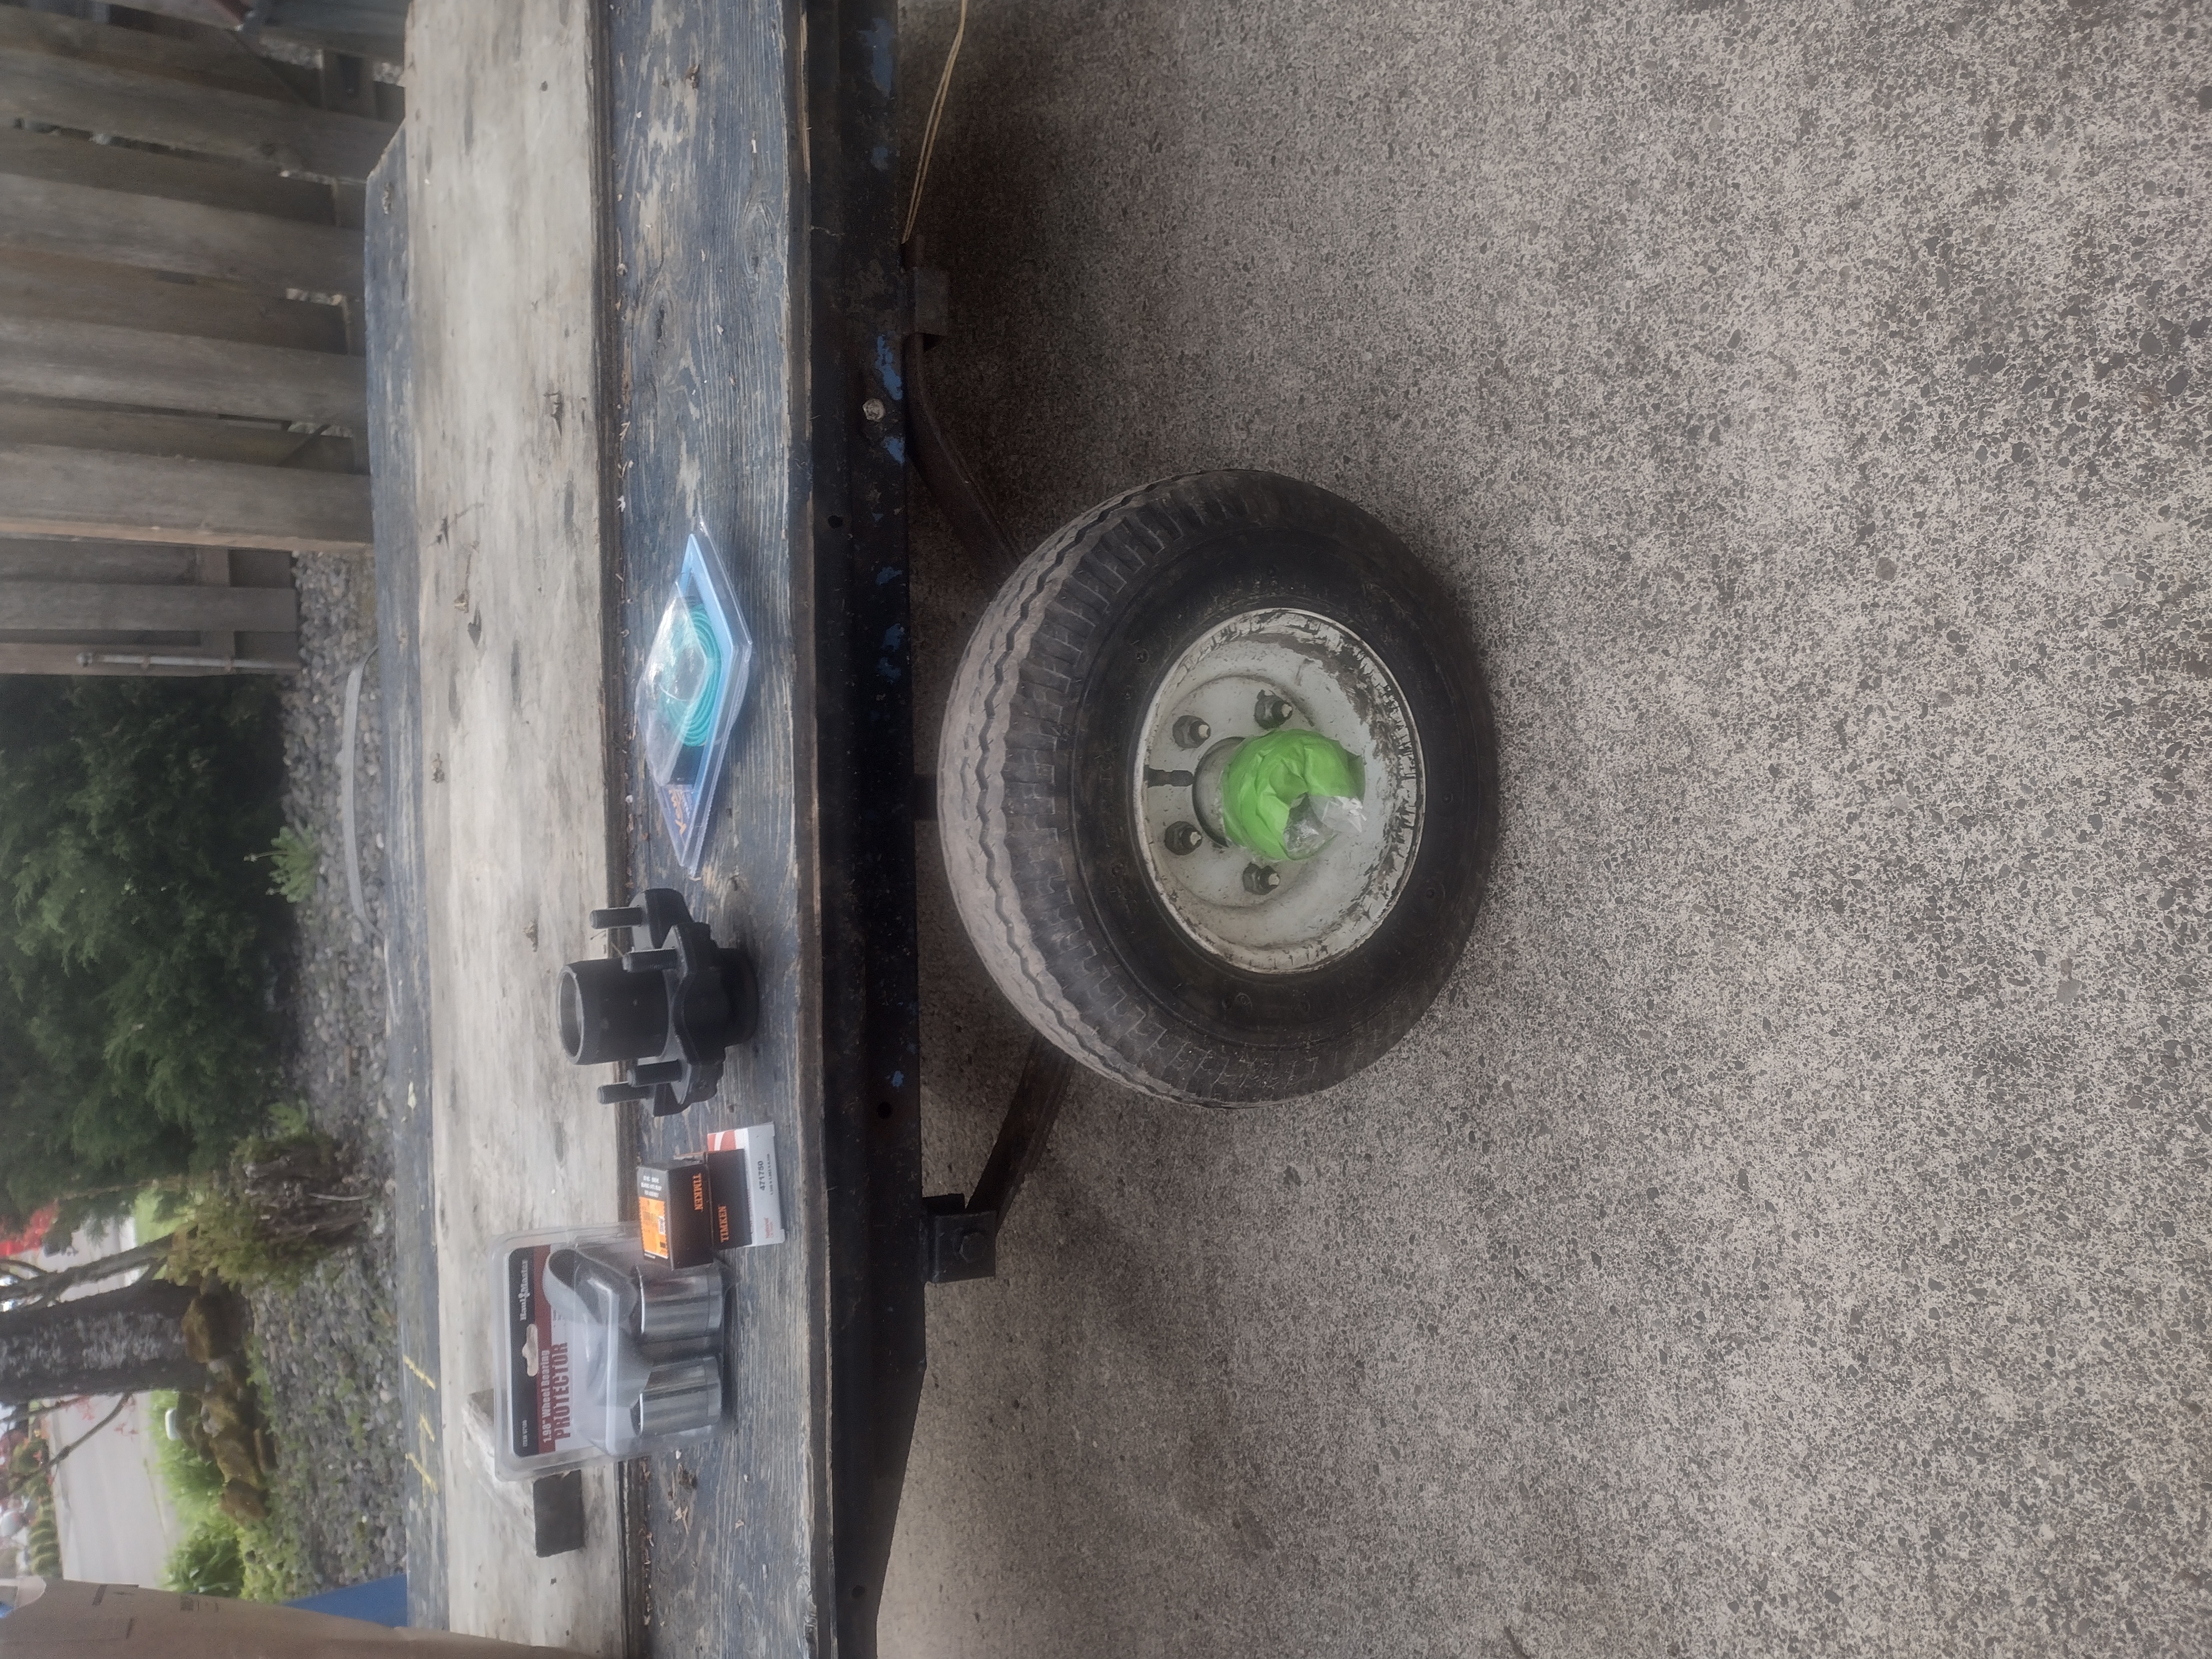
I went to put new bearings in the hub that were shot last weekend, got almost all done and discovered that the hub had been machined out where the grease cap goes in because the inner bearing had disintegrated and that caused the wheel to kick over and the hub to rub against the spindle nut.
The cap no fit no mo’.
So after work yesterday I hauled ass across the bridge to an outfit that I used to do business with and snagged some parts.
First thing I snagged was a new hub, bearings, seal, two new spindle nuts and a grease cap.
I already have the greasable bearing caps and might throw those on today instead.
.
A plastic baggie and some tape to keep the rain out temporarily.
While I was there, I also picked up a swiveling tongue jack with a wheel on it so I don’t have to throw my back out every time I need to move the damn trailer.
I got that on last night, in the rain of course.
While I was there I got a price on a set of 12 inch wheels and tires. I was going to pick up a couple at Horror Freight last week but I wasn’t sure of the bolt pattern. Shoulda Coulda Woulda, the tires are shot on this thing.
Yeah Shoulda, this outfit wanted $80 apiece for them and they were two for that price at the Chinesium Emporium.
I went over there this morning to grab them but sure as shit, someone snagged them while I Dilly Dallied.
Crap.
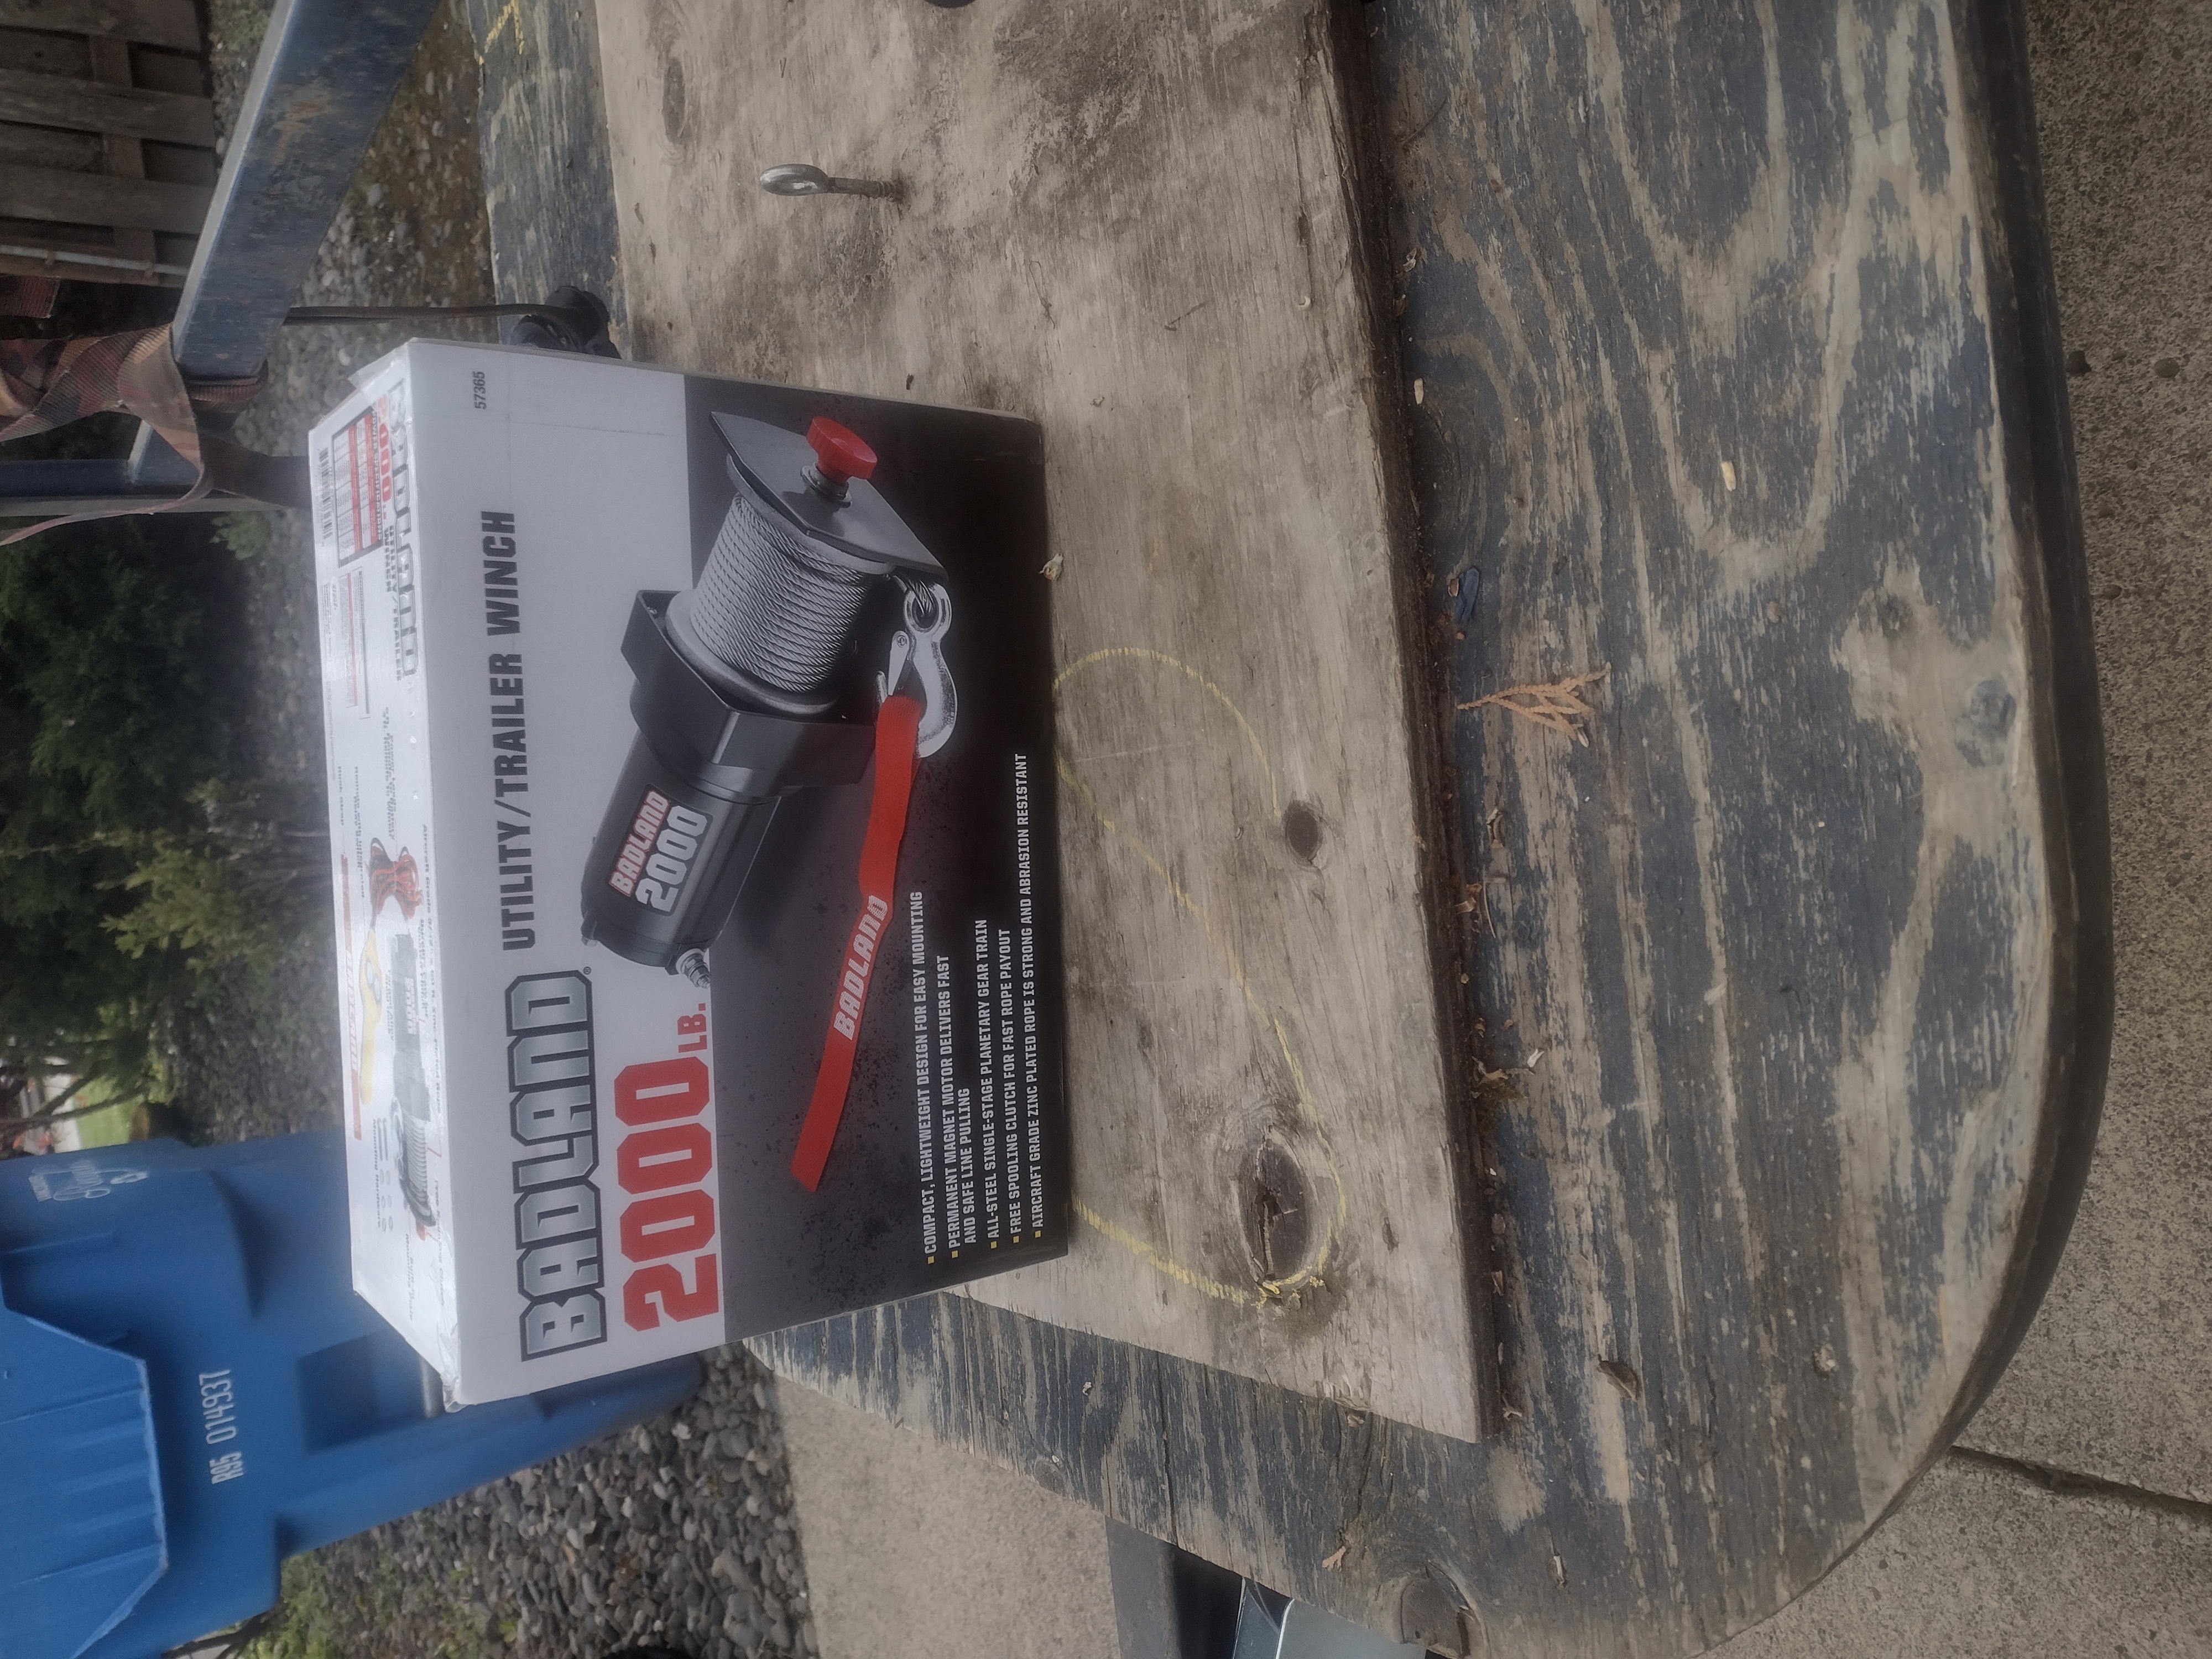
However, thanks to some EXTREMELY GENEROUS readers, you know who you are, I was able to dip into Phil’s Temple of Tools Emergency Fund and get something else that I was wanting for this little unit.
Thank You, Thank You, THANK YOU!
Yes siree, I want to mount that little Bad Boy and a small battery on the front of this little bugger so I can DRAG shit on instead of trying to PUSH shit on.
Sweet!
So I am now getting ready to go back out there while it isn’t pouring rain and swap out the bad hub, redo the other one that the bearings are also shot in and start looking at what it’s going to take to mount that little winch on the thing.
I am also waiting on some plastic fenders I ordered last week that are supposed to show up today.
I will have to make brackets for them but that will be pretty easy with some 3/16’s X1 flat bar, a couple of bends and drilling a few holes.
So as usual, I am busier than a cat trying to bury shit on a hot tin roof.
I still have the engine swap to do on the mowers and I still have that 220 volt motor/ VFD to install on my Smithy 3 in 1 machine. That thing whispers my name every time I slip by it sideways and it’s driving me nuts but first things first. My Father In Laws lawn is going to be knee high by the time I get this trailer done and that mower going.
So off I go.
My sincere thanks again to you for stopping by here and my very sincere thanks to those who have chipped in to the Tool Fund.
The New World Order assholes are going to learn this the hard way just like the Nazis and the Japanese did.
BFYTW.
Americans are some of the most honest, hard working, innovative and compassionate people on this planet.
History has proven this time and time again.
We are also the most vicious sonsabitches this Earth has ever seen when pissed off collectively.
Also proven time and time again.
These rat clever bastards who have been yanking our chains for the last few years are just that, rat clever.
They aren’t actually all that smart.
If they were, they would have thought twice about enraging a hundred million heavily armed people who have no problems burning entire countries to the fucking ground.
They think they have this all figured out.
They haven’t bothered to take note that we literally haven’t even BEGUN to fight back.
When that switch gets flipped there will be no place on or under this Earth that they will be safe.
It will be Seek And Destroy, Terminate With Extreme Prejudice, until there aren’t enough of them left to try this shit again for a thousand years.
They have been begging for it and By God’s Grace, they are going to get it.
Remember what it is to be an American and pass that down.
The Media has already jumped the shark, they are going to be very high on the list of those who must pay for their transgressions.
The Medical system is also full of those who must pay.
The crooked politicians however are going to be Enemy Number One.
It is coming. As sure as the Sun rises in the East, the pendulum is going to swing back.
It has already swung as Far Left as it is going to and has started it’s return trip.
The signs are everywhere.
Keep you head held high and keep your damn wits about you.
They have been goading us because they think they have some clever plan to neutralize us.
I am here to tell you that unless they plan to kill us En Mass that they have very seriously underestimated just who they are fucking with.
It isn’t any coincidence that they have been testing their tyrannical ways on other countries to see what they can get away with.
The Canadians surprised everyone when they stood up and said ENOUGH EH?
These cretins behind this are acutely aware of the fact that we have enough firepower to take on Russia, without the military stepping off a base, by ourselves.
They have been walking a tightrope because of that fact and that is why they are so desperately trying to infringe on our Second Amendment at every opportunity.
Passing stupid laws that make criminals out of law abiding citizens and turning their heads when their favored Thugs mow innocent people down.
I have some news for these idiots.
Pass all the laws you want. Outlaw guns completely. Put it all on paper and send your goons to come get them.
I double dog dare you.
They might even get a few.
However, the minute that news of these raids gets out, your days are numbered from then on.
We aren’t going to take that shit for one fucking second and you damn well know that clear to the bottom of your rubbery spine.
It’s not like I won’t be busy as hell all weekend just like the 9 hour days I put in last weekend but at least I don’t have to start them at five O:clock in the fucking morning.
It’s been a long week and it’s going to be a long day.
I can feel it in my sore assed feet already.
But hey, I have a job and a guy has to do what a guy has to do.
I get that.
The list is long though and not only is it supposed to rain all weekend, they are talking snow over 1,000 feet next week.
Wednesday morning it was 29 degrees here. Thursday afternoon it was 77 degrees. Today is going to be crappy and then cold and rain.